When users try to restart their computer after installing the latest Windows system, the error message “A driver cannot load on this device” pops up. Such driver issues can affect the overall functionality of the device. Therefore, you should never ignore them.
Thankfully, in this post, we analyze what might be causing this error in your case and share 6 ways to fix the “A driver cannot load on this device” error on your Windows PC.
Why does the “A driver cannot load on this device” error occur?
The “A driver cannot load on this device” error is a problem related to Windows 11/10, mainly with the recent release of new operating systems and constant upgrades. You may see the error when the operating system starts up, or it may occur when the affected driver is required to run. The main causes of the error are as follows:
1. Memory integrity settings in Windows Security are preventing drivers from loading on your device. Windows prevents unauthenticated drivers from being loaded into memory to protect the system from hacking and cracking attempts.
2. There is a problem with the driver. This error can also occur due to corrupted or outdated device drivers.
3. This type of error usually occurs when Windows cannot load a particular driver due to compatibility issues.
# Solution 1: Turn off the Memory Integrity Setting
Memory Integrity is a Windows security feature that makes it harder for malware to take control of your computer through low-level drivers. It is also known as Hypervisor Protected Code Integrity (HVCI). You are receiving this “A driver cannot load on this device” error message because memory integrity settings in Windows Security are preventing drivers from loading on your device.
If you want to be able to use this driver, you can try to turn off the memory integrity setting by following the steps below.
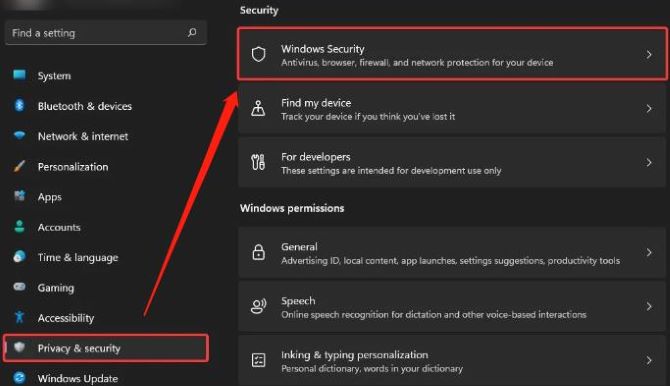
Step 1: Press the Windows key + I to open Settings.
Step 2: Go to the Privacy & Security tab and click on Windows Security.
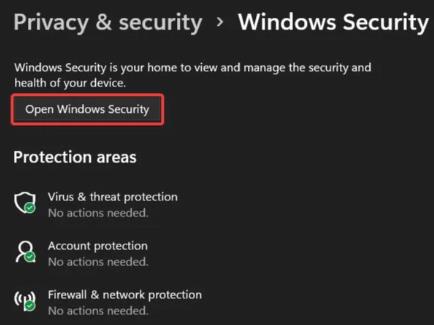
Step 3: Click on the Open Windows Security button to open Windows Security.
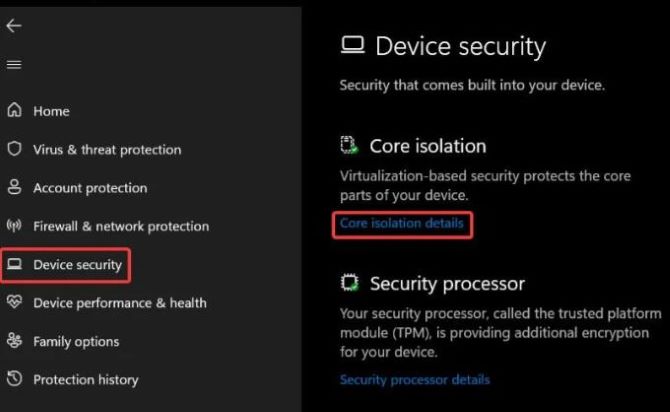
Step 4: Now, click on the Device Security tab on the left.
Step 5: Click on Core isolation details from Core isolation section on the right.

Step 6: Turn off the toggle for Memory integrity.
Step 7: Finally, restart the computer for the changes to fully come into effect.
# Solution 2: Delete UpperFilters and LowerFilters Registry Keys for the Device
Such errors can also appear when some registry entries associated with the device are corrupted. Specifically, to resolve this issue, you need to delete the UpperFilters and LowerFilters registry entries for the device that triggered the error.
Step 1: Press the Windows key + R to open Run box.
Step 2: In the Run dialog box, type devmgmt.msc and hit Enter to open the Device Manager.
Step 3: Right-click on the affected driver and click on Properties.
Step 4: Open the Details tab.
Step 5: In Property, click the drop-down menu and select Class Guid.
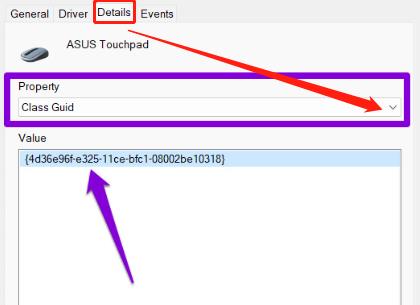
Step 6: Right-click to Copy the Class Guid value.
Step 7: Press the Windows key + R to invoke the Run dialog.
Step 8: In the Run dialog box, type regedit and hit Enter to open Registry Editor.
Step 9: Copy and paste the following into the address bar of the registry editor:
Computer\HKEY_LOCAL_MACHINE\SYSTEM\CurrentControlSet\Control\Class\DeviceDriverGUID
Step 10: Now, delete the Lowerfilters and Upperfilters values.
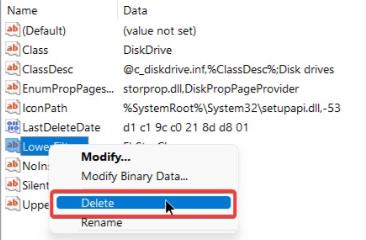
Step 11: Select Yes when prompted for confirmation.
Step 12: Restart your device after deleting the values.
# Solution 3: Run Program Compatibility Troubleshooter
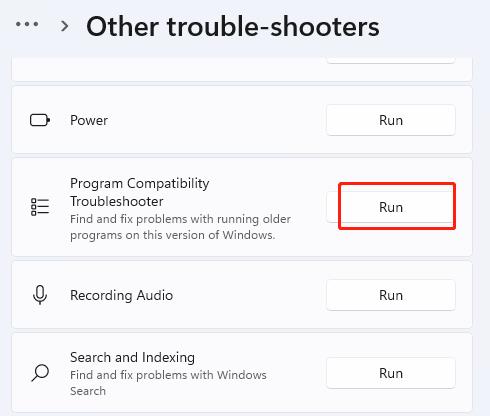
To prevent systems from failing to boot properly, boot drivers will not be blocked, but they will be removed by the Program Compatibility Assistant. So, you can run the Program Compatibility Troubleshooter to resolve any driver compatibility issue.
Step 1: Press the Windows key + I to open the Settings app.
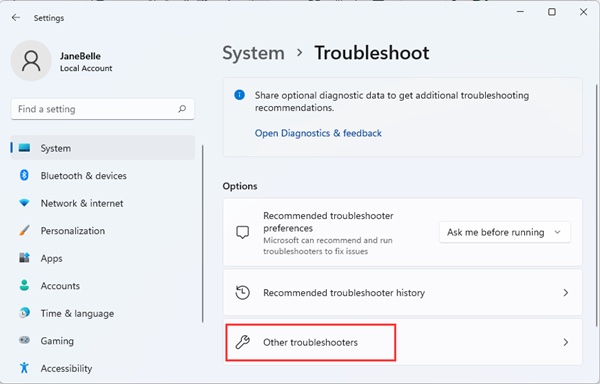
Step 2: Navigate to System > Troubleshoot > Other trouble-shooters.
Step 3: Under the Other section, find Program Compatibility Troubleshooter.
Step 4: Click the Run button.
Step 5: Follow on-screen instructions and apply any recommended fixes.
# Solution 4: Update Driver to fix a driver cannot load on this device error
Since the problem can also be caused by an incompatible driver, another fix you can try is to update the driver to the latest version. In most cases, updating the drivers is very effective in resolving such issues. Here, you can update outdated drivers by using a reliable third-party application. We recommend using Driver Booster, a driver-specific tool that automatically installs the latest versions (if available) for all drivers and keeps them up to date.
Driver Booster is specially developed to keep your drivers up-to-date, and it has greatly caught the attention of many users. Driver Booster provides an easy and convenient way to check your entire PC, download and install device drivers from official hardware manufacturers and signed by WHQL. Not only that, its scan and update engines have also been optimized, promising 20 percent faster scans and 10 percent faster updates.
It keeps drivers updated, especially when you face driver-related issues. Driver Booster comes with a Tools tab that quickly and easily scans and fixes a range of issues, including no sound, poor display resolution, and network issues.
Step 1: Download, install and run Driver Booster on your Windows PC.
Step 2: Click Scan.

The detecting time lasts about one minute and after detecting, you can get a list of outdated, missing, and faulty drivers on your PC.
Step 3:Check the outdated device drivers and click the Update icon next to the device.
Tips:
If you have so many outdated device drivers to be updated, you can also one-click the Update Now icon on the top right, which will save you a lot of time.
# Solution 5: Temporarily Disabling Driver Signature Enforcement
If you have enabled the Driver Signature Enforcement feature, it may also explain this “a driver cannot load on this device” error message. Driver Signature Enforcement ensures that only drivers that have been sent to Microsoft for signing are loaded into the Windows, preventing viruses from infecting the Windows kernel. You can try disabling driver signature enforcement temporarily and see if the driver loads normally or manually install it on your computer.
# Solution 6: Perform a System Restore
If the error is still there, you can perform a system restore. Recent changes to system settings or newly installed programs may be interfering with the driver and preventing it from loading. Performing a system restore will allow you to undo these changes by reverting to a point before the error first occurred.
To perform a system restore on Windows, follow the steps below.
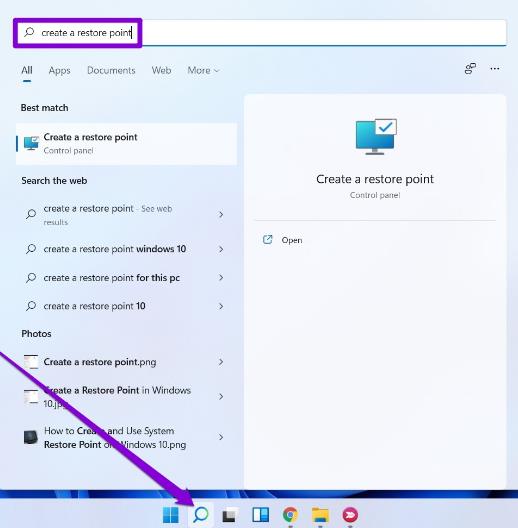
Step 1: Open the Start Menu, type in create a restore point, and press Enter.
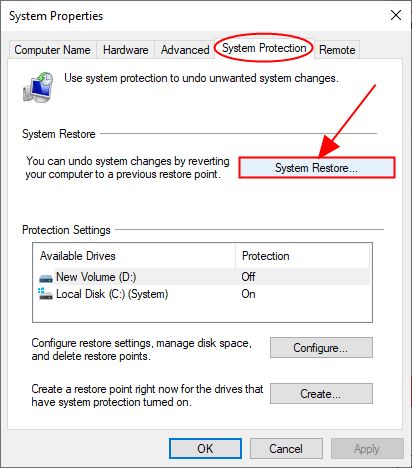
Step 2: Under the System Protection tab, click on the System Restore button.
Step 3: Click on Next.
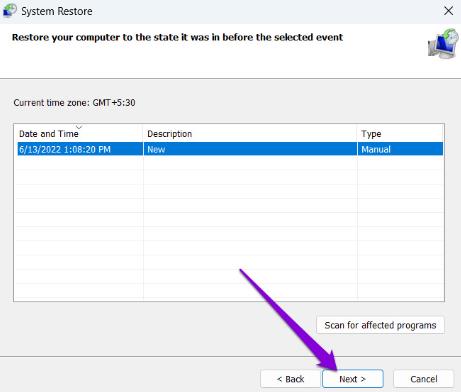
Step 4: Select the restore point before the error first occurred. Then, hit Next.
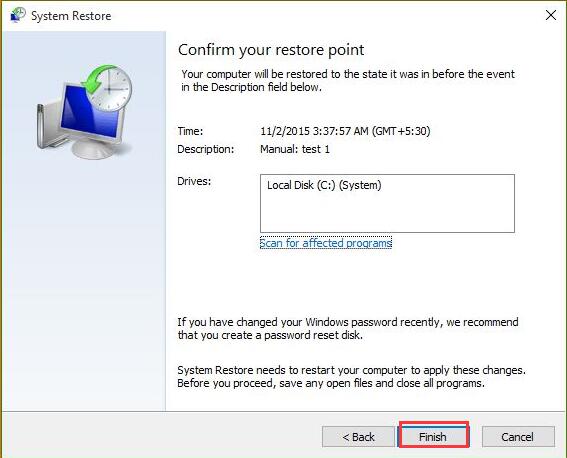
Step 5: Review all the details and hit Finish.
Step 6: Restart your PC and check whether the error disappears.
Conclusion:
The 6 methods here have fixed the “The driver cannot load on this device” error for most users, and then everything is back to normal. Hope this article can help you in the same way.