Formerly known as Microsoft Lync Server, Skype for Business is preferred by users who would like to realize communication in both daily life and work using a single platform.
However, some people wish to delete Skype Business from Windows 10 when they find this communication tool useless for them or running into problems.
Although Skype for Business cannot only allow users to keep in touch with friends z and families but also accomplish tasks in work like video conferencing and immediate business communication, it may cause problems like full disk usage or program conflicts.
Unable to get rid of Skype for Business? This post will introduce to you some powerful ways to get rid of Business Skype from Windows 10, 8, 7, and Mac.
Overview:
- How to Uninstall Skype for Business Completely for Windows?
- How to Disable Skype for Business on Mac?
How to Uninstall Skype for Business Completely for Windows?
Since some users complained that Skype for Business uninstall failed, and they just can’t uninstall the Skype app from Windows systems, more than one method will be offered to you.
You need to bear in mind that so long as your Skype Business version belongs to Microsoft Office 365, it is impossible to completely delete it from Windows 10 unless you are determined to uninstall the whole Office package.
While if you noticed that Skype for Business is still working on the Windows system even after you tried one of the ways below, you can try another one until disabling or removing the package of Skype for Business permanently.
Methods:
- 1: Uninstall Skype for Business via Control Panel
- 2: Remove Skype for Business in Skype Settings
- 3: Get rid of Skype for Business in Registry Editor
- 4: Uninstall Skype for Business Automatically
Method: 1: Uninstall Skype for Business via Control Panel
It is viable to manage programs on Windows systems in Control Panel. In this case, if you feel like to stop the Skype Business version from running on Windows 10, it is worth a shot to go to Control Panel. Before you start to uninstall this Microsoft Office program, you may as well log out of your account and delete the account information.
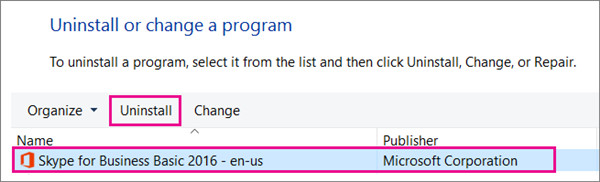
1. Open Control Panel.
2. Find out Programs > Uninstall a program. Here, you can View by Category to locate the items more quickly.
3. In Programs and Features, pinpoint the Skype for Business program and then right click it to Uninstall it.
You can then check whether the Skype remains on your device. However, as discussed, Skype for Business won’t install completely unless you remove the whole Microsoft Office package. This method is to stop the Skype Business from causing conflicts to your system by starting at startup.
Method 2: Remove Skype for Business in Skype Settings
Now that you are unable to uninstall the Skype app, you might as well follow up to disable the Skype for Business from running at startup within the Skype settings. In so doing, this app will not work unless you need it.
1. Open Skype for Business and then find out Settings > Tools > Options.
2. On the left panel, choose Personal and then uncheck the option – Automatically start the app when I log on to Windows 10 and Start the app in the foreground.
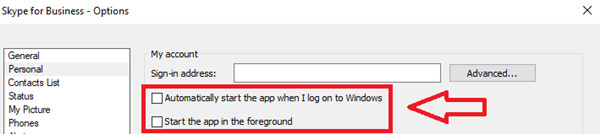
3. Click OK to save changes.
4. Hit Settings and then select File > Exit.
Skype for Business will be disabled from running before you re-change its settings. If you need it, you can just enable it to start in the foreground.
Method 3: Get rid of Skype for Business in Registry Editor
You can also uninstall Skype for Business features for Windows in Registry Editor. Before you move on, you would better back up the registries.
1. Press Windows + R to elevate the Run box and enter regedit in the box.
2. Click Edit > Find.
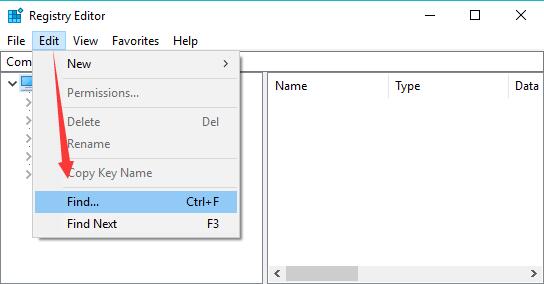
3. Type in Skype for Business and then hit Find Next. You can then see that the Registry Editor is searching for registry.
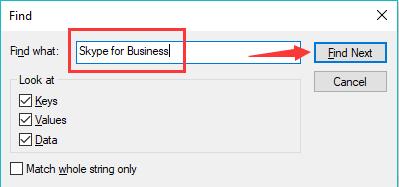
4. Right-click the registries under Skype for Business to Delete them.
These are the methods available for you to uninstall Skype for Business for Windows. Here you need to know that users can’t remove Business Skype completely unless the Microsoft Office Suite is uninstalled. You can disable this program from startup or running in the foreground if needed.
Solution 4: Uninstall Skype for Business Automatically
If you noticed that Skype for Business can’t be uninstalled with methods above, you might as well try to use a third-party uninstaller.
Here IObit Uninstaller can be an effective tool for you to get rid of any unwanted software and even bundled software with only one click.
More importantly, it is capable of remove stubborn software and residuals of the unwanted programs in short time based on its large database than its competitors.
Many users reported that this uninstaller helped them eliminate many programs that failed to be removed from control panel or other system settings. Therefore, you can use this tool to remove Skype for Business quickly.
1. Download, install and run IObit Uninstaller.
2. On the left pane, hit All programs, and then find out Skype for Business.
3. Tick the box of Skype for Business and then hit Uninstall on the top right corner to remove it.

4. Check the box of Create a restore point before uninstall and Automatically remove residual files and click Uninstall.

Wait until this uninstaller uninstall the Skype for Business from Windows 10, 8, 7. Besides, if needed, users can also use this uninstaller to get rid of malicious browser plug-ins or toolbars to protect the safety of your Google Chrome, Firefox, or any other browsers.
How to Disable Skype for Business on Mac?
It is known that users can download Skype onto a Mac computer quickly from Skype’s website with a few clicks. When you tried to remove Skype from macOS, you can choose either a manual or automatic way.
Methods:
Method 1: Disable Skype for Business on Mac Manually
If you feel like uninstalling Skype for Business from Mac manually, you can follow the steps below. You first need to throw this app into the computer trash and then you should delete its files.
1. On Mac Desktop, drag the Skype for Business to Trash.
2. In Finder menu, go to:
files:/Users/<User>/Library/Containers/com.microsoft.SkypeForBusiness/Users/<User>/Library/Logs/LwaTracing/Users/<User>/Saved Application State/com.microsoft.SkypeForBusiness.savedState/Users/<User>/Preferences/com.microsoft.SkypeForBusiness.plistErase the following file:/Library/Internet Plug-Ins/MeetingJoinPlugin.plugin.
3. Delete the MeetingJoinPlugin,plugin.
4. In the Applications/Utilities folder, locate KeychainAccess and then delete Skype for Business.
Method 2: Uninstall Mac Skype for Business Automatically
While if you noticed that Mac Skype for Business can’t be uninstalled by yourself, you can also rely on a professional tool, which is IObit MacBooster.
This uninstaller is designed for Mac computers and provide fast scanning and cleaning of programs and files. In a few clicks, you will see that your Skype for Business disappeared from macOS with the Mac app uninstaller.
1. Download, install and run IOBit MacBooster.
2. On the left pane, locate Uninstaller, and then on the right side, check the box of Skype.
3. Click Uninstall to get rid of Mac Skype.

As you can see, this Mac app uninstaller can also clean system junks and scan virus and malware for your MacBook. If needed, you can just keep it to clean your Mac regularly.
In so doing, both the Skype for Business settings and the app will be uninstalled completely from Mac. This Microsoft app will not cause problems to your system.
In a word, users can find different options to get rid of Skype for Business for both Windows and Mac systems in this post. If you prefer this program not to run on your computer, or it just causes problems, you can remove Skype Business completely.


