If you are a hardcore gamer, then you must know the importance of headphones in gaming. However, some users have reported that their HyperX Cloud Stinger microphones are not working properly and cannot communicate with other people.
Using one of the solutions we’ve listed below, you should be able to fix your HyperX Cloud Stinger microphone issue fairly easily.
Solution 1: Unplug and Re-plug HyperX Cloud Stinger Mic
The first thing you should do is unplug and re-plug HyperX Cloud Stinger Mic, including extension cable connections.
For the microphone, make sure it’s fully inserted and not loose. Sometimes in the heat of a game, you can jerk to the side or move too quickly and your wires start to pop out.
Check and tighten any flexible or dangling microphones that may be attached to your device and then check to see if your microphone is working again.
If the problem persists, try connecting this device to another port on your computer first. This will resolve any issues you may have with the ports you are using. If changing ports doesn’t work for you, then connect HyperX Cloud Stinger Mic to another computer.
Solution 2: Check the physical connections to avoid HyperX Cloud Stinger Mic Not Working
The next thing worth checking is the mute settings of this device to make sure they are properly seated. If your HyperX Cloud Stinger is not working, it may be accidentally muted.
Check the volume knob on the right ear to make sure the microphone is not muted or the volume is not too low.
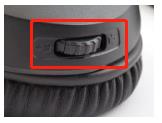
If you’re using the headset’s control box, make sure the mute switch is not activated.
Solution 3: Allow Access to your Headset Mic
When your computer can’t access the microphone you’re using, that can explain why HyperX Cloud Stinger Mic is not working on your PC. Provide proper permissions to avoid this issue.
Here use Windows 11 as the example:
Step 1: Go to Windows > Settings.
Step 2: Click on Privacy & Security.
Step 3: On the right panel, scroll down and in the App Permission, look for the Microphone.
Step 4: Turn on Microphone access.
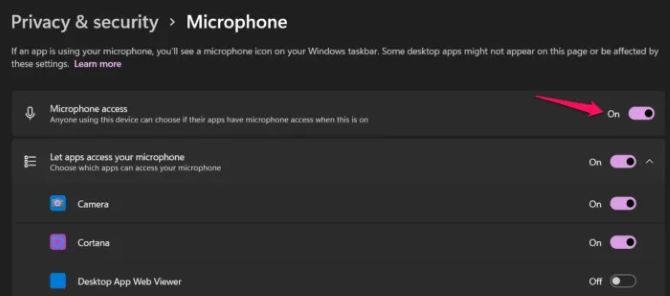
You should also scroll down in the list of installed apps on your computer and check if there is a particular app for which the Microphone is disabled. If there is, switch the slider next to the apps you wish to provide access to turn it on.
Step 5: Restart your computer.
Check whether the issue resists or not. Try out the following solution if you still can’t use the microphone.
Solution 4: Change Microphone Settings
If you have HyperX Cloud Stinger Mic enabled on your computer, the next thing you need to see is if it’s the default microphone. If you’re moving back and forth between different headsets, another may be active.
To set the HyperX Cloud Stinger as the default microphone on your PC, follow these steps:
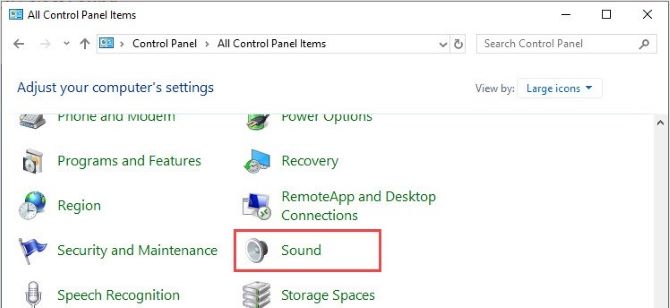
Step 1: Press Windows + R key to open Run dialogue, and then type Control Panel in the search box and press Enter.
Step 2: In the control panel page, choose Sound.
Step 3: Go to the Recording Tab.
Step 4: Right-click on the empty area and tick Show Disabled Devices.
Step 5: Right-click the HyperX Cloud Stinger Microphone and click Enable.
Step 6: Again, right-click on the headset one more time and select Set as Default Device.
Step 7: Right-click the HyperX Cloud Stinger Microphone and click Properties.
Step 8: Open the Levels tab, and make sure to increase the volume to 100%.

Step 9: Click on the OK button, and again check whether the mic is working or not.
Solution 5: Run Recording Audio Troubleshooter
Recording Audio Troubleshooting is the most basic way to detect and resolve HyperX Cloud Stinger Mic Not Working issues. Here are the steps to follow when troubleshooting your headset.
Step 1: Open Settings.
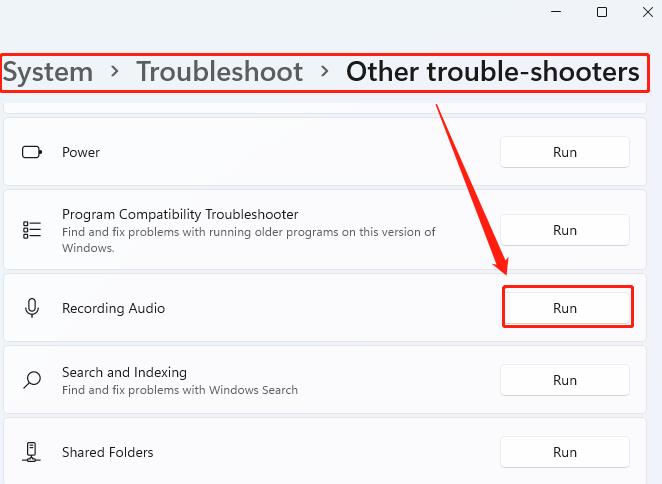
Step 2: Click System > Troubleshoot > Other trouble-shooters.
Step 3: Look for the Recording Audio troubleshooter, and click on the Run button.
Solution 6: Update your Audio Drivers to solve HyperX Cloud Stinger Mic Not Working
Another common reason for a HyperX Cloud Stinger microphone or HyperX Cloud 2 not working properly is outdated or damaged audio drivers. To fix microphone not working on your PC, you should update your drivers and see if it helps with the issue at hand. You can choose to upgrade the driver manually or automatically.
Due to the time-consuming nature of the procedure, the technical complexity, we do not recommend the manual update method.
The process of automatically updating drivers is very simple. Just install and run Driver Booster and it will automatically find all the outdated, missing, and faulty drivers on your PC and install them for you.
Here’s how to use it.
Step 1: Download, install and run Driver Booster on Windows 11 or Windows 10.
Step 2: Click the icon Scan. Driver Booster will start scanning all the drivers on your PC and give an outdated driver list to you.

Step 3: Click the Update button next to your sound device or your headset to download the latest and correct driver for it.
Tips: Click Update Now at the top right to download and install the latest version for all outdated drivers automatically with one click.
Solution 7: Uninstall and Reinstall Audio Drivers
If the audio drivers you are currently using are outdated or damaged for any reason, your PC will not be able to detect the HyperX Cloud Stinger microphone. Uninstall the audio driver and reinstall it to avoid this.
Step 1: Open Device Manager by right-clicking the Start icon.
Step 2: Expand Sound, video and game controllers.
Step 3: Right-click on the HyperX Cloud Stinger and select Uninstall device.
Step 4: A pop-up appears on your screen, so click Yes to confirm the uninstallation process.
Step 5: Go to the official site to download the latest driver for your microphone device.
Solution 8: Contact HyperX Support
Contacting the official HyperX support team is your last resort if the solutions above fail to get the microphone working again. Explain your problem to the official and they will provide appropriate support.
# FAQ about HyperX Cloud Stinger Mic Not Working
Your HyperX Cloud Stinger mic may not be working because your audio devices are disabled. You can enable them from audio settings on your device. Simply go to your audio settings and enable the mic and speakers from there.
Yes. the HyperX Cloud Stinger’s passive noise cancellation technology minimizes background noise, resulting in improved voice quality.
Yes. To make sure your headset works properly with your computer, a specific driver tailored for your HyperX headset is needed. However, the HyperX driver will be automatically installed when you plug your headset into your computer.
No. HyperX Cloud headsets including Stinger are not designed with microphone monitoring features.
Connect the headset to a USB port on the PC using a micro USB cable. Connect the USB wireless adapter to a USB port on the PC. Run the HyperX firmware updater. Click the Update button when the application is ready.
More Articles:
Download Beats Audio Driver for Windows 11, 10, 8 and 7
[Solved] Install Realtek HD Audio Driver Failure
3 Ways to Download Conexant HD Audio Drivers for Windows 10/11