Do you want to add or remove “USB selective suspend settings” in power options in Windows systems? Many users have heard the setting of USB selective suspend before, but you have no idea what exactly this USB feature works.

Or some people know what the USB selective suspend is, but you are unable to disable USB selective suspend from Windows 10. This post will introduce the function of this USB setting and what to do if you wish to use it.
Overview:
- What is USB Selective Suspend Feature?
- How to Enable or Disable USB Selective Suspend?
- How to Add or Remove “USB Selective Suspend” Setting on Windows Power Options?
What is USB Selective Suspend Feature?
The USB Selective Suspend feature is designed for Windows systems to save power by getting idle USB ports suspended. Even so, other USB devices will not be affected.
Therefore, this Selective Suspend feature is mostly applicable to laptops. As for how this feature works, in the suspended mode, data transfer through the USB port will be temporarily disabled from actively engaging in accessing the system memory and consuming power.
When being put into the suspended mode, the USB port will work as a laptop in the sleep mode requiring little power or any other resource. So long as all related components or settings run well, especially the USB driver, you can enable the Selective Suspend feature for a single USB port.
How to Enable or Disable USB Selective Suspend?
As for the question “when should I adjust USB selective suspend settings”, you need to turn on or off this USB setting from Power Options in Windows systems according to your needs. For instance, if you need to stop Windows from powering off your USB devices, there is much need for you to disable the USB Selective Suspend mode.
Or the Windows selective suspend mode causes USB hardware problems like USB mouse not working, you can try to disable this USB port power management option. However, when you feel like relying on the USB Selective Suspend setting to save power, you might as well enable it on Windows 10, 8, 7.
Enable or Disable USB Selective Suspend Setting:
Windows 10, 8, and 7 USB selective suspend mode is located in Power Options, so you need to access the power settings to activate or deactivate the USB port suspend option.
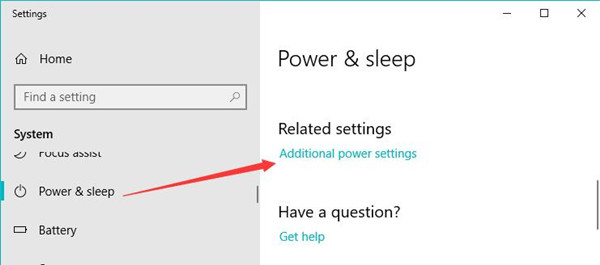
1. Search power options in the search box and then press the keyboard key Enter.
2. Under Power & Sleep, on the right side, hit Additional power settings.
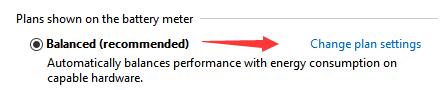
3. Change plan settings of your power plan like Balanced, High performance, or any custom plan.
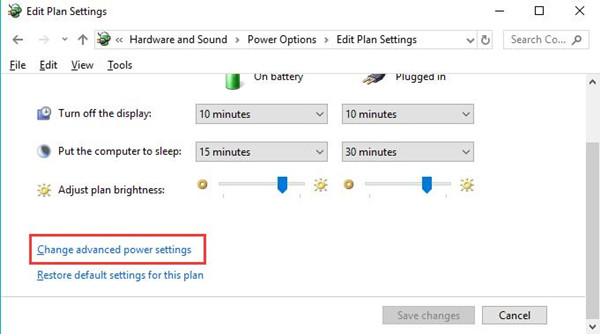
4. Hit Change advanced power settings.
5. Locate USB settings > USB selective suspend setting > Ob battery or Plugged in and then set it Enabled or Disabled.
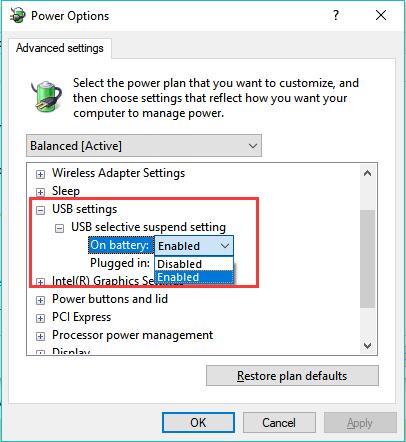
6. Click Apply and OK to save changes.
You will have added or removed the USB selective suspend setting to Windows power options.
Note: Are you wondering which option is to change, On battery or Plugged in?
Here you need to know that for Windows devices with plug-in power, saving power seems to be less necessary, so it is allowed that users choose to enable USB Selective Suspend when the computer is on battery, mostly, for laptops and choose to disable the Windows selective suspend mode when the device is plugged in, Desktop for instance.
How to Add or Remove “USB Selective Suspend” Setting on Windows Power Options?
Since some users reported that the selective suspend for USB devices can’t be found on the Windows system. Or you would like to delete this USB feature from the Power Options. You can refer to the following steps to add or remove the USB selective suspend mode from the system.
Add USB Selective Suspend to Power Options on Windows 7, 8, and 10:
- Input command prompt in the search box and then right click the best-matched result to Run as administrator.
- In Command Prompt, copy and paste the following command and then hit the Enter keyboard key to add this USB option.
powercfg-attributes2a737441-1930-4402-8d77-b2bebba308a348e6b7a6-50f5-4782-a5d4-53bb8f07e226 -ATTRIB_HIDE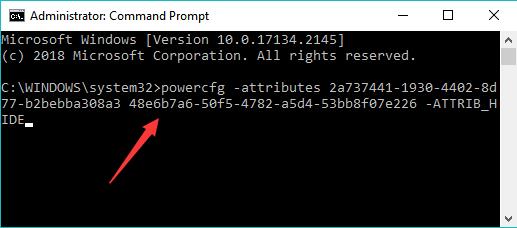
After that, you can go to the power options in Windows and enable or disable it on battery or plugged in.
Remove “USB Selective Suspend” from Power Options:
In Command Prompt, run the following command to simply get rid of this USB feature from Windows 10, 8, and 7.
powercfg-attributes2a737441-1930-4402-8d77-b2bebba308a348e6b7a6-50f5-4782-a5d4-53bb8f07e226 +ATTRIB_HIDEIn so doing, you can see that the USB selective suspend feature is nowhere to be seen in Windows power options, not to mention lead to USB device not working issues.
Summary:
In this post, you will learn about what the USB Selective Suspend mode is and how you can turn on or off this feature on Windows 10, 8, 7.
Particularly, for different types of devices, laptop or desktop, on battery or plugged in, you can choose to enable or disable this Windows USB port power management setting separately. If needed, you can also add or remove this USB feature on Windows systems.


