
Summary
For the best partition manager must be Minitool Partition Wizard. It breaks some limitations and offers flexible solutions to users to partition hard drive.
Are you still vexed about how to partition hard drive Windows 10? Here, in this article, 5 top recommended tools will be discussed in the aspects of create and resize partition with clear screenshots given. I believe you will find the best choice to partition hard drive.
# No.1 Best Partition Manager – MiniTool Partition Wizard
MiniTool Partition Wizard is the best partition manager that enables you to create and resize partitions easily and freely in Windows 10/8/7. It breaks some limitations and offers flexible solutions to users to partition hard drive. See the step-by-step guide below.
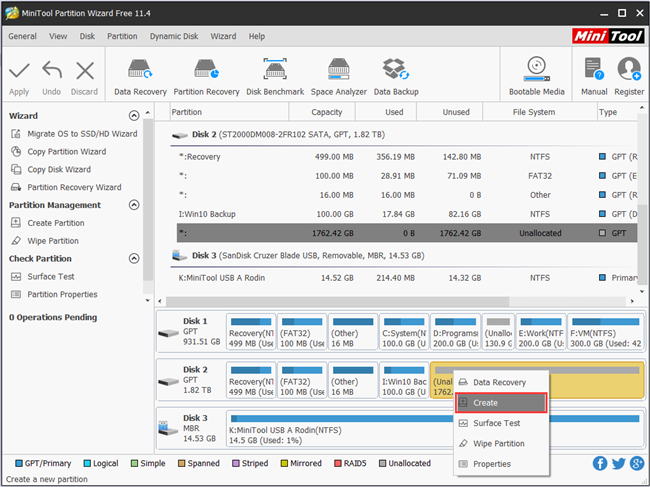
Step 1. After the installation of MiniTool Partition Wizard in Windows 10, run this software to get its main interface.
Step 2. Select the unallocated space of the hard drive on which you want to create new partitions and click Create partition in the left action panel.
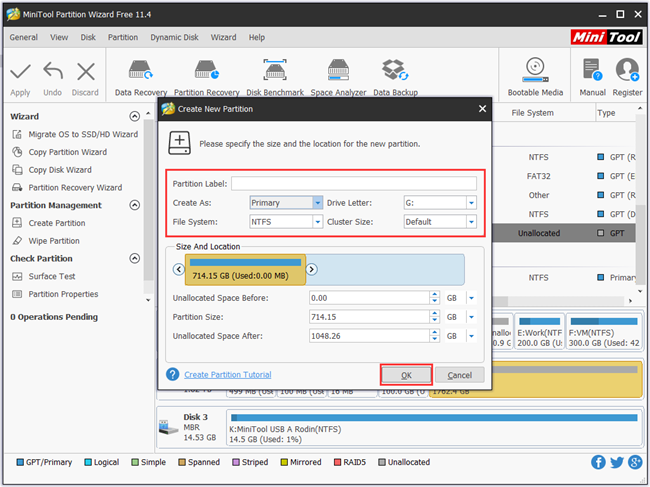
Step 3. In this pop-up window, you can specify the size and location of new partition. As is shown to us, users can set Partition Label, create a primary or logical partition, as well as choose the file system. After setting the detailed parameters, please click OK to continue.
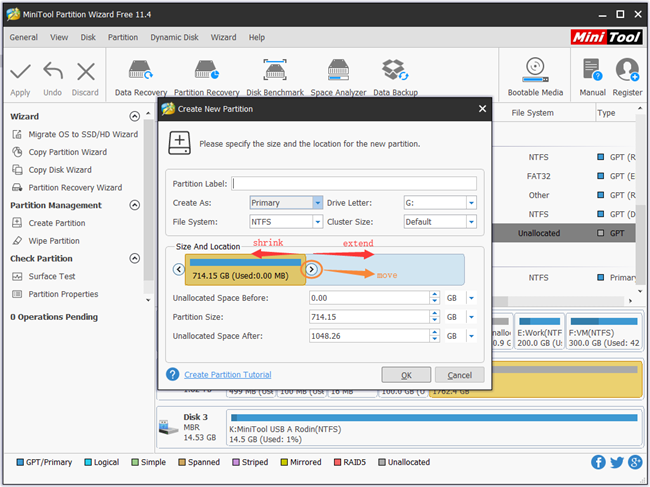
Besides, MiniTool Partition Wizard supports the Move/Resize Partition feature while creating a new partition. You have three options:
- Drag the handle bar internally to shrink the partition.
- Drag the handle bar to both ends when there is some unallocated space available to enlarge the partition.
- Move the whole yellow handle towards unallocated space to change partition location.
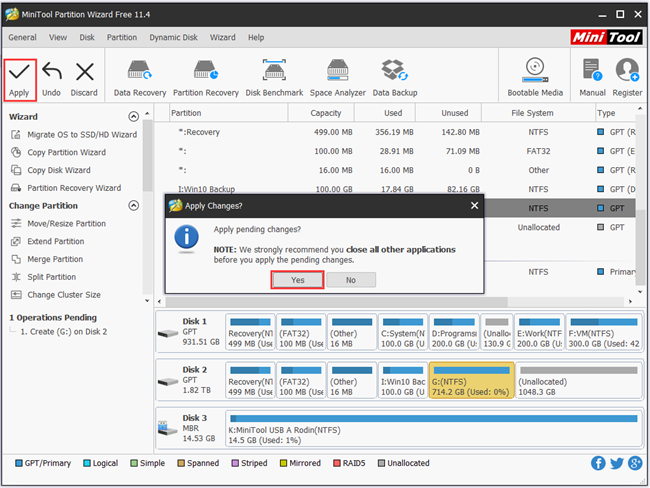
Step 4. After that, please click Apply to execute the operation pending. Then in this pop-up window, a note recommends you close all other applications before you apply the pending changes and just click Yes.
That’s how to Create and Move/Resize Partition, so easy, right? In addition, there are more choice for you to partition Windows 10using this partition manager. For instance, you can use its Split partition feature to quickly divide a large partition into 2 parts. Correspondingly, Merge Partition is offered to combine two partitions.
What we like and rate it No. 1 is MiniTool Partition Wizard is not only professional in hard disk partition but also brings other powerful features such as convert MBR to GPT, analyze disk space usage, migrate Windows 10 and so on. This all-in-one Windows 10 partition manager brings robust functions, flawless operations and user-friendly experience.
# No.2 Windows Built-in Disk Management Utility
As we know, this is the built-in Windows 10 partition manager with clear GUI and intuitive how-to guide. Besides, no computer restart will occur by using this utility. Next, let’s see how to partition hard drive with Disk Management in Windows 10.
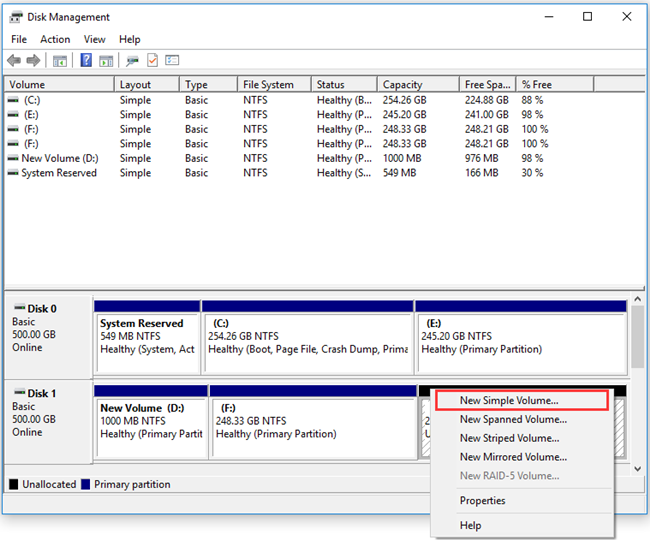
Step 1. Right-click Start menu in the lower left corner window to select Disk Management and enter its main interface.
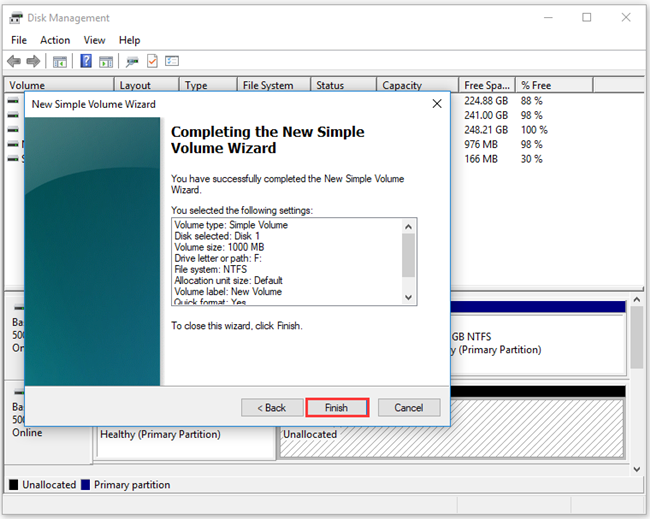
Step 2. If you want to create a new partition, please right click the unallocated space of the disk to create a partition, and select New Simple Volume. And then click Next to continue.
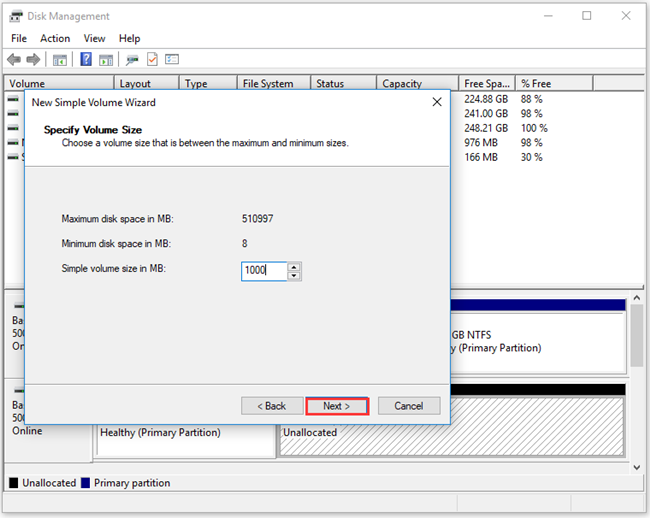
Step 3. In the new page, specify the volume size in MB and click Next.
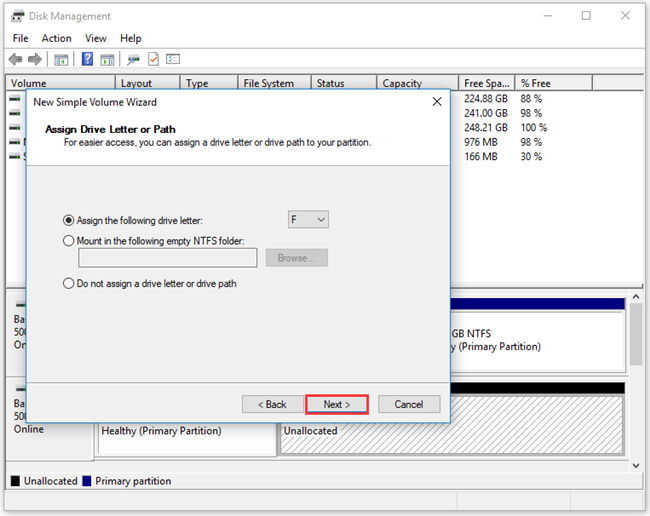
Step 3. Assign a drive letter or path for the partition and click Next.
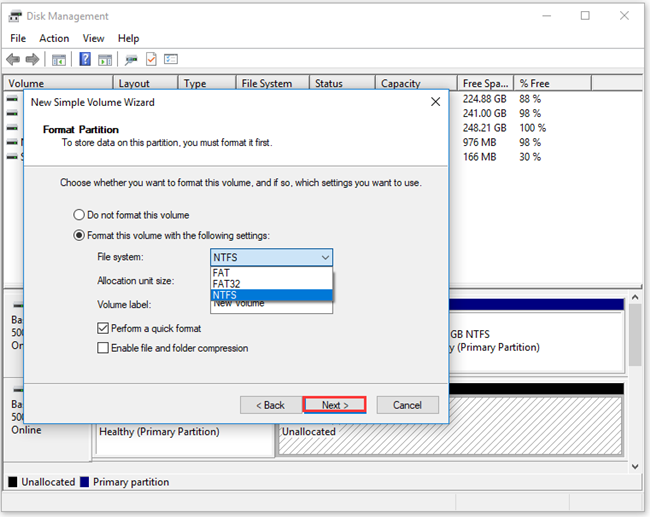
Step 4. Format the partition to store data, including choose a file system, set volume label and allocation unit size. After that, click Next.
Step 5. Click Finish to complete the creation of new partition.
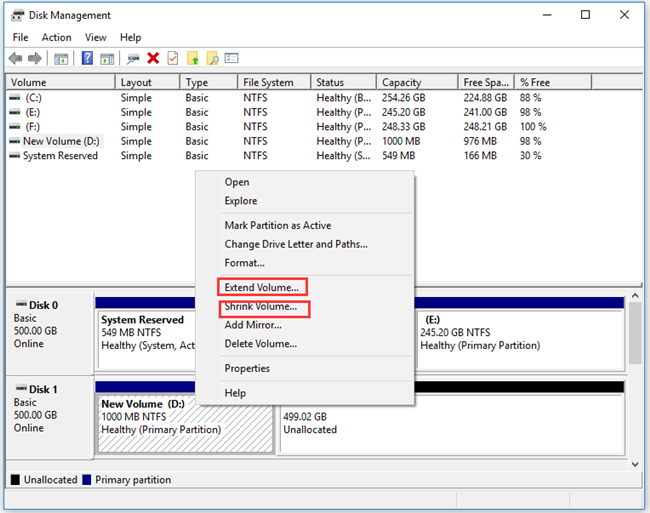
Right now, new hard drive partition has been made successfully. In addition, if you want to change a partition size, you can also choose Extend Volume or Shrink Volume on the existing partition to enlarge or shrink it.
Disk Management brings easy operation to help us create and resize partition. However, sometimes you may encounter troubles when partition hard drive with Disk Management and it does not offer a feasible way to help you resolve unless you carry out the partition deletion.
Case 1: Can’t create a new volume because the disk already contains maximum partitions.
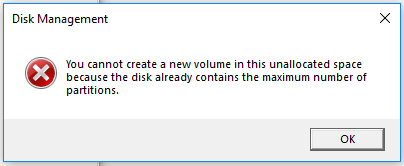
As you know an MBR disk only can hold 4 primary partitions or 3 primary partitions plus 1 extended partition (with many logical partitions).
If you want to create a partition on unallocated space that is not adjacent to the logical partition, you will receive this message error. However, Disk Management cannot move the partition before/behind the unallocated space.
Case 2: Extend Volume feature of Windows is grayed out
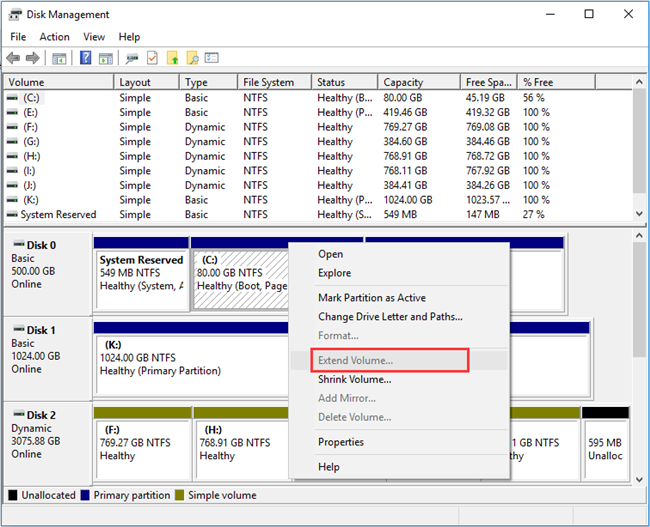
Why this situation occurs? The reason depends on whether it is a basic disk or a dynamic disk. Usually, when you are trying to extend a volume on basic disk but no adjacent unallocated space or free space is followed by the target volume, Extend Volume is definitely grayed out.
For more detail information you can get from this related article: Why Extend Volume Grayed Out and How to Quickly Fix It.
In both cases, you can try MiniTool Partition Wizard, which helps convert partition to logical for creating more new partitions and allows taking some free space from the other partitions located on the same disk to extend partition regardless if there are adjacent unallocated space.
# No.3 Diskpart.exe
If you are familiar with command lines, then it is a good idea to partition Windows 10 using diskpart.exe. Let’s see how to create partition Windows with Diskpart.
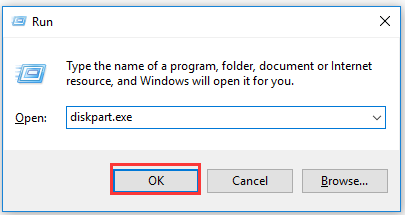
Step 1. Click Win+R in the keyboard and input diskpart.exe in the search box and click OK.
Step 2. Then please use the list disk command to list all disks in your computer so as to select disk.
Step 3. Input Select disk*(the disk you want to create partition on it) and press Enter button on keyboard.
Step 4. If you want to create a primary partition, you can input Create partition primary Size= (MB).
Step 5. Next type assign letter=H (you can choose other capital letter not taken by any other partitions) and hit Enter.
Step 6. After assigning a letter for the partition, please type format fs=ntfs quick and hit Enter to format this partition.

Step 7. Now, you have created partition successfully. Type exit and press Enter.
To change the partition size, you will need to select the partition to be managed input extended size=N (in MB) or shrink desired=N (in MB). However, in many cases, you will see Virtual disk service error which brought by the same limitations in Disk Management.
Be aware that you can partition hard drive Windows 10 only by executing specific commands and there is no revert. Additionally, diskpart tool cannot make more advanced management for partition like move/resize partition, convert NTFS to FAT and so on.
Besides the above three ways, we also recommended another two opensource software to help you create partition Windows 10.
# No.4 Gparted
Gparted (GNOME Partition Editor) enables you to use its live iSO to create a bootable media like USB or CD/DVD so as to manage hard drive partition. So, to use its disk management feature, you will have to:
Step 1. Download and burn the iSO file to a USB or CD/DVD, then you need to boot Gparted live from CD/DVD or USB Flash Drive on your computer. After that, you can get its main interface.
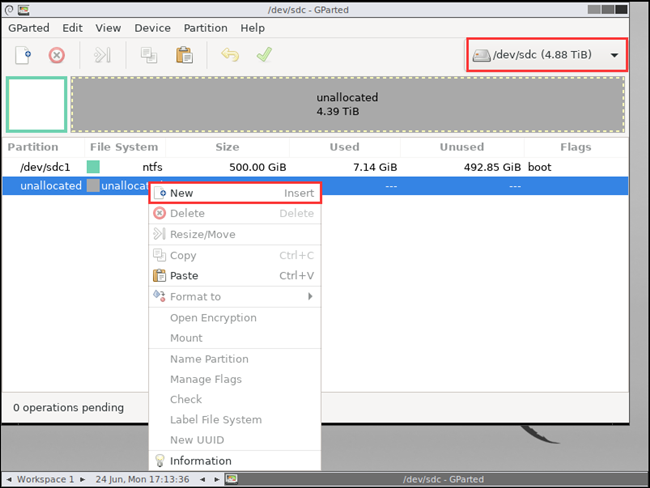
Step 2. Select a hard disk in the drop-down menu first and right-click the unallocated space to select New to continue.
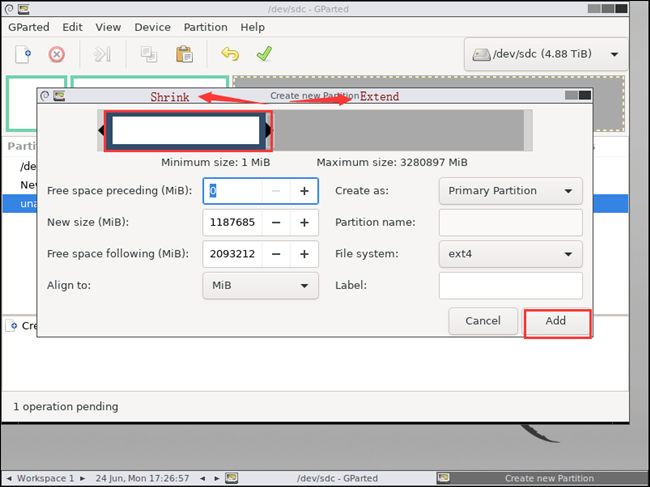
Step 3. Specify the detailed parameters of this new partition, you can drag the partition handle leftward to shrink the partition or drag this handle rightward to enlarge the partition. Still you are able to move the whole handle to adjust the location. Furthermore, choose a file system and partition type. After setting these detailed parameters, please click Add to continue.
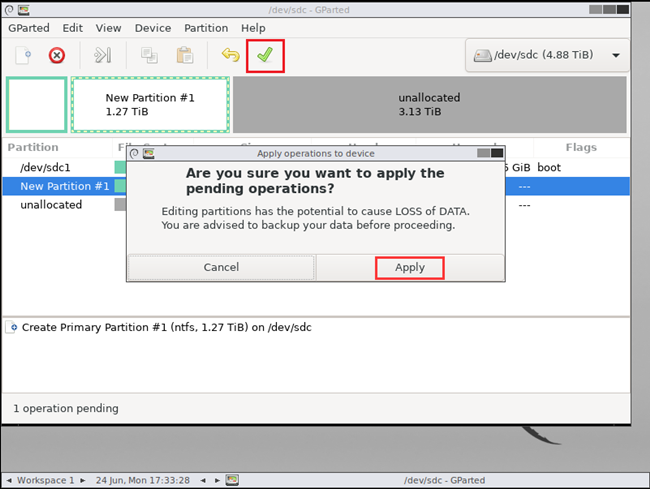
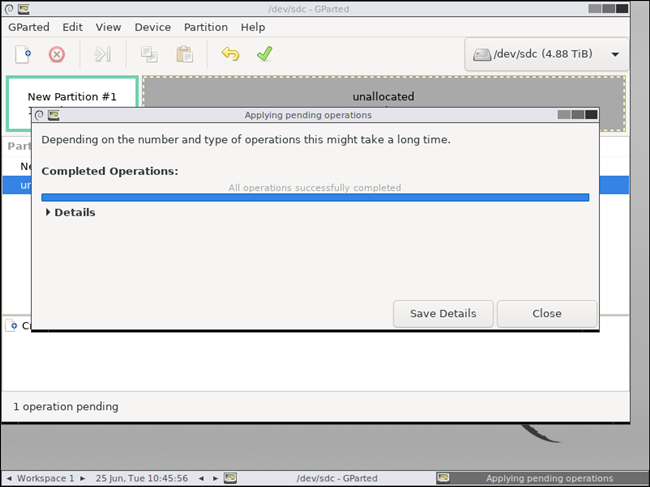
Step 4. Then click the green check mark on the toolbar to execute the pending changes.
After finishing all operations above, you have created a partition successfully. Well you can see the Save Details.
In addition, there is another Copy function offered. Using it you can simply choose a partition to copy and paste it on the unallocated space.
Generally speaking, this tool is rather easy to use, however, advantages of this Windows 10 partition manager is that the functions are too much limited towards hard disk partition.
# No.5 Cute Partition Manager
Note that this utility also requires you to create a bootable CD/DVD or bootable floppy disk (seems weird nowadays) before you can use it. Let’s see how to manage hard drive with Cute Partition Manager.
Step 1. After downing this software, you must burn the software to CD/DVD disc or floppy before use.
Step 2. Now boot your computer with the created bootable media. In this process, you will come across multiple options like the language display. It’s better for you to hit Enter each time to accept the default settings.
Step 3. In the pop-up blue disk management window, please click F2 in your keyboard to select the disk on which you want to create partition.

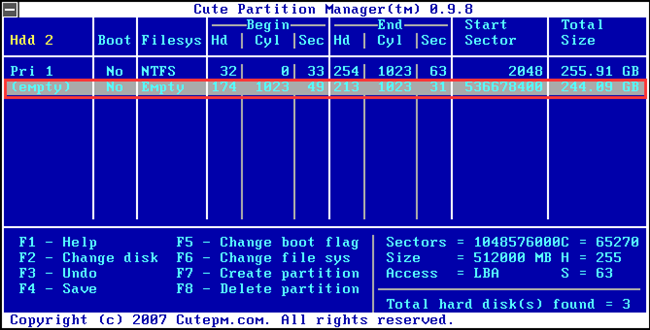
Step 4. After selecting a target disk, you will find all partitions listed here. Now click Down key in the keyboard to choose the Empty (means unallocated space) and click F7 as prompted to create a new partition.
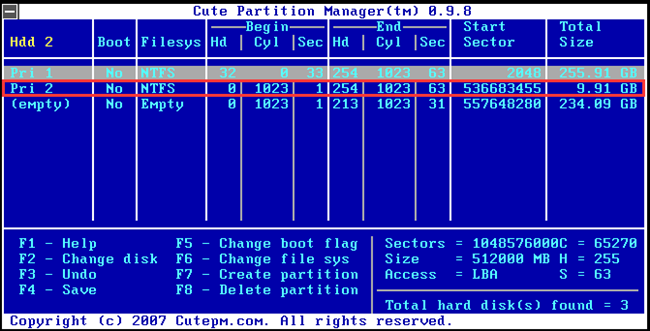
Step 5. In the pop-up window, you can set the file system and size of the new partition. Please click Up and Down Keys to select a file system and click Enter. Then navigate to the Enter Size in MB area to input the new partition size. Click Enter when you have selected Create button by clicking Up and Down Keys.
Kindly Reminder: If you want to create a partition in GB, please multiply it by 1024 MB, and so on to create in TB.

You see, the new partition has been created successfully.
Change File System
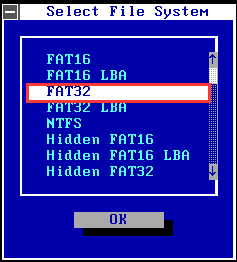
There are also other options for you. To change file system, please click F6 in the keyboard and a new pop-up window will be here. Click Enter button when you change file system by clicking Up and Down Keys.
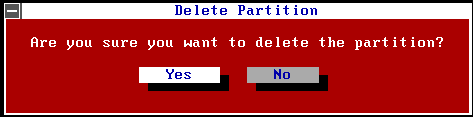
To delete a partition, please click F8. In the pop-up window, click Enter button of the keyboard when you selected Yes by clicking Left and Right Key.
Right now, you may find an obvious inconvenience, that is you are unable to do the disk partition management using the mouse. And the features of this software are not so much. You cannot copy partition, move/resize partition and perform other more advanced managements.
Now You Have the Choice
Ok, we have introduced five methods to partition hard drive for you. But you may ask which one should I choose to create partition Windows 10?
As mentioned above, you may receive the message errors when you use built-in tool Disk Management utility and diskpart. It’s not easy and convenient to use them, right?
As to another two third-party software – Gparted and Cute Partition Manager, they all require users to burn the software to CD/DVD or floppy before use. And some features like convert MBR to GPT, Merge Partition, and Split Partitions are not supported by the two software.
Besides, it’s not so nice to use Cute Partition Manager since you cannot operate it by mouse.
Now, which is the best choice for you? I believe there’s already an answer in your mind, right?


