The HyperX Cloud Alpha headset is one of the most popular and prestigious gaming headsets on the market. It is comfortable to wear and has amazing sound quality. Recently, some of its users reported an issue where its microphone wasn’t working properly. If you are using headphones for the first time and also have this issue, don’t worry.
In this post, we’ll provide nine solutions for fixing this problem, so you can get back to your favorite game or that important meeting and communicate smoothly with your mates again.
# Why Is HyperX Cloud Alpha Mic Not Working?
Your microphone could cease working due to the three possible causes.
Firstly, problems with your device, wiring, or software utility are all possibilities.
Secondly, out-of-date audio drivers.
Lastly, permissions for audio have not been updated.
# Solution 1: Check the connections
A common cause of the HyperX Cloud Alpha microphone not working is that the wire connecting the headset is not plugged in properly.
Since the HyperX Cloud Alpha comes with a detachable microphone, the first thing you can do is make sure that all microphone input and output jacks are properly connected to your PC, and that there’s no tiny gap between the microphone and the headset port.
If so, push the microphone jack until it clicks into place. Apart from this, damaged headphone cords and cables can also cause issues with the microphone and stop working. To check for damage to the power cord, go over it from top to bottom and look for any cuts. If you feel a cut or damage to the power cable, replace the cable.
# Solution 2: Allow apps access to your microphone
To ensure the security and privacy of Windows 10 PCs, Microsoft has enabled certain policies that require external devices to have the appropriate permissions before they can function optimally.
So when your computer can’t access the HyperX Cloud Alpha microphone you’re using, it’s most likely the main reason why your HyperX Cloud Alpha mic not working properly on your PC.
Follow these steps to make sure the app you’re using has permission to access your microphone.
Step 1: Right-click the Start icon and choose Settings.
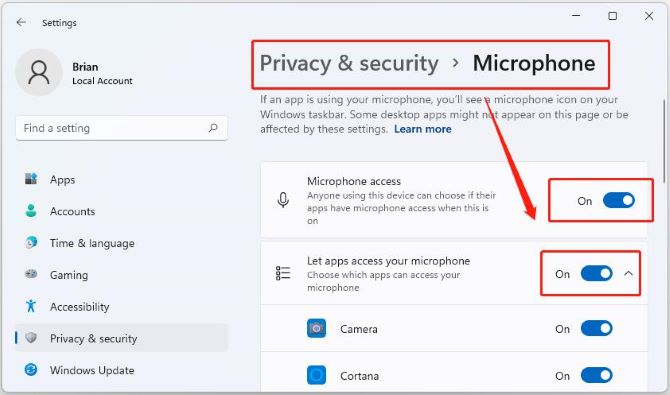
Step 2: Choose Privacy & security > Microphone.
Step 3: Toggle Microphone access and Let apps access your microphone to the On position so that other apps can use your microphone.
Step 4: Scroll down to choose which app can access your microphone, and make sure that you have it set for all the apps you want.
Step 5: Test your microphone to make sure it’s set up correctly for the program you’re now using.
# Solution 3: Set your microphone as the default device
Another reason for the HyperX Cloud Alpha mic not working is that it is not set as your default device, or has been disabled. Once the headphones are plugged in, Windows should recognize your microphone, and it should automatically set your microphone as the computer’s default input device.
However, sometimes you need to explicitly designate it as the default device, such as when installing a new operating system.
Therefore, follow the steps below to set your microphone as the default device:
Step 1: Open your Control Panel and find the Sound.
Step 2: This time choose the Recording tab.
Step 3: Right-click on an empty part of the page and check the Show Disabled Devices sections.
Step 4: If your HyperX Cloud Alpha mic appears at this point, you should right-click it and choose the Enable button.
Step 5: Right-click it again and check the Set as Default Device option.
# Solution 4: Update your audio driver
If your audio drivers are faulty or outdated, you may experience issues with your HyperX Cloud Alpha Mic not working properly, and it’s not just an issue with the HyperX Cloud Alpha Mic. Therefore, it is very important to keep your drivers updated to keep your PC running smoothly and flawlessly.
The easiest and most time-efficient way to update your drivers is to use a safe and trustworthy auto-update driver tool.
Driver Booster is a software that can identify, repair, and update outdated, missing, or incorrect drivers on your computer.
If you use the old method of manually updating drivers, you would need to know all of your hardware and find each driver at a time, which would take hours. Driver Booster will bring you to a modern era where everything is updated with an easy one-click.
Besides updated drivers, Driver Booster is also the best display driver uninstaller that can completely uninstall AMD, NVIDIA, and INTEL graphics card drivers and remove all traces of display driver leftovers. If you want to install a fresh driver, removing the driver that caused the problem, it will help you do that.
Step 1: Download, install and run Driver Booster on Windows 11 or Windows 10.
Step 2: Click Scan. It doesn’t require any information from you, after about 2 minutes of automatically scanning your computer, Driver Booster displays a list of all outdated drivers on your device.

Step 3: Click the Update button next to the flagged audio driver to automatically download the correct version of that drive.
Tips:
Click Update Now at the top right to download and install the latest version for all outdated drivers automatically with one click.
# Solution 5: Change the Mic Volume Settings
HyperX Cloud Alpha microphone still not working after doing the above solutions? Time to check the volume settings of your microphone device. Microphones can also have issues if the volume is set too low and won’t record your voice. Follow the steps below to check the settings:
Step 1: Open your Control Panel and find the Sound once again.
Step 2: Right-click your HyperX Cloud Alpha Mic or headset and choose the Properties tab.
Step 3: Choose the Levels tab and check the volume sliders. Set them to full volume to test your mic.
Step 4: Click OK to apply the changes.
# Solution 6: Run Recording Audio Troubleshooter
If you have problems recording audio on your computer, you can run Windows 11/10 Recording Audio troubleshooter to automatically detect and fix problems with recording sound. Here are the steps to run the audio troubleshooter on Windows 10:
Step 1: Right-click the Start icon > Choose Setting.
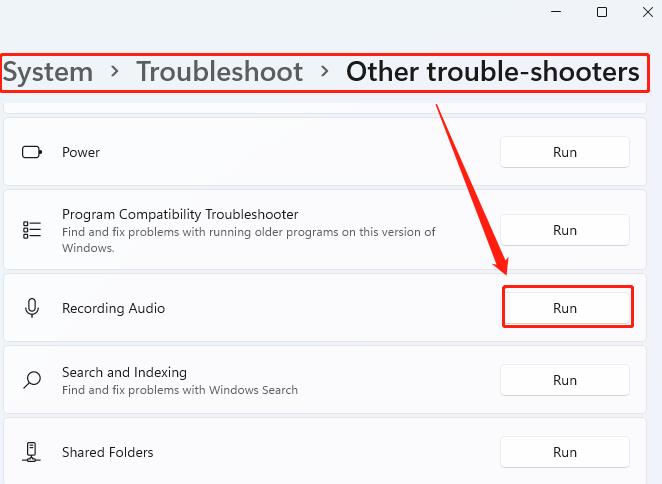
Step 2: Click System > Troubleshoot > Other trouble-shooters.
Step 3: Look for the Recording Audio troubleshooter, and click on the Run button.
# Solution 7: Reset the Windows audio service
If any files related to Windows Audio Services are corrupt, they may cause your HyperX Cloud 2 microphone to stop working. To resolve this issue, try resetting your Windows Audio service. The Windows Audio service manages audio devices for Windows-based programs.
Step 1: Press the Win + R key together and then type services.msc and click on Enter.
Step 2: Locate Windows Audio Services in the Service Manager window and check the Status/Startup columns to see if it’s running and enabled.
Step 3: If this service is not enabled, right-click it, and select Start. If it’s enabled, right-click it and select Restart.

# Solution 8: Uninstall and Reinstall your audio driver
When using an outdated or damaged audio driver for any reason, your PC will not be able to detect the HyperX Cloud Alpha microphone. Uninstalling the audio driver and reinstalling it can also avoid this error if updating the driver doesn’t help.
Step 1: Search for the Device Manager in the Windows search box.
Step 2: Expand the Sound, video and game controllers.
Step 3: Right-click on your HyperX Cloud Alpha microphone and select uninstall driver.
Step 4: Follow the on-screen manual to uninstall. Your computer will require a reboot after uninstalling.
Step 5: Go to the official site of HyperX to download the latest driver for your microphone device.
# Solution 9: Contact the manufacturer
The last thing I suggest you do is to check your headset itself. According to some user feedback, if connecting the headset to other devices doesn’t work, your HyperX Cloud may be broken or have an internal problem. If it was bought new and is under warranty, you can try contacting the manufacturer and ask for a replacement.
If it is not in the warranty period, you can also explain your problem to the relevant technical personnel, and they will provide appropriate help and support.
Conclusion:
Hopefully you have now successfully resolved your HyperX Cloud Alpha microphone not working issue with the nine solutions listed above. These troubleshooting steps should be enough to resolve any microphone and sound issues on your computer.
More Articles:
[8 Ways] HyperX Cloud Stinger Mic Not Working (2023 Update)