When you update from Windows 10 to Windows 11, there is a great chance that your PC will contain some temporary files, vacant programs, and some outdated or missing drivers which will put a lot of stress on your computer. Don’t panic, in this post, you will discover there are many things you can do to speed up your Windows 11 PC.
Why is Windows 11 so slow?
Sometimes, you may feel your Windows 11 PC running slowly or freezing. This situation is mostly caused by low disk space of system drive, Insufficient RAM, too many running programs, Usage of old HDD, lower specification PC or laptop, or outdated graphics card drivers. This post will tell you a lot of convenient tips to solve this issue.
How to Speed up your Windows 11 PC?
Windows 11 has its system requirements to run fast on different PCs. But we still have some methods to make it run faster.
#1 Drives Optimization to reduce system fragmentation
Doing defragmentation can help organize the data in your hard drives and reduce system fragmentation. To complete the defragmentation, you can use Windows’ drive optimization tool with the following steps.
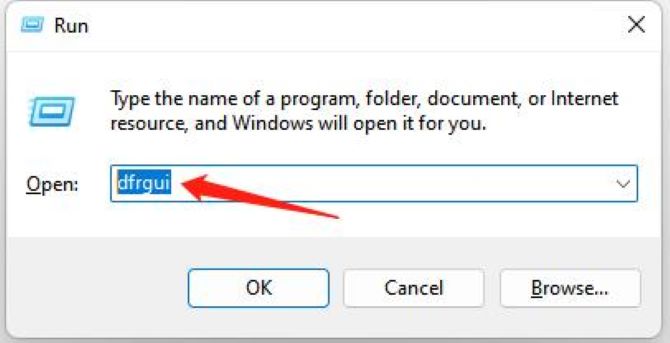
Step 1. Press the Win + R key to open the Run box, and then type dfrgui to enter Optimize Drives function.
Step 2. Select the System drive and click Optimize.
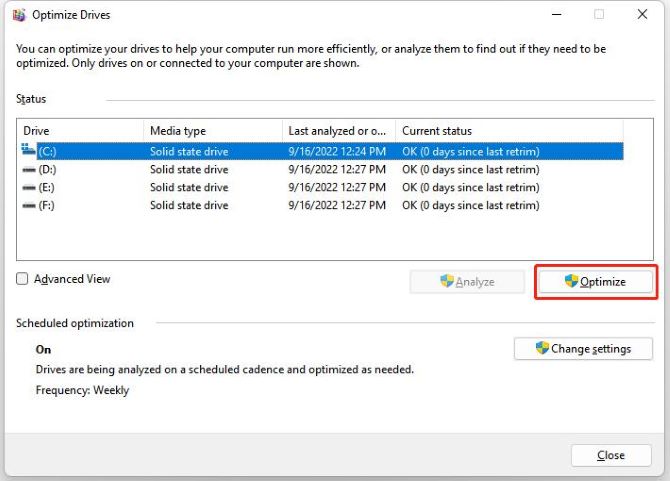
It’s recommended to defragment all drives at least once a month. Or you can create an automatic schedule for it.
Step 3. Click Change settings and the Optimization schedule box will show.
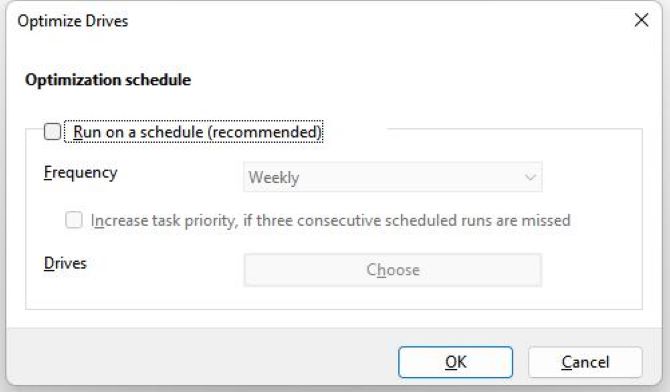
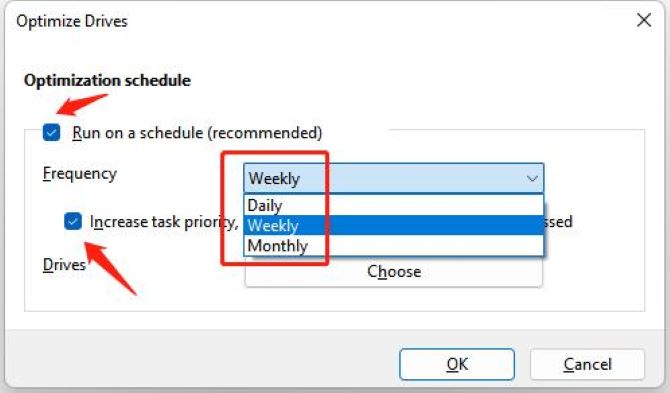
Step 4. Tick Run on a schedule (recommended) and Increase task priority, if three consecutive scheduled runs are missed, and choose a suitable Frequency.
#2 Execute Disk Cleanup to free up space on the hard drive
Disk Cleanup is a windows tool that can free up space in your hard drive. Higher free storage can ensure faster performance. You can do the following steps to use this tool.
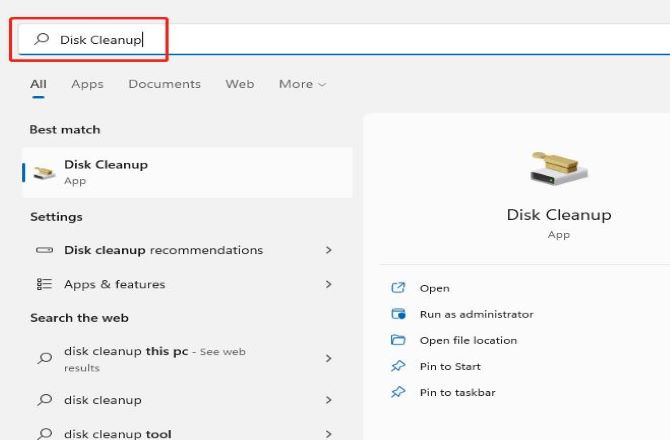
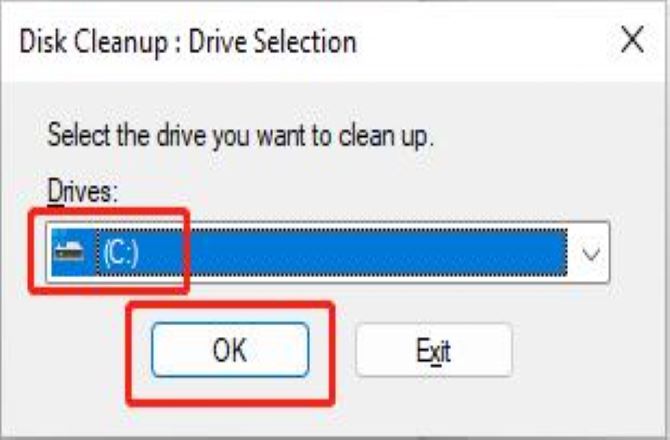
1. Search Disk Cleanup in the search box and click Open.
2. Select the drive you want to clean up in the pop-up box and then click OK.
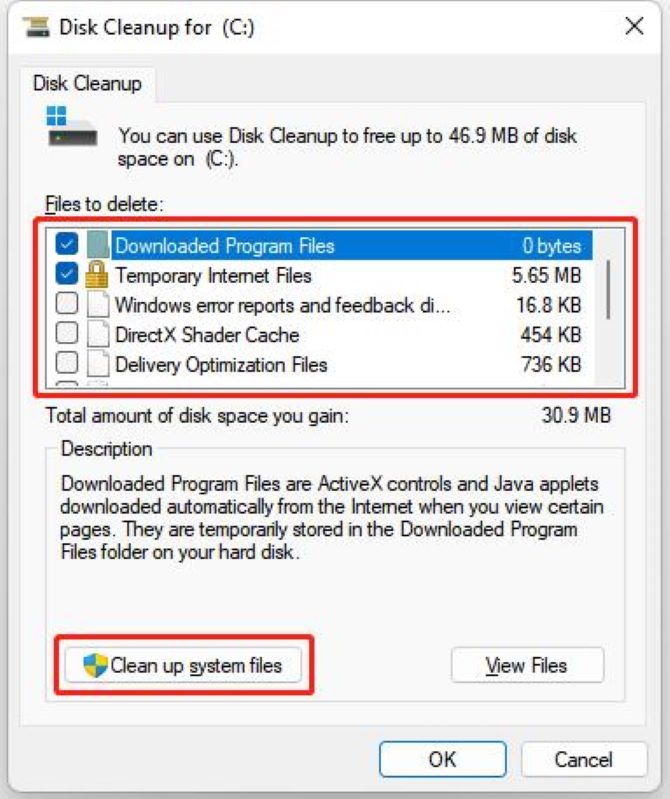
3. Click Clean up system files to clean up the selected disk.
#3 Disable Unnecessary Startup Apps to speed up the boot process
Startup apps are applications that run automatically during the system boot process. Too many Startup apps will slow down the speed of the OS. So it’s necessary to check and disable unnecessary startup apps.
Before disabling it, you should check each app and its purpose. If you are not familiar with what the app does, you should google it to check the details. Do not disable apps randomly, it may cause unwanted results.
To disable an unwanted startup app, you should do the following steps.
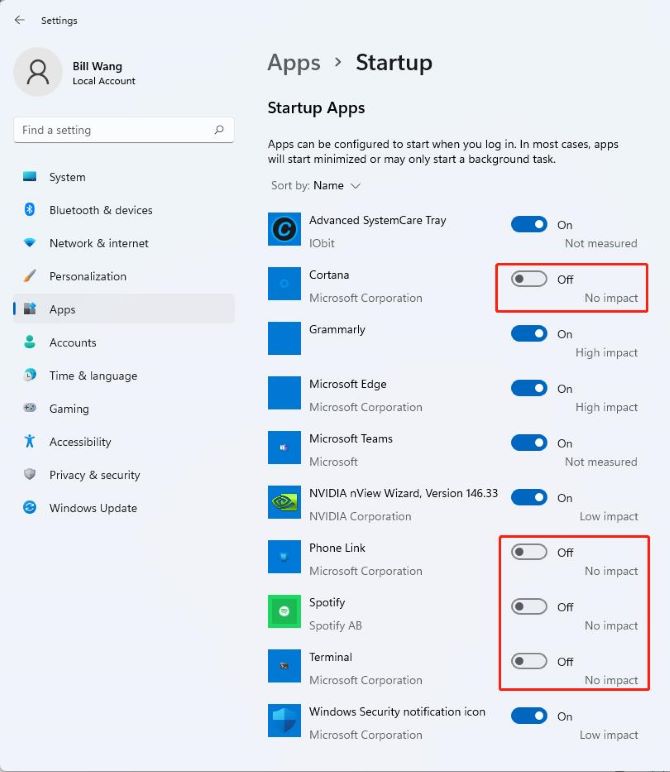
1. Enter Settings > Apps > Startup.
2. Check each app and turn off the unneeded ones in the apps list.
#4 Enable Storage Sense to clean up temporary files and user content
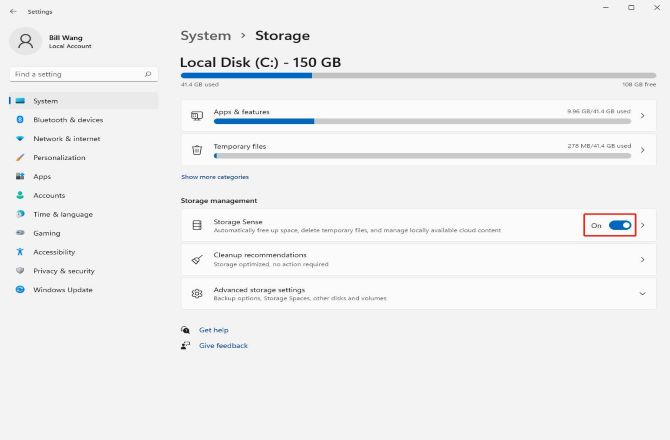
To automatically free up space, delete temporary files, and manage available cloud content, you can turn on Storage Sense in System Storage settings.
1. Press Win + I to enter System Settings.
2. Choose Storage.
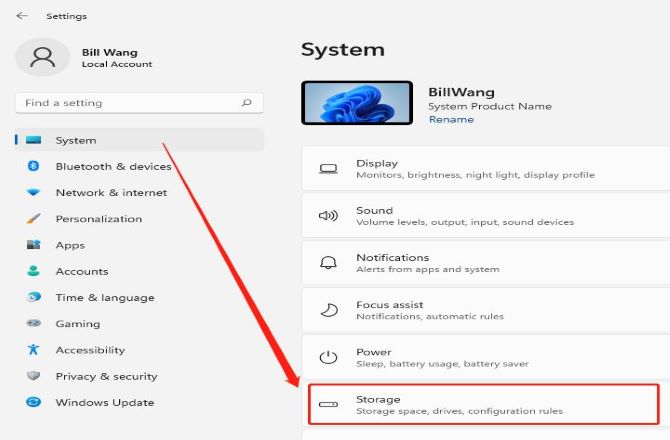
3. Under Storage management, click to turn on Storage Sense.
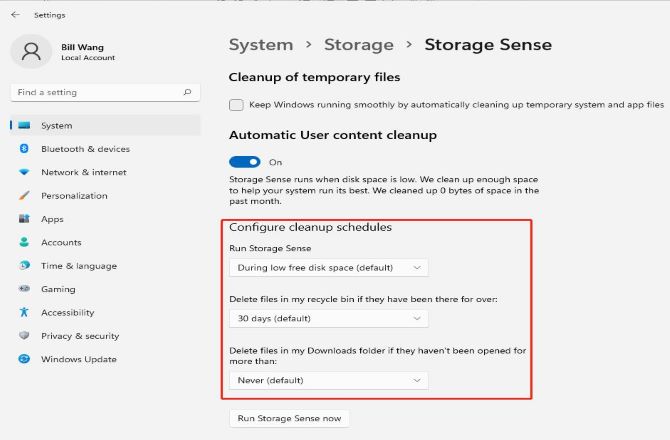
4. Click on the Storage Sense section will enter the configuration interface. Configure cleanup schedules according to your needs.
#4 Free Up System Storage to speed up Windows 11
Residues in the primary drive may lead to OS lagging or other related issues. So always trying to check and free up as much storage as possible is important.
1. Enter Settings > System > Storage.
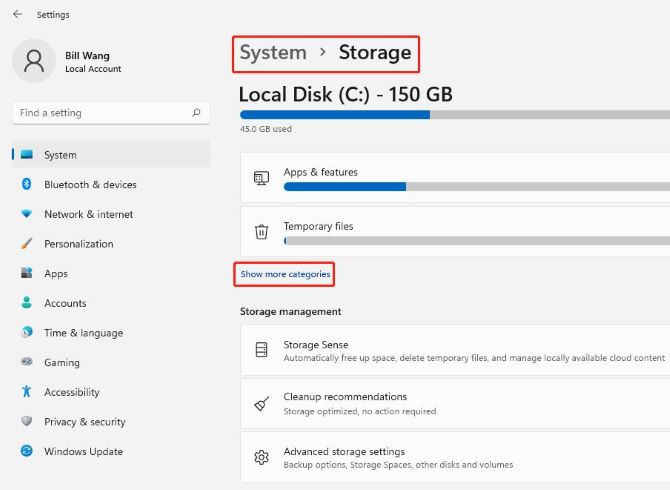
2. Clicking Show more categories will show the entire Storage usage list.
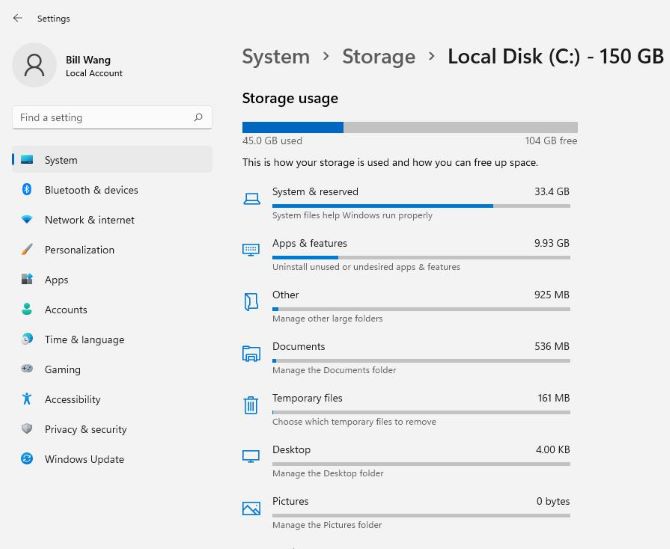
3. Check each category except Apps & Features and click to remove folders, and additional accounts, or delete the unneeded temporary files.
#5 Disable Transparency or Animation Effects to save system resources
Because Windows 11 needs to dedicate some resources to make some skillful animation and visual effects run smoothly on your PC.
To make your PC run faster, you can turn off them to save some resources.
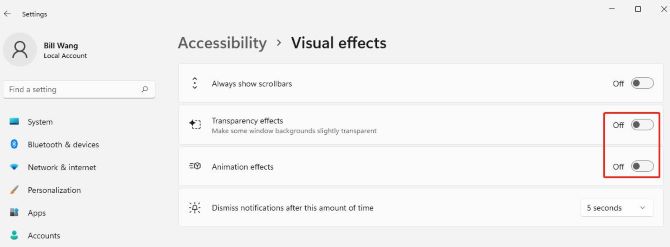
Turn off Transparency effects and Animation effects
1. Enter Settings > Accessibility > Visual effects function.
2. Click to toggle off Transparency effects and Animation effects.
Modify Visual Effects Settings
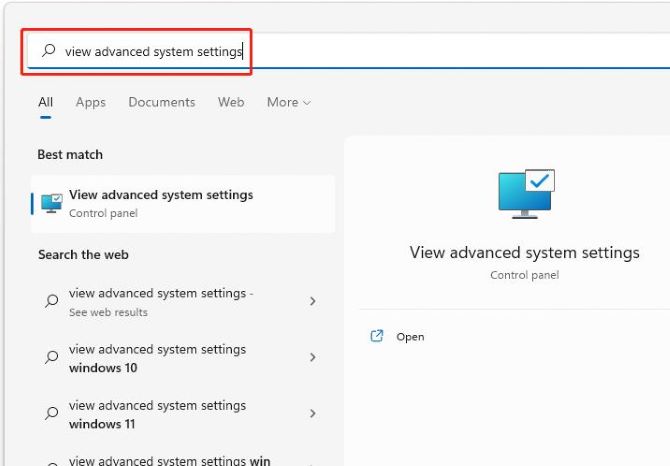
1. Search View advanced system settings in the search box.
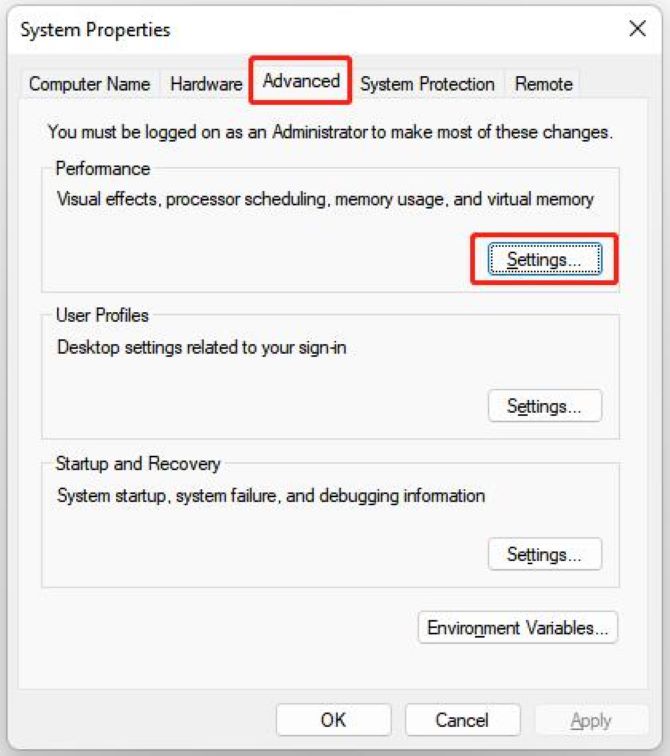
2. Click Open and enter the System Properties > Advanced page, and then click Settings in the Performance part.
3. On the Performance Options page, select Adjust for best performance under the Visual Effects tab.
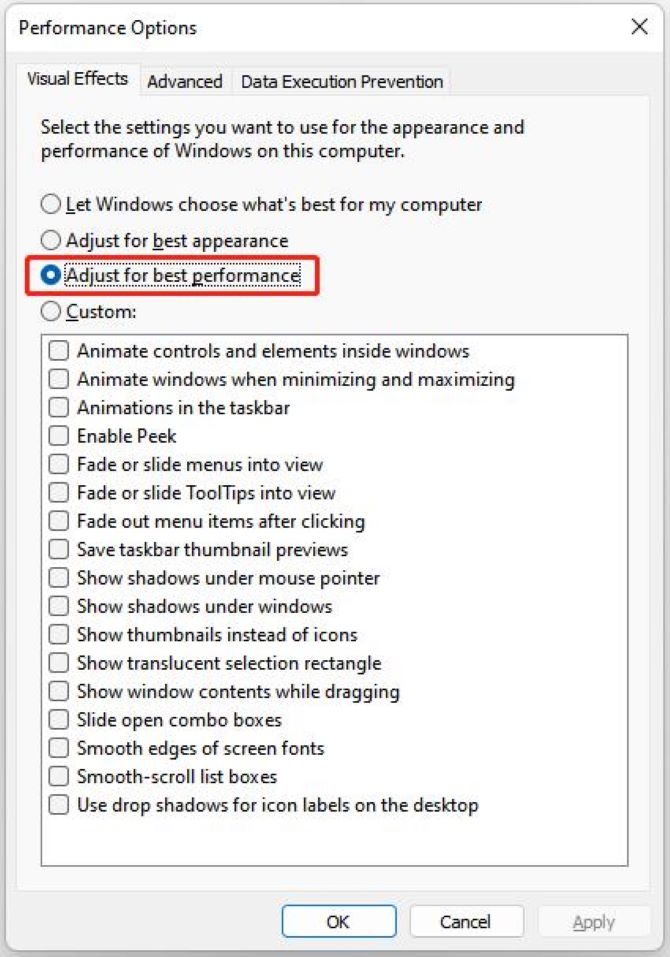
4. Click on Apply and then click OK.
You can select any of the above Custom options according to your preference to minimize visual effects as much as possible.
#6 Uninstall Unwanted Applications to release system and hardware resources
Some programs will automatically run in the background when you are using your computer. It will occupy some valuable system and hardware resources. So it is necessary to kill these unwanted programs.
1. Enter Settings > Apps > Apps & features, and you will see a list of apps.
2. Locate the unwanted applications and click the three-dot on the side to uninstall them.
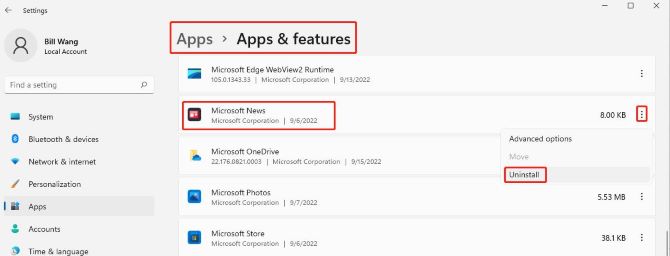
Be aware don’t uninstall apps that you can’t understand. You’d better google what they are and decide if you can uninstall them.
#7 Run a Malware Scan to protect and speed up your PC
Sometimes, you will feel your PC run slower than before, this may be the result of a virus or malware affection. We suggest you use an antivirus program like Bitdefender Antivirus Plus, Webroot SecureAnywhere AntiVirus, or Microsoft Defender to do scanning periodically. By doing this, you can protect your PC and make it run faster.
#8 Disable Gaming Mode to stop background services
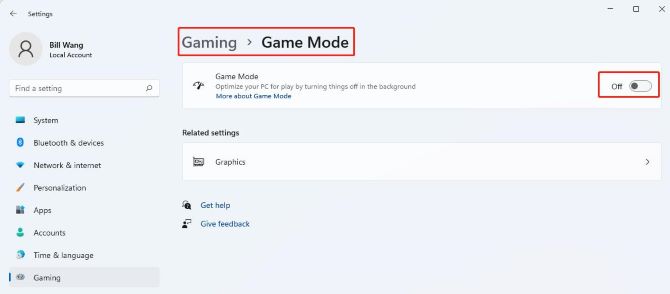
If you are not a gamer and seldom play games on your PC, it is recommended to disable gaming mode in system settings. This will stop Xbox-related services and DVR from running in the background.
The gaming mode is turned on by default on Windows 11 and you can disable it manually.
Enter Settings > Gaming > Game Mode and click to toggle off Game Mode.
#9 Change Power Settings to the best power performance
Setting your power plan to the best performance can make your Windows 11 PC run faster. Execute the following steps to change power plan settings.
1. Enter Control Panel > Hardware and Sound > Power Options.
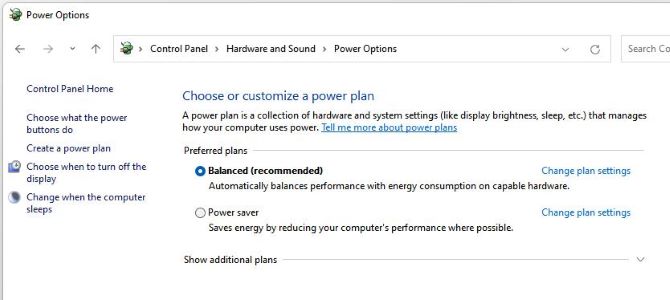
2. Click Change plan settings will enter the power plan settings function.
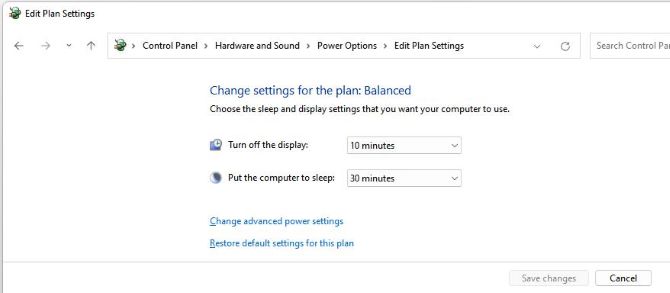
3. Click on Change advanced power settings and locate the option Processor Power Management and click to expand.
4. Set Minimum Processor State and Maximum Processor State to 100%.
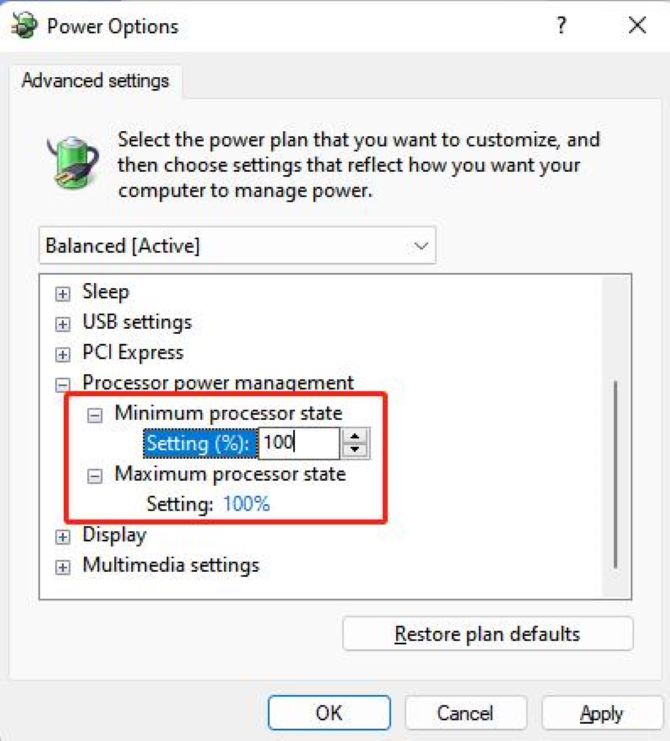
5. Click Apply and then click OK.
#10 Keep Windows 11 Updated to improve your PC’s performance
When there are some existing bugs or new performance optimization options for your OS, Microsoft will send them to you via updates. So it is necessary to always keep the OS updated. Do the following steps to check and update your OS.
1. Enter Settings > Windows Update.
2. Clicking Check for updates or Download & Install will start to download and install the available updates.

#11 Upgrade Hardware to speed up your Windows 11 PC
To speed up your Windows 11 PC, you can check its system requirements on the official website and upgrade your system configurations. There are three tips for you.
Install your OS into SSD rather than HDD.
According to the Windows 11 system requirements on the official website, replace a higher CPU and Graphics Card, and ensure your system RAM is larger than 8 – 10 GB.
Purchase a more appropriate computer.
#12 Speed up Windows 11 automatically
If you feel the above manual speed-up methods are a little troublesome, you can use a tool called Advanced SystemCare to help you speed up your Windows 11 PC automatically. Do the following steps to use this tool to speed up your computer.
1. Download, install and run Advanced System Care on Windows 11, then you will see the simple interface.
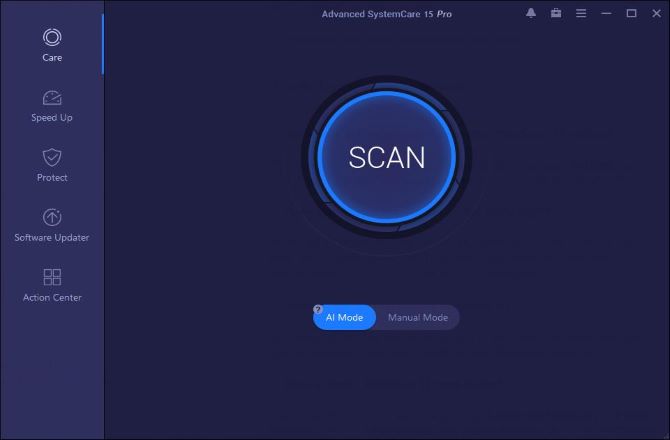
Before you scan the computer, you should notice the two modes.
AI Mode: This mode can intelligently clean and speed up your PC according to your PC’s current status.
Manual Mode: You can customize the optimization items according to your needs. Or you can tick Select All to do the entire scanning.
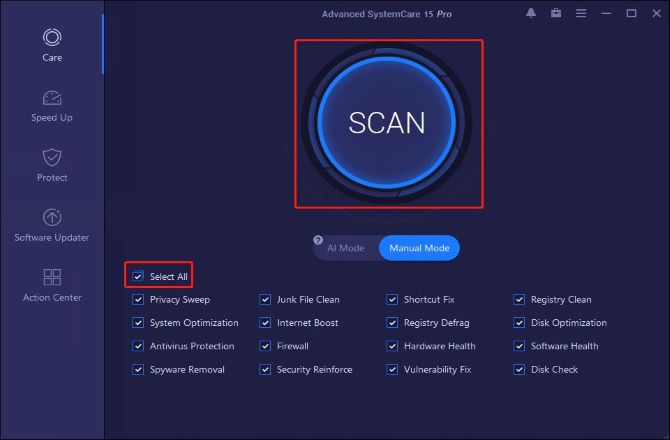
Privacy Sweep
This module can clean all the browser privacy traces completely and keep your PC clean with a faster browsing speed.
Junk File Clean
You can clear junk files like user accounts and other items under the Windows Download folder in this module.
Internet Boost
This module can help to test and increase your network’s speed.
Disk Optimization
You can organize fragments on Hard Disk and provide the best performance for your Disk.
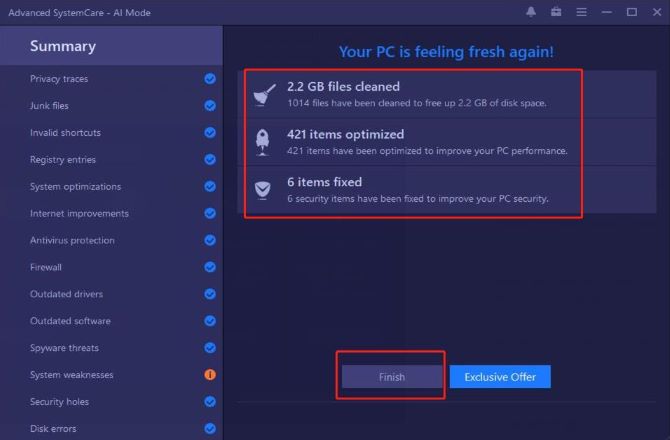
2. Click SCAN and the scanning results show as below.
3. Click Fix can fix the optimizable items and will show the fixed results.
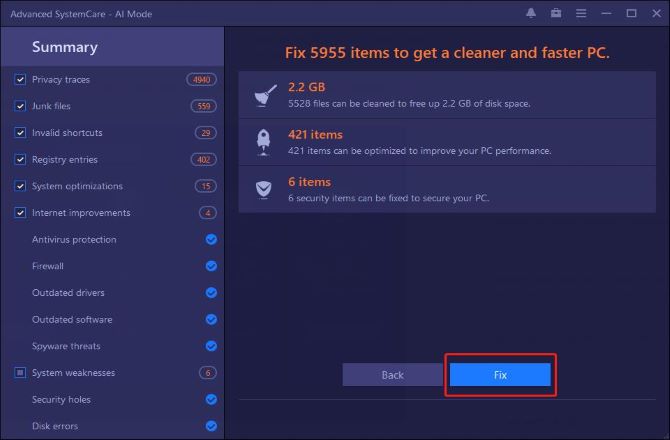
4. Click Finish to exit and return.
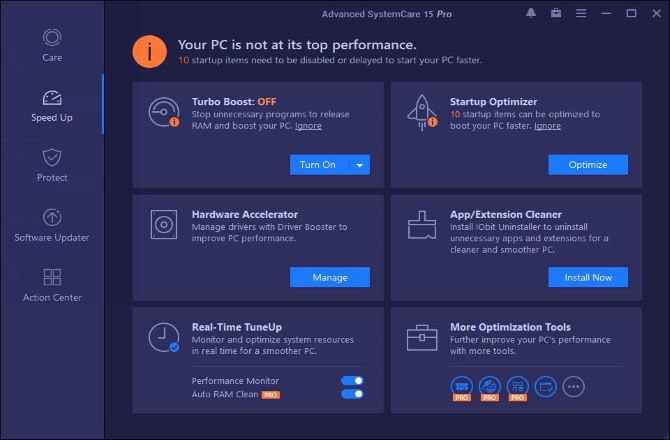
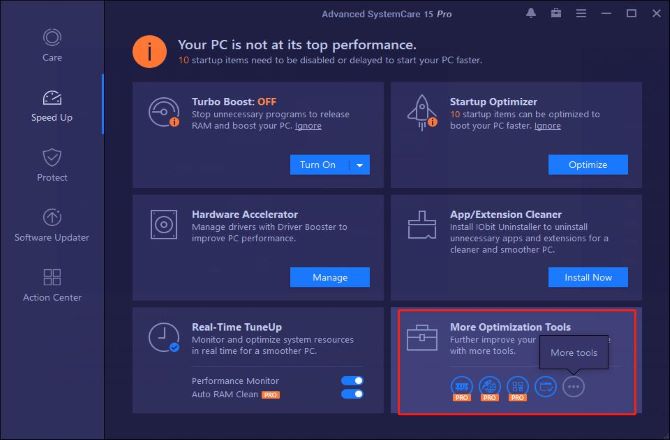
If you want to further improve your PC’s performance and speed, you can switch to the Speed Up section.
Turn on Turbo Boost
Turbo Boost can speed up the running services and background programs to improve your PC’s performance.
1. Moving your mouse over the Turn On button will show the Configure link.
2. Clicking the link will enter the Boost Configure interface.
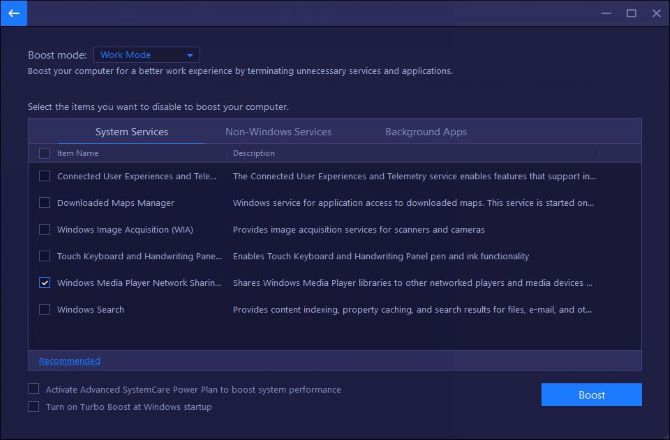
Here, you can configure the Boost mode according to your needs.
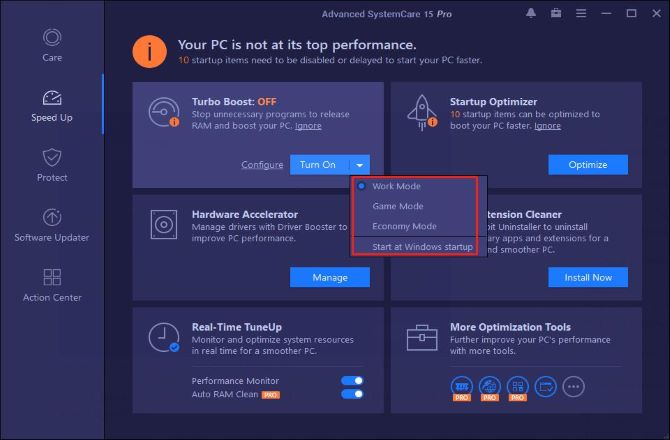
3. Click Back to return and lift your mouse over the Turn On button in the Turbo Boost part to change boost mode.
Optimize Startup items
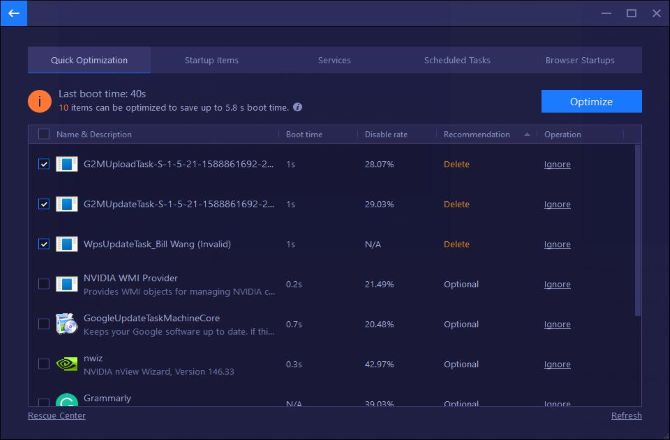
Click Optimize in the Startup Optimizer part will enter the Quick Optimization page. You can optimize these start-up items to speed up your PC’s boot time with one click.
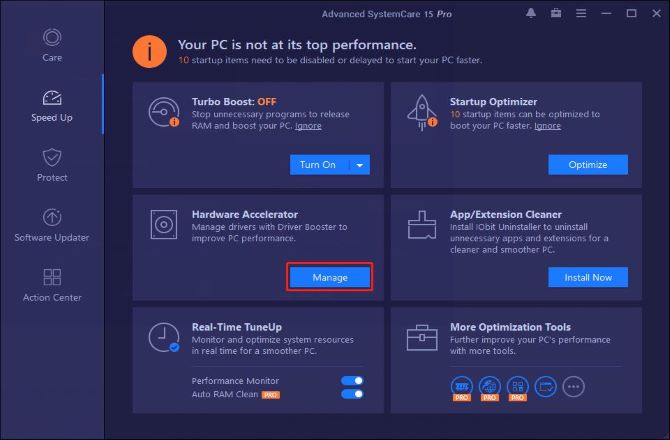
Manage Hardware Accelerator
Click Manage to manage drivers with Driver Booster to improve PC performance.
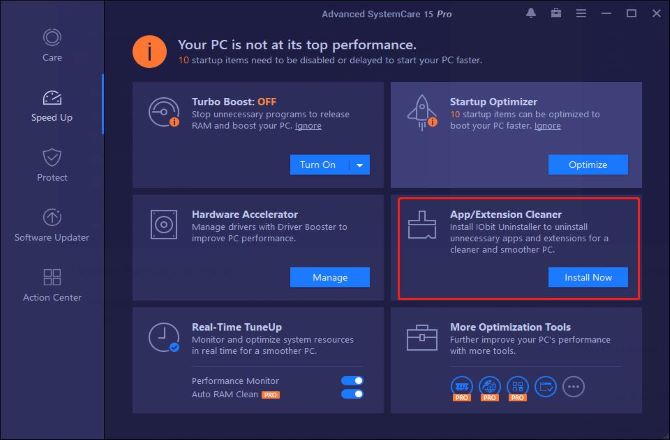
App/Extension Cleaner
App/Extension Cleaner uses IObit Uninstaller to uninstall unnecessary apps and extensions to speed up and clean your PC. And you can click Install Now to install IObit Uninstaller.
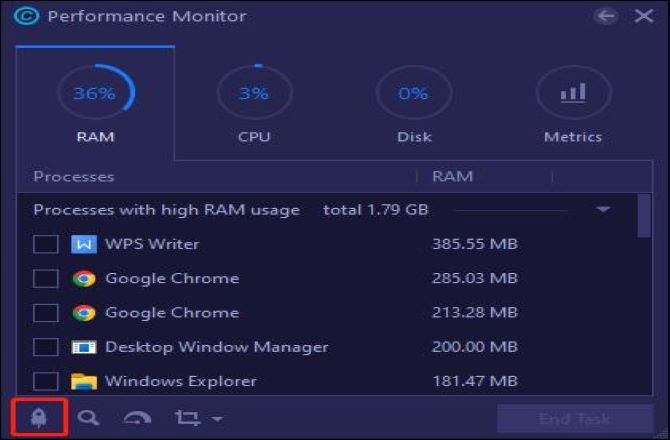
Real-Time TuneUp
Turning on Performance Monitor under Real-Time TuneUp will show a Performance Monitor pop-up window. Clicking Clean RAM can release memory space to speed up your PC.
More Optimization Tools
To further improve your PC’s performance, you can also use Smart RAM, Internet Booster, Registry Cleaner, Program Deactivator, or other tools.
FAQ about Speeding Up Windows 11
The Windows 11 update may be unstable and it will contain some unknown issues when running on your laptop. You can revoke the update by restore your system in Settings > System > Recovery or Settings > Windows Update > Update History > Uninstall updates.
Windows 11 generally requires an 8th-generation Intel Core CPU or AMD Ryzen 3000-series CPU or better. Old computers with low specifications may not support running them smoothly.
Yes. Turning on fast startup on Windows 11 will make the hibernate and resume process faster and speed up your Windows boot time.
Open your PC’s control panel and enter System and Security > Power Options. Click on Choose what the power buttons do.
Click the Change settings that are currently unavailable link. Under the Shutdown settings section, tick the Turn on fast startup (recommended) option to turn on this feature.
No, Windows 11 is faster than Windows 10 mainly because of the improved memory management system that Windows 11 is using. Compared with Windows 10, Windows 11 has higher application stability and speed, and faster browser launching speed.

