Screen capture is the most critical task for Acer laptop users and it plays an important role in daily life. Mastering the art of screenshotting on your Acer laptop will enable you to save and share visual information effectively. Some novice users find it difficult to take screenshots. But the process of taking a screenshot is pretty straightforward once you know how.
So this article will be very helpful for you. It mainly introduces 5 methods on how to take a screenshot on an Acer laptop, and especially shows how to take a screenshot on an Acer Chromebook 315.
Method 1: Using Microsoft Paint To Screenshot On Acer Laptop
Using Microsoft Paint is often the fastest and easiest way to take a screenshot, since it’s included as a default application in nearly every recent version of the Microsoft Windows operating system.
But the downside is that it’s not the most convenient when it comes to editing screenshots. But it doesn’t matter, it can still be handled with simple operation. Here’s how to use it:
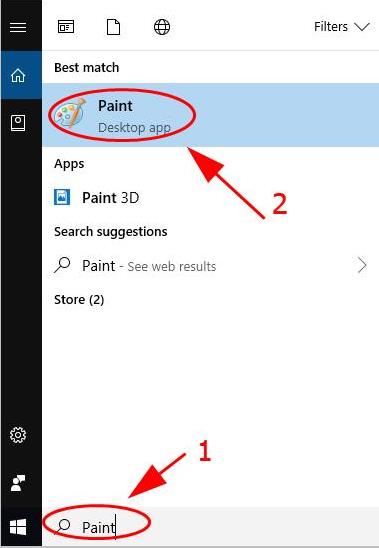
Step 1: Type Paint in the search box on your desktop, and click Paint to open it.
Step 2: Open the window that you want to capture, and press the PrtSc key on your keyboard. The screenshot is saved in your clipboard.
Microsoft Paint will offer you four snipping modes:
- Rectangular Snip: The mode allows you to drag the cursor and capture a rectangle screenshot.
- Freeform Snip: You can create a custom-shaped screenshot using the mouse using the Freeform mode. Just move the cursor on your screen to capture the screen area and shape you desire.
- Windows Snip: The third snipping mode you can use on the MS Paint app is the Windows Snip, which allows you to capture part of the screen — like a window on the screen — such as a browser window or file explorer window.
- Fullscreen: The Fullscreen snipping mode captures the entire screen.
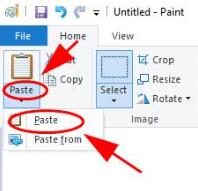
Step 3: Click the Paste button in Paint to paste your screenshot.
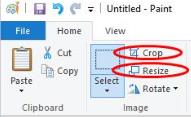
You can resize or crop the screenshot to adjust the size.
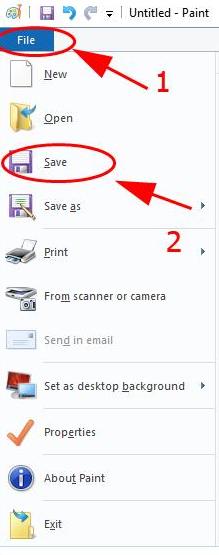
Step 4: After editing, click File > Save and choose a location to save your screenshots.
Method 2: Using Snipping Tool To Screenshot On Acer Laptop
Snipping Tool is another easiest way for Acer laptop users who use Windows OS on their laptops. Snipping Tool is a built-in Windows application. It is included in Windows Vista and later and allows you to easily capture specific areas of your screen.
Here’s how to take a screenshot on an Acer laptop using the Snipping Tool:
Step 1: Type Snipping Tool in the search box on your desktop, and click Snipping Tool to open it.
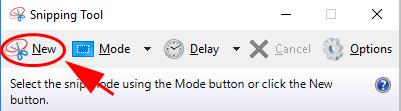
Step 2: To take a screenshot, click on the “New” option and then set your desired screenshot area to complete the process.
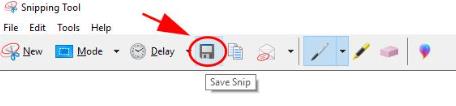
Step 3: Now save the captured screenshot by clicking on the “Save Snip” option as shown below.
Method 3: Using Keyboard Combinations To Screenshot On Acer Laptop
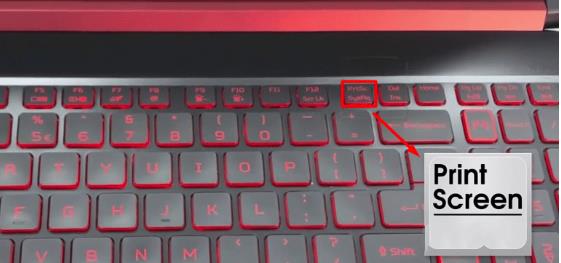
Take a closer look at the keyboard you’re using and you’ll see that there’s a key called PrtScn, PrtSc, PrntScrn, Print Scr, Prt Scrn, Print Scrn, Pr Sc, etc. The PrntSc key is used on laptops to take screenshots.
Likewise, you can also use this key to take a screenshot on your Acer laptop within a second. Using the “Print Screen” key is the fastest and easiest way to take a screenshot on your Acer.
This key will capture the entire image of the screen. You can then find this file by clicking the folder icon in the taskbar, opening the Pictures folder, and selecting Screenshots. But you need to be aware that it also has an obvious disadvantage: you can’t easily edit screenshots.
Method 4: Using Shortcut To Screenshot On Acer Chromebook 315
Note that some Chromebooks have a dedicated screenshot key, marked by a small camera icon. If you have it, you can press that button instead of using the shortcut mentioned above. You can also press the Power + Volume Down buttons simultaneously to take a full-screen screenshot.
Note that the volume buttons are not the same as the volume keys on your keyboard. You’ll find the volume buttons on the right or left side of your Chromebook.
Method 5: Using iTop Screenshot To Screenshot On Acer Laptop
Whether you’re trying to capture error messages, record a specific process, or save your entire screen, Microsoft Paint and the Snipping tool are excellent ways to take screenshots on your Acer Laptop. However, these tools are not the most advanced image editing software. It can only do some basic screenshot tasks like cropping and re-sizing screenshots. So, you can download a third-party app that lets you capture high-quality screenshots on your Acer desktop.
iTop Screenshot is a free and powerful screenshot utility that enables users to quickly capture, annotate and share screenshots of any selected area.
It offers various screenshot modes that allow you to capture any selected area, window or full screen and easily pin them to the desktop, copy them to a clipboard or save them elsewhere. Its scrolling screenshot feature is unique and rarely seen in other competitors’ products.
In just a few simple steps, you can easily customize, shoot, edit, save and share all the photos you take with iTop Screenshot. It will be a convenient companion for different occasions. So taking screenshots for movies, games, webinars, lectures, websites, folders, files and more, will be easier than ever.
All in all, with a simple interface and convenient hotkeys, iTop Screenshot can provide you with a fast and pleasant screenshot experience.
Step 1: Download the latest iTop Screenshot.
Step 2: Double-click the downloaded itop-screenshot-setup.exe to start the installation.
Step 3: Run the software and click the Capture button.

Then you can select the area to take a screenshot. iTop Screenshot supports Rectangle, Oval, Line, Arrow, Paintbrush, and Text to annotate and highlight your screenshots to make them clearer and more attractive.
Step 4: After you completed a capture, you can find the floating toolbar under the screenshot. Click the Save button to open the directory where you save the screenshot to.

Conclusion:
All in all, taking a screenshot on an Acer laptop is very easy, and you can easily do it within seconds by following the five methods given above.
More Articles:


