Now that you have figured out how to get or open the Snipping Tool on Windows 10, the next thing you are to do is learning to use it to take snapshots of Windows 10.
You are rather sure how to take advantage of the Print screen key and some physical button combo to save news, stories, etc. But each of them has their own demerits, for instance, the Print screen can only take full-screen snapshots.
On the contrary, as for the Snipping Tool on Windows systems, people are not so familiar with what it is and how to use it. In this case, this post emerged.
You can clearly see from the Snipping Tool window that there are only four tabs—New, Mode, Delay and Options.
Wondering how can it make snapshots for Windows 10? Let’s move on to learn more about the usage of snipping tool.
1. Snip Screenshots
Once you opened the Snipping Tool, click Mode to choose which snipping mode you would like to use to capture the snapshot.
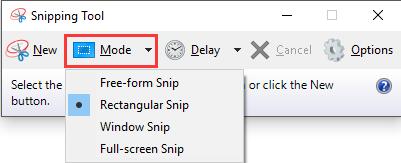
Here you can see from the screenshot there are four kinds of snips in Mode.
For Free-form Snip, you are able to draw a casual around the object you want to take snapshots.
For Rectangular Snip, use the cursor to draw a rectangle around the targeted object.
For Window Snip, just to choose to the window to snip.
For Full-screen Snip, the entire screen would be captured.
2. Screenshot a menu
With the Snipping Tool, it is also available for you to capture a snip of the menu on Windows 10, which cannot be finished by the Print Screen key.
First off, open the menu you would like to take a screenshot and then press Ctrl + PrintScreen to capture the whole screen.
At last, hit Mode in Snipping Tool and then select a type of cutting.
3. Annotate the Screenshots
After you have selected a snipping mode, there is a need for you to snip the picture.
You need to use the Pen to highlight what the importance is in this snapshot.
Here the screenshot is in the Rectangular mode with the drawing Pen.
4. Save the Snips
Soon after you took the snapshot with the Windows snipping tool, you must save it in the location you can find it the next time.
Just right click the snip to Save As and then set the name, file location for it.
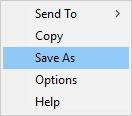
Or you can manage to Send to share the screenshots with others.
5. Remove the URL
It is only used when you want to snip a browser window.
In Snipping Tool, choose Options, which is on the right of the window.
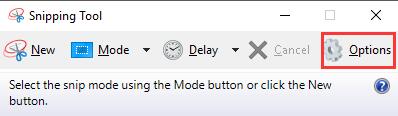
Then uncheck the box for Include RUL below snips (HTML only).

Here you can see it is also accessible to Hide instruction text, Prompt to save snips before exiting, change Ink color, etc.
On that occasion, you can make full use of the Snipping Tool to capture snips on Windows 10.
More Articles:
How to Open Microsoft Paint on Windows 10