If your Kyocera printer is not printing or responding after upgrading from Windows 7 to Windows 10, there is much need for you to update the Kyocera printer drivers. Normally, the corrupted or outdated Kyocera printer driver is the main cause of many Kyocera printer issues.
Now try one of the following ways to install Kyocera drivers on Windows 10, 8, 7.
How to Update Kyocera Printer Drivers on Windows 10?
You can download or update Kyocera printer drivers with reference to the following steps.
Methods:
1: Update Kyocera Printer Driver Automatically
2: Update Kyocera Printer Driver in Device Manager
3: Update Kyocera Printer Driver Manually
Method 1: Update Kyocera Printer Driver Automatically
As users reported that it is hard to find the right Kyocera driver by oneself, you can try to turn to Driver Booster. Driver Booster is capable of scanning, downloading and installing the Kyocera printer drivers on Windows 10. If you happen to Kyocera printer not printing or not waking up, Driver Booster will quickly get rid of the Kyocera printer issue by virtue of updating the Kyocera drivers.
1. Download, install and run Driver Booster.
2. Click the Scan. Then Driver Booster will scan all the device drivers on your PC for the corrupted, missing, and even faulty drivers, including Kyocera printer drivers.

3. Locate Printers from the search result and then Update the Kyocera printer driver.
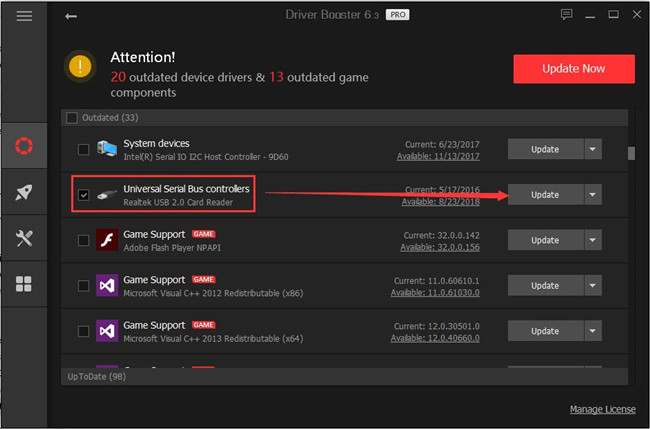
In a large sense, Driver Booster will automatically install the driver for your Kyocera printer, such as Kyocera Universal printer driver, Kyocera 3550ci driver, and Kyocera taskalfa 1800 driver.
You can check whether the Kyocera printer not responding on Windows 10 has been resolved or not.
Method 2: Update Kyocera Printer Driver in Device Manager
On another hand, you can still take advantage of Windows tools. Here in order to get the latest Kyocera printer drivers, Device Manager is always ready for you.
1. Open Device Manager.
2. Expand Printers, and then right click the Printer driver to Update driver.

3. Choose to Search automatically for updated driver software.
You will be observing that Device Manager is searching for the driver for Kyocera printer online. If there is any, it will prompt you to install Kyocera printer driver on Windows 7, 8, 10.
Method 3: Update Kyocera Printer Driver Manually
Lastly, for Kyocera printer users, it is up to you to download or update Kyocera drivers from Kyocera site. Although it requires skills and patience, most of you can find the drivers you need.
Nevertheless, Prior to that, it is wise to figure out your PC system is running on 32-bit or 64-bit. You can check your system type by righting click This PC and then opening the Properties. And here is a tutorial about how to check computer specs.
Here this PC is on Windows 10 64-bit operating system. You are supposed to bear your system type in mind in order to install the right Kyocera driver for Windows 7, 8, 10.
1. Navigate to Kyocera official site.
2. Select the Country or Region you are in and then hit Download. Here choose the United States.
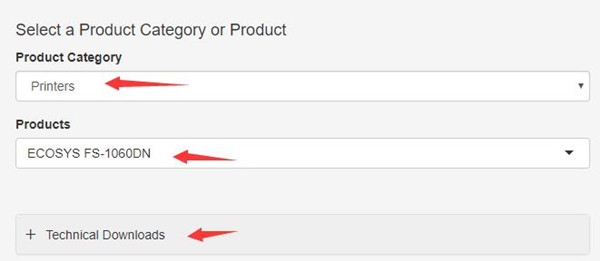
3. Then pick out Printers from Product Category, ECOSYS FS-1060DN from Products.
4. At last, click Technical Downloads to get all the available downloads for your Kyocera printer model.
5. Under Technical Downloads, choose Drivers.
6. In Driver searching result, decide to Download the Kyocera driver you need. Here for this Kyocera printer model, KX Print Driver and Kyocera XPS print driver are available.

7. Follow the on-screen instructions to finish installing the Kyocera printer drivers on Windows 10, 8, 7.
Upon getting the compatible or latest Kyocera driver, the Kyocera printer won’t stumble upon not printing error.
In a word, all these three ways in this post are able to download or update Kyocera printer drivers on Windows 7, 8 10. But one of them will be a perfect match for you.

