When attempting to launch Minecraft Java on PC, players may encounter an error warning: “GLFW error 65542: WGL: The driver does not appear to support OpenGL. Please make sure you have up-to-date drivers.”, resulting in them being unable to play the game. If you have the same problem, don’t worry because we will teach you how to fix OpenGL while playing Minecraft.
This post will analyze and determine the possible causes of this error and provide 7 effective ways to quickly resolve GLFW error 65542 WGL on Minecraft.
What is Minecraft GLFW Error 65542?
OpenGL (Open Graphics Library) is a cross-language, cross-platform application programming interface for rendering 2D and 3D graphics. For Minecraft, OpenGL is responsible for reducing the rendering load on the system in an attempt to make the game run faster and smoother on the computer. Because of its advantages, most players prefer to keep this setting enabled, even after knowing that it can cause errors.
Minecraft GLFW error 65542 usually occurs when there is a missing OpenGL library or a problem with the graphics driver. The installed driver may be outdated or corrupt, or there may be a bug in the installed version.
Why does “the driver does not appear to support OpenGL” occur?
It appears that the driver does not support OpenGL when you try to start the Minecraft Launcher, and it will not open on your device. Minecraft GLFW Error 65542 can also occur when you try to open certain games or applications. Therefore, we outline some possible causes of the error in detail in order to resolve this error more effectively.
- Problems with OpenGL: OpenGL is a library used for rendering in most games and applications. According to several affected users, replacing openGL32.ll will fix the error.
- Corrupted or outdated graphics drivers: Another possible cause is an outdated or corrupted graphics driver, which often triggers Minecraft GLFW error 65542 (Driver does not support OpenGL).
- Faulty or broken shaders and mods: Shaders can drain your application’s resources. Also, they can interfere with other mods. Some mods are not compatible and can cause problems when installed together. This could also be the source of OpenGL errors on your computer.
Now, if you are wondering how to fix persistent OpenGL errors on your PC, follow the instructions we are going to share in this post. We have 7 solutions for you to try.
Solution 1: Update your Graphics Driver
As the error message indicates: The driver does not appear to support OpenGL — GLFW Error 65542 in Minecraft can be caused by outdated drivers. Drivers are critical and can get corrupted due to malware attacks or other reasons. If drivers are out of date, they may inhibit OpenGL functionality and cause errors. In this case, you can fix the error by updating the graphics drivers. Updating it has helped many users resolve the issue.
Driver Booster is a software that supports the automatic download and installation of drivers for PCs and laptops. It can automatically search for outdated, missing, and faulty drivers and install the latest version for you automatically. It helps you update drivers and game components without spending too much time and effort. This allows you to update drivers from its huge driver database containing over 8,000,000 devices of all kinds.
In addition to automatically finding and installing missing and outdated drivers for your PC, Driver Booster helps users detect and fix hardware-related errors or conflicts on their computer systems. It can smoothly boost your system by updating drivers and reducing system errors. Users can also easily grasp the current status of drivers on their computers and update them to ensure the smooth and proper functioning of all computer functions.
Step 1: Download, install and run Driver Booster on your Windows PC.
Step 2: Click the icon Scan.

Driver Booster will start to detect all the drivers on your PC and show you all the outdated and missing drivers.
Step 3: Check the Display adapters and click the Update icon next to the graphics driver.

Tips: You can also update all the drivers by one-clicking the Update Now on the top right.
Solution 2: Replace opengl32.dll File
GLFW Error 65542 can also be triggered by a missing opengl32.dll file. OpenGL32.dll is a file that references OpenGL, which is used by standard processes to render 2D and 3D graphics. If the opengl32.dll file is missing on your Windows 11/10 PC, the error will be triggered when you try to launch the Minecraft Launcher.
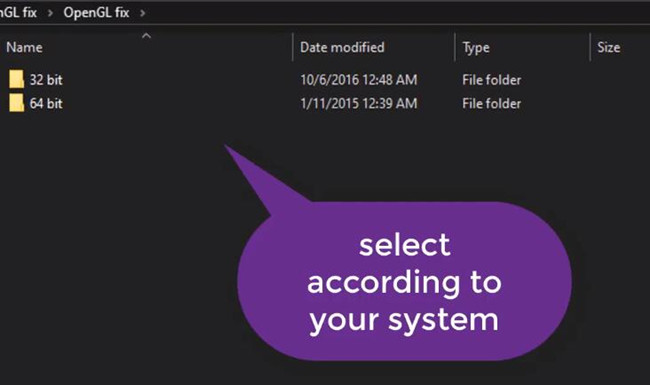
To resolve this issue, you can manually restore/replace the opengl32.dll file into the Java and JRE folders on the device.
Please do the following:
Step 1: Download DLL File Client, install and run it on your PC.
Step 2: Download Opengl32.dll files from DLL File Client.
Step 3: After downloading, extract the downloaded zip file to a folder.
Step 4: Right-click the Minecraft and select Open file location.
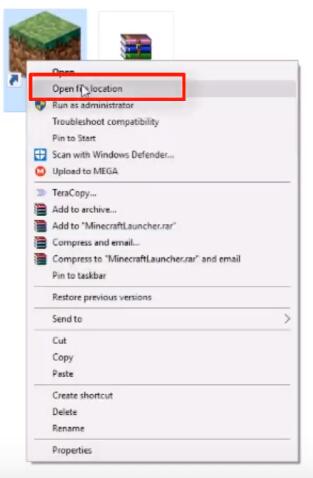
Step 5: Go to Minecraft > Runtime > Jre-x64 > bin.
Step 6: Paste the opengl32.dll to the bin folder.
Step 7: Once done, restart your computer and see if the problem is solved.
Solution 3: Disable or Remove Shaders and Mods
The beauty of Minecraft is its adaptability to user-created mods. You can expand the replayability and fun of the game by installing mods. The game’s shaders also allow Minecraft players to set various terrains and settings. In a way, they’re mini-mods that let you tweak game textures.
But this usually comes at the expense of the smooth running of the game. Some mods have not been fully tested and may cause glitches when added to Minecraft. Shaders can also use up the application’s resources. Therefore, to avoid malfunctioning of the software due to shaders and mods, we must delete or manage them.
Step 1: Press Windows + R to open the Run app.
Step 2: Type %AppData% and press Enter.
Step 3: For Shaders: Minecraft -> Resourcepacks -> Shaderpacks.
Step 4: For Mods: Minecraft -> Mods.
Step 5: Right-click the shaders or mods you want to get rid of and click Delete.
Step 6: Try playing the game to see if any OpenGL error occurs again.
Solution 4: Turn Off OpenGL in Minecraft
No matter what version OpenGL Minecraft uses, it will be enabled by default on your computer. Now, if you experience an error with this feature, you can turn it off through the settings. It’s better not to have this feature than to constantly face errors. To do this, you need to follow these steps:
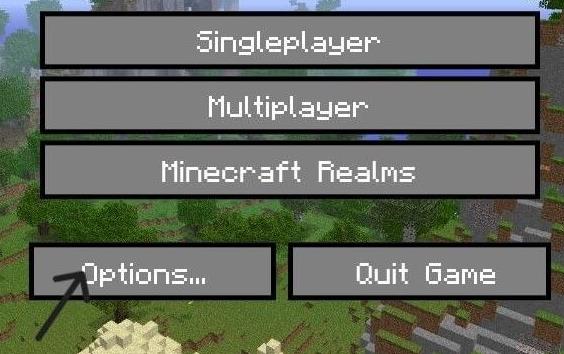
Step 1: Open Minecraft, then select Options and click Video Settings.
Step 2: Look for the Advanced OpenGL settings, then disable the feature.
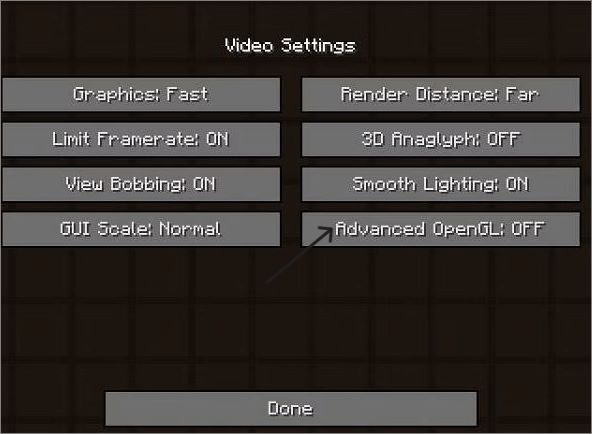
Step 3: Save the changes you’ve made, then restart Minecraft.
Solution 5: Preventing Minecraft from Showing OpenGL Errors
Minecraft video settings include stopping the game from showing errors in the chat box. If you’re annoyed by OpenGL errors, you can choose to prevent Minecraft from displaying them in chat. You can turn this setting off by following the instructions below, but this does not mean that you fix the error successfully.
Step 1: Launch Minecraft, then click on Options.
Step 2: Now, go to Video Settings and click Others.
Step 3: Select Show GL Errors, then set the feature to OFF.
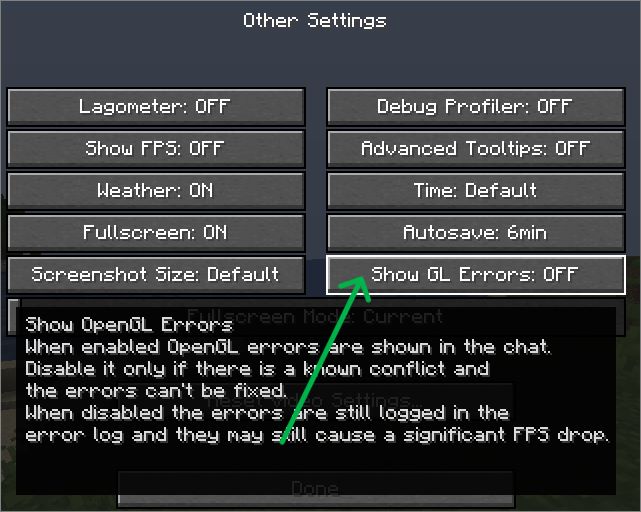
Step 4: Save the changes you’ve made, then relaunch Minecraft to see if you won’t see the OpenGL error again.
Solution 6: Uninstall DisplayLink
According to reports, the DisplayLink graphics driver conflicts with Minecraft Java and may be the culprit for this error of the driver does not appear to support OpenGL—GLFW Error 65542. In this case, to rule this out, if you have a DisplayLink driver installed on your system, you can see if that helps by uninstalling the program. Otherwise, try the next solution.
Step 1: On your keyboard, press the Windows logo key and R at the same time to open Run box.
Step 2: Type appwiz.cpl and press Enter to bring up the Programs and Features menu.
Step 3: In the list of programs you’ve installed, locate the DisplayLink Graphics driver.
Step 4: Then right-click on it and click Uninstall.
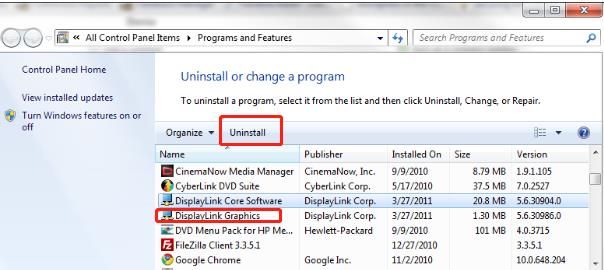
Step 5: Follow the on-screen instructions to uninstall it completely.
Step 6: Restart your computer and re-launch Minecraft and see if it runs properly this time.
Solution 7: Uninstall and Reinstall Minecraft
If none of the solutions above resolve your issue, uninstalling and reinstalling the Minecraft game is a last resort at the cost of losing all your Minecraft user data. This will delete all shaders, mods, and corrupted files for the game, which means you’ll have to start over. To continue, please follow the steps below:
Step 1: Type control in the search box and select the Control Panel app from the Best match.
Step 2: Scroll down and click on Programs and Features.
Step 3: Then a list of installed programs will be shown here. Right-click the Minecraft program and select the Uninstall option.
Step 4: Follow the on-screen prompts to fully uninstall Minecraft.
Step 5: Go to the official site to download Minecraft again.
Step 6: Follow the on-screen instruction to reinstall Minecraft on your PC.
Conclusion:
By now, you know all the solutions for GLFW error 65542 WGL when opening Minecraft on Windows 7, 8, 10 and 11. Hope the above seven solutions can help you solve this error smoothly.
More Articles:
Fix Minecraft Keeps Crashing Windows 11, 10 (2023 Update)
Solved: Unable to Update the Minecraft Native Launcher (2023 Update)