The surface pro is a line of 2-in-1 laptops produced by Microsoft. It is a hybrid device that can be used as a laptop and a tablet, and a great choice for many office workers and college students.
If you are a surface pro user, you may have the need to screen capture on your surface pro for communication, problem-solving, and documentation purposes. But how to screen record on surface pro?
Here in this post, we will offer five different approaches to help you record your screen on surface pro. Some of them are native to surface pro with Windows 10 / 11, others are competent third-party screen recording tools. Read on and find the best solution for yourself.
Can you screen record on Surface Pro?
Yes.
Surface Pro 4 and all the later versions (Surface Pro 7, Surface Pro 8, Surface Pro 9, Surface Pro X, etc.), all come with Windows 10 or 11 operating systems. It offers built-in screen recording tools, and you can capture videos on your Surface Pro directly.
Apart from the preinstalled recording tools on your surface pro, there are a bunch of recording tools in the market as well. They will offer extended recording features and help you capture your surface pro screen effectively.
To learn more, here’s our step-by-step guide on how to screen record on surface pro in different ways.
Way 1: Screen recording Surface Pro with built-in Windows Game Bar
Because Microsoft surface pro is based on the Windows system, one of the easiest ways to record your screen is by using the built-in recording tool Xbox Game bar.
Available in Windows 10 and 11, the Xbox Game Bar video capture tool is designed to record gameplay on your surface pro. But it’s a versatile tool in that it will capture just about any other type of your screen activity.
However, Game Bar has a few drawbacks. It only works within a single application at a time, and it can’t record your Windows desktop or File Explorer either.
If you want to screen record a series of task steps using multiple programs, or if you need to demonstrate anything using the Windows start menu, see Way 2 directly.
How to screen record with Xbox Game Bar on Surface Pro
1. Press Windows key + G to launch the Game Bar.
2. Hit the Record button or simultaneously push the Windows + Alt + R keys on your keyboard to start recording your Surface Pro screen.

3. A timer will appear in the upper-right corner of your screen once the Game Bar begins recording the Surface Pro screen.
4. Hit the Stop button or repeat the Windows + Alt + R keyboard shortcut to end the recording.

5. The captured footage will be stored in your Surface Pro’s Videos folder and within the Captures sub-folder.
Way 2. Record on Surface Pro with Screen Recorder (Recommended)
A professional surface pro screen recorder gives you powerful recording functions to capture, annotate, and share what’s on your screen.
iTop Screen Recorder is such an ideal recording tool that records both video and audio on your Surface Pro (suited for all Windows operating systems too) without any limitations.
Offering the best service to record screen on Surface Pro, iTop Screen Recorder is with high-definition visual performance and without lagging on the frame. It can capture videos on Surface Pro in customized sizes with no time limits and no watermark.
Better than Game Bar, iTop Screen Recorder offers a built-in advanced editor, so that you can trim, split and combine the recorded video tracks in a few clicks.
What you can get from iTop Screen Recorder:
- Flexible screen capture with audio
- Record screen with no time limit and no watermark
- Capture screen in 4K graphic quality
- Support various output and convert formats
- Edit videos after recording
Steps to record screen on surface pro with iTop Screen Recorder
1. Download and install iTop Screen Recorder, then launch it to proceed.
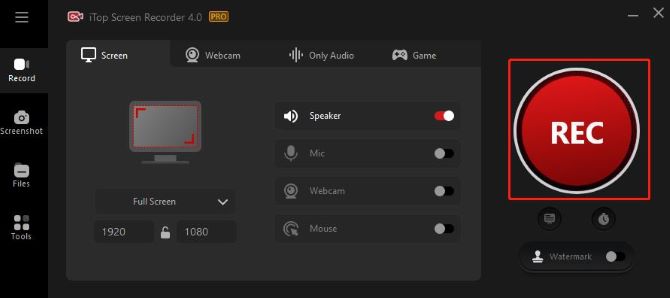
2. Select either full, half, or a specific area of the window for recording on Surface Pro screen.

3. Customize the microphone, speaker, and camera settings according to your wish.

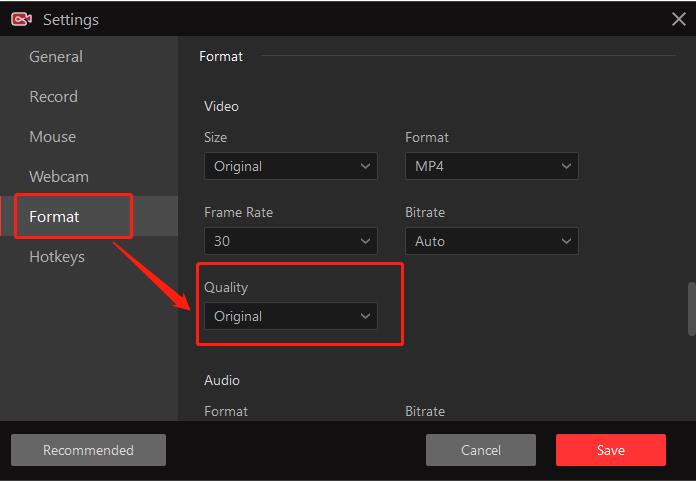
4. Different settings can also be altered if you want to change the graphic and audio quality of the video. Select settings (three lines on the top left), and click format > quality > original to record screen of Surface Pro with high-quality.
5. Use the F9 hotkey to start recording or hit the big REC button. It will start after a countdown of 3 seconds by default.
6. You’ll see a red control bar appear on the bottom right corner of your screen. Click the pause icon to temporarily stop and click stop (the red square icon) to finish recording on Surface Pro.

Check the recorded video in Files > video. You can right-click the video, and select open file location to find out where it is stored on your Surface Pro.
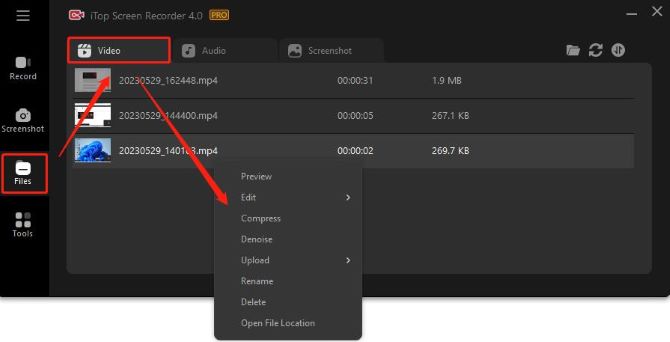
Right-click the video and select edit if you need to cut, trim, or add visual effects. After that, you can share the video with your friends or watch it offline.
Recording video on surface pro with iTop Screen Recorder is simple and easy. It is suitable for people who are not that skilled at laptop techniques, and no complex operations are required.
Tips: If you want to capture screen on your Surface Pro for just a few minutes without downloading and registration, iTop online video recorder is a handy tool to help you out.
Way 3. Screen capture on Microsoft Surface Pro via OBS Studio
For a safe and free screen recorder on surface pro, OBS studio is another good option.
As a free, open-source tool, OBS studio enables you to record meetings, video calls, presentations, games, and live broadcasts on your Surface Pro screen. In addition to this, you can edit, trim, cut, merge, and delete some sections of the video.
However, it is a little difficult for novices because of its complex user interface. If you are a beginner, you may find OBS studio a little bit complicated, and are likely to spend a lot of unnecessary time on it.
Steps to record screen on surface pro with OBS studio
1. install OBS studio on your Surface Pro and go through the below-mentioned steps.
2. Open OBS studio in your Surface Pro.
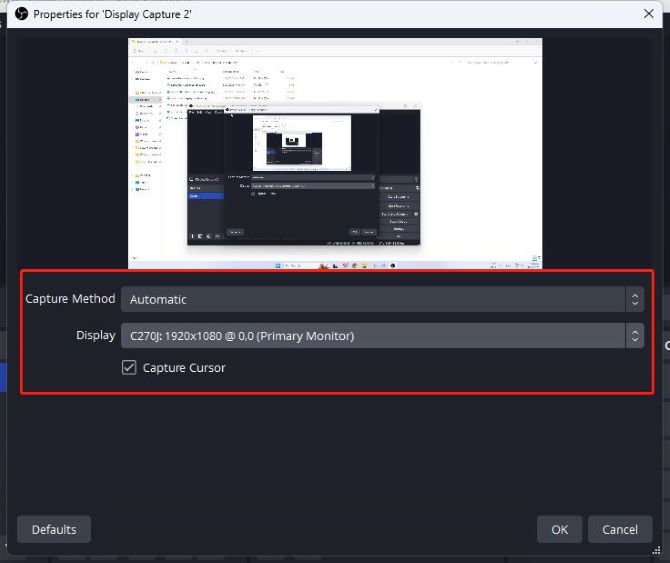
3. In the Sources window, click the “+” sign. Then select Display Capture. Now you can record your Surface Pro screen even if you are switching between apps.

4. Adjust a few settings before starting your recording. With multiple monitors, select the one you want to record, adjust the mouse cursor setting, and open the toggle switch for microphone recording.
5. Select Start Recording from the right Controls panel.
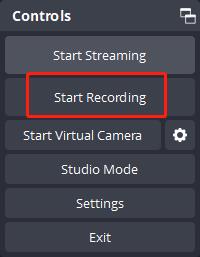
6. When your screen recording on Surface Pro is finished, click Stop Recording in the bottom right corner.
7. You can find the recorded video in your Surface Pro’s Videos folder.
Way 4: Record video on Surface Pro laptop via Microsoft Stream
Microsoft Stream is another powerful tool that allows you to effortlessly capture video recordings on your surface pro.
Microsoft Stream has smooth integration with other workplace applications, such as Sharepoint, and empowers you to quickly share your recorded footage with colleagues and teammates in no time.
However, you can only create short screen recordings of up to 15 minutes using Microsoft Stream, and camera recording is not available when recording a window or browser tab.
To record your surface pro screen, you must use the latest Microsoft Edge or Google Chrome on Windows 10 or 11.
How to capture screen on surface pro with Microsoft Stream
1. Open Microsoft Stream in your Surface Pro browser and sign-up / sign-in.
2. Once logged in, click the “+” icon in the screen’s top right corner to start a new recording.
3. Select Record Screen, and you will be taken to the recording settings. Here, you can customize the resolution, audio input and output, and camera settings to your preference.

4. When everything is set, press Start to capture your Surface Pro screen.

5. To pause or end the recording at any time, you can use the green bar on the top of the screen.
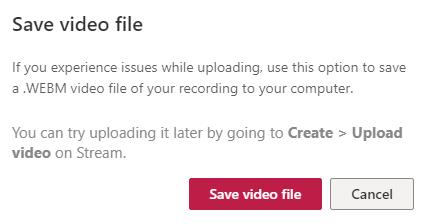
6. When you have finished, click Save to complete the recording and save it to your Microsoft Stream account.
Way 5: Screen record on Surface Pro using Snipping Tool
For Surface Pro with Windows 11 operating system, its users will have an additional option to record their screen: Snipping Tool. You will find the Snipping Tool a much easier built-in option to use over the Game Bar.
To record your screen in Windows 11 with the Snipping Tool, you’ll need a certain build for the OS. To check, go to Settings > System > About. In the Windows specifications section, the build should be 22621.1344 or higher.
If you do not qualify, head to Windows Update to snag the latest updates for the OS, then to the Microsoft Store to grab the latest updates for your Store apps.
How to screen recording on surface pro with Snipping Tool
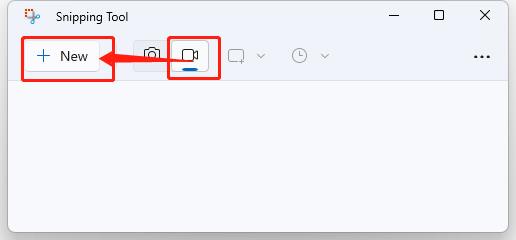
1. Launch the Snipping Tool by selecting it from the start menu or by using the Win + Shift + S shortcut.
2. Click the camera icon on the toolbar, then click the New button.
3. A small recording toolbar will pop up at the top of the screen.
4. Select the portion of the screen that you want to capture, then click the Start button on the toolbar.
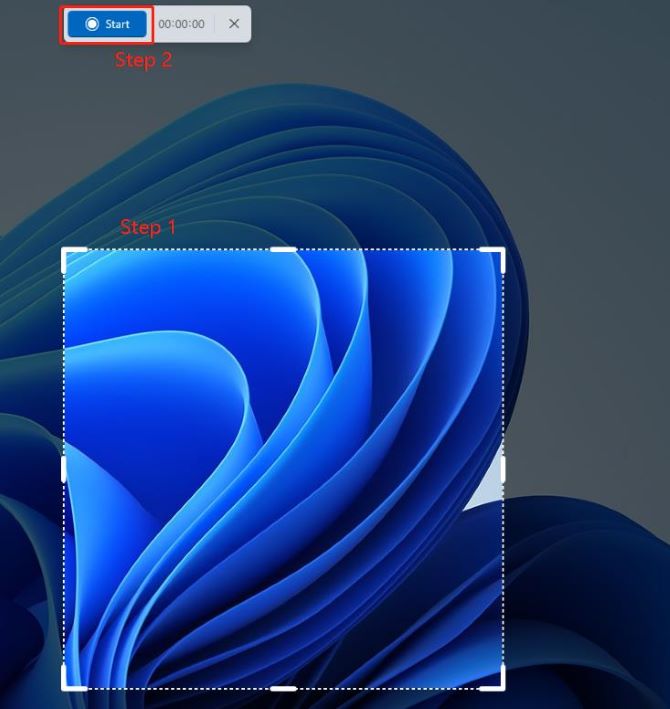
5. You can hit the Pause button to stop the recording, then resume when you are ready. When finished recording on your Surface Pro, click the Stop button.
6. A video of the activity you just captured appears on the screen. Click the Save icon to save the recording on your Surface Pro as an MP4 file.
Tips: you can also take a screenshot on your Surface Pro by pressing the Windows logo key + Shift + S.
However, this new functionality is limited to Windows 11. If your Surface Pro is still on Windows 10, you’ll have to stick to the Game Bar. Or you can screen capture on Surface Pro with a third-party screen recorder software.
In this post, we have highlighted five excellent ways to screen record on surface pro. You’re welcome to pick one and try it out.
Among the available recording tools mentioned above, iTop Screen Recorder is our recommendation as it is a one-stop tool that allows you to screen record on surface Pro without limitations and even edit those videos to make them more eye-catching.
FAQs about how to screen record on Microsoft Surface Pro
A: Yes. Surface Pro can be screen recorded with the help of different Windows built-in recording utilities, such as Xbox Game Bar and Snipping Tool. Note that Game Bar is only available for Surface Pro with Windows 10 and 11 operating system, and Snipping Tools is limited to Windows 11.
A: If the intention of the recording is for personal use, you can record videos on your Surface Pro all you want. Yet, if you will distribute your recordings with copyrighted files, and it is for monetary purposes, then it is considered illegal.
A: Yes. Microsoft Surface Pro is built with an internal mouthpiece allowing users to record audio or speak using a video chat and video call session. Nevertheless, users can insert their external microphone to have better audio input.
A: If a keyboard is attached to your Surface Pro 4 and later version, you can use the keyboard shortcuts to take a screenshot of the entire screen or an active window. Press Windows + PrtScn key to capture the entire screen, and press Alt + PrtScn key to capturing an active window.
A: The best way to screen record on Surface Pro is to use a professional third-party screen recorder, which has no recording limitations and is easy to use. For example, you can use OBS studio, Bandicam, or iTop Screen Recorder to screen capture any content on your Surface Pro easily.
More Articles: