Have you ever encountered a series of problems such as your Zebra ZP450 printer not working on your PC? According to the report, the reason why most devices do not work is related to the drivers. Drivers are software that various devices on your computer rely on to function properly. Without these drivers, most of your devices will fail. Therefore, it is crucial for you to know how to update the latest drivers.
So, in this post, you will find 4 useful and effective methods to update your Zebra ZP 450 drivers, and also these methods apply to other devices’ update too.
# Method 1: Update Zebra ZP450 Drivers via Device Manager
Whenever Windows is updated, many drivers on your computer are automatically updated. However, if you need to install or update drivers manually, you can use Device Manager to do so.
Step 1: Type device manager on the Start menu search bar and click on the Device Manager.
Step 2: Double-click the Printer queues.
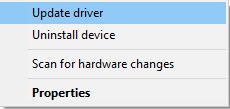
Step 3: Right-click on the Zebra ZP450, and select Update driver.
Step 4: Next, select Search automatically for drivers to go ahead with the update.
# Method 2: Update Zebra ZP450 Drivers automatically via Driver Booster (Recommended)
The driver update is the first feature of Driver Booster. It automatically scans all your computer’s drivers and reports which ones are outdated or missing. After that, you can download the latest version for the outdated version or the new version for the missing version with one click.
Driver Booster checks your drivers against a huge database of over 8 million drivers. You can use this feature to quickly update your Zebra ZP450 driver and improve its performance.
Now, let’s update it via Driver Booster.
Step 1:Download, install and run Driver Booster on Windows 11 or Windows 10.
Step 2: Click the icon Scan. Then Driver Booster will start to detect all the drivers, and it will inform you of the number of outdated drivers and not installed game drivers.

Step 3: Find out Zebra ZP450 Drivers and click the icon Update next to the driver.
# Method 3: Update Zebra ZP450 Drivers manually on the official site
Going to the official website to download the latest driver is recognized as the safest and most reliable method. Therefore, if you want to reassure yourself, you can choose to go to Zebra’s official website to download the latest version of ZP450 Drivers.
Step 1: Go to Zebra’s official website.
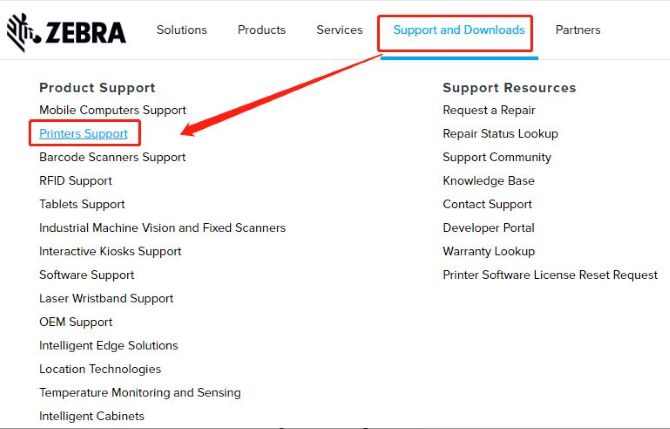
Step 2: Click Printers Support in the Support and Downloads section.
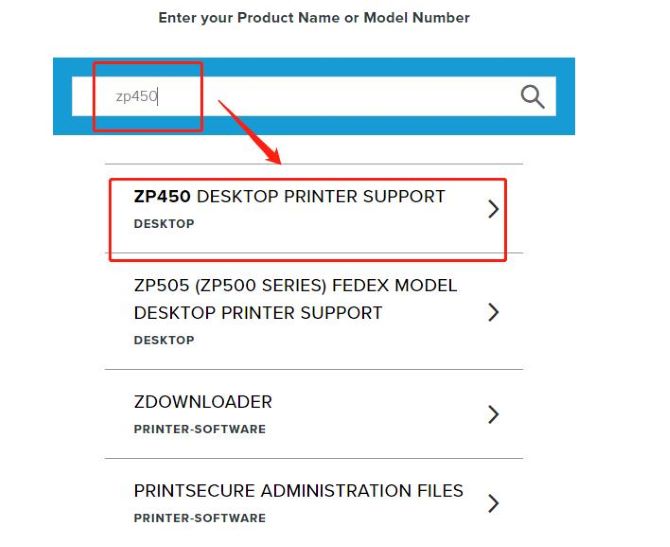
Step 3: Type ZP-450 in the search box and press Enter.
Step 4: Click on the choice ZP-450 Desktop Printer Support.
Step 5: Choose the driver package that fits your PC.
Step 6: Click ACCEPT AND BEGIN DOWNLOAD NOW to immediately begin downloading the driver file.

Step 7: Run the downloaded file and follow the instructions to finish the installation.
Step 8: Restart your computer.
# Method 4: Update Zebra ZP450 Drivers via Windows Update
Usually, the built-in Windows Update service should keep all device and system drivers up to date, so you should never have to worry. If you still want to update Zebra ZP450 Drivers solely, you can also update it via Windows Update.
Step 1: Open Settings.
Step 2: Click on Update & Security > Windows Update > Check for updates.
Step 3: Click the View optional updates option.
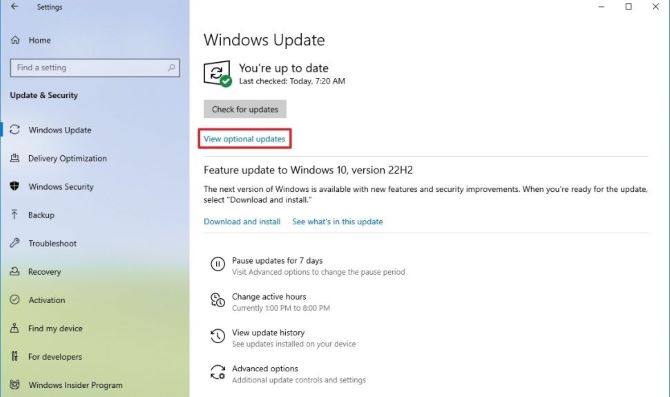
Step 4: Click the Driver updates tab.
Step 5: Select Zebra ZP450 Drivers.
Step 6: Click the Download and install button.

After completing these steps, the updated driver will be automatically downloaded and installed on your device. Many device drivers require a restart to complete the installation. So if necessary, the last step must be restarting your PC.
FAQ about Zebra ZP450 Drivers
Step 1: Go to the printer’s official website.
Step 2: Select the Operating System(OS) your PC is and then select the driver to be downloaded.
Step 3: Once downloaded, open the location of the driver file and then extract it.
Step 4: Connect the printer’s USB cable to your device(computer or laptop)and make sure it is fully connected.
Step 5: Open the driver file and start running.
Step 6: Follow the instructions to complete.
Step 7: Restart your PC.
Firstly, hold down the forward feed button on the front panel. The indicator light will start a flash sequence: 1, 1-2, 1-2-3, and so on. And then when it flashes four times, release it, which can reset the printer to factory defaults. Lastly, wait for the light to go solid green to indicate that the reset is complete.
Step 1: Launch Device Manager by pressing Win + X in Windows 11/10.
Step 2: Expand Network adapters, right-click on the Zebra ZP450 driver and choose Uninstall device.
Step 3: Restart your PC.
Step 1: Load the printer with the labels for your application.
Step 2: Power on the printer.
Step 3: Press and hold the Feed Button until it flashes quickly two times then release the Feed Button (it is a flash sequence, you can see one flash, then two quick flashes, and after that release the Feed Button).
Step 4: Allow the printer to complete feeding labels and print sensor profiles.
Step 5: Now the printer is calibrated.
Step 6: Press the Feed Button and one label should be issued each time.
Yes. The Zebra ZP450 is very fast, printing 5 inches per second. Optional Upgrade: Ethernet (Cat5/RJ45) & Wireless (WiFi).
More Articles:
Download Samsung Printer Drivers on Windows 10, 8, 7