Drivers are essential for a computer to operate normally. So it is an indispensable step for us to download Lenovo drivers for our computers, and meanwhile, there may be some troubles with our drivers when we upgraded our Lenovo computers to Windows 10. So in this way, updating drivers may be a good solution to solve the problem.
Now, this post will introduce three ways to download and update drivers for Windows 10 in detail, especially, it will mainly tell you the methods to download and update Lenovo drivers, which can also be applied to other brands of computer, including Lenovo WIFI driver, Lenovo camera driver, etc. for Windows 10 32-bit and 64-bit.
Methods:
- 1: Update Lenovo Drivers in Device Manager
- 2: Download and Update Lenovo drivers Automatically
- 3: Manually Download and Update Lenovo Drivers
Method 1: Update Lenovo Drivers in Device Manager
First off, it is available to download or update the Lenovo drivers in Device Manager, from which you can find drivers for Lenovo laptops, desktops, or tablets without using sources outside the system.
1. Open Device Manager.
2. Then locate your Lenovo driver and right click it to Update driver.
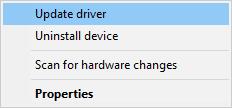
3. Choose to Search automatically for updated driver software.
If Device Manager can find out the up-to-date Lenovo drivers for Windows 10, it will install the driver.
Method 2: Download and Update Lenovo Drivers Automatically
It is strongly recommended using this way for it is so simple that it can save you much time and energy. In fact, this way refers specifically to the use of Driver Booster, which is a perfect tool for downloading and updating drivers. It will help you update Lenovo laptop drivers or any other drivers automatically from its 3,000,000 driver databases.
1. Download, install and run Driver Booster on your PC.
2. Hit Scan button to scan your drivers which need to be downloaded and updated.

3. Pinpoint the Lenovo drivers and then Update it or them.
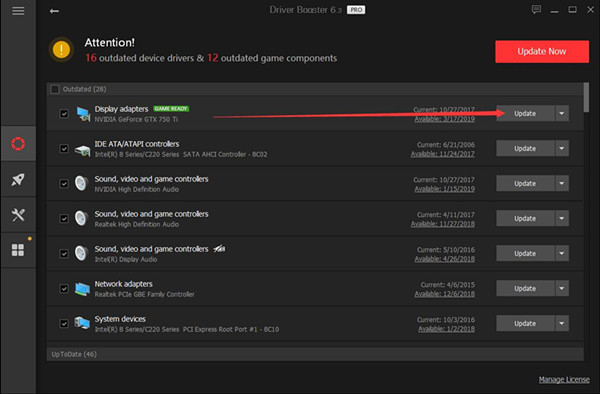
4. Or if there are too many Lenovo drives to be updated, choose to Update Now to get all drivers updated.
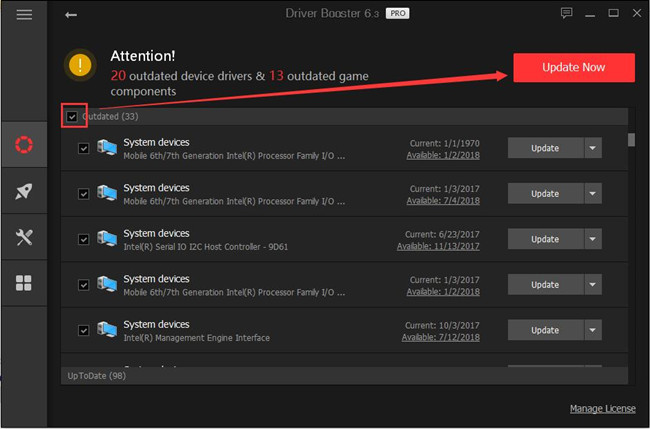
These are all we should do to download and update drivers automatically. We can see that if we can employ the tool – Driver Booster, with only several clicks, we can download and update Lenovo drivers easily.
Method 3: Download and Update Lenovo Drivers Manually
There are also some people who want to download and update Lenovo drivers on their own, in other words, by downloading and updating drivers from the official site of Lenovo. You can refer to the steps below.
1. Go to Lenovo official download center. An interface will appear as below. And the official site will help detect your laptop or desktop model automatically.
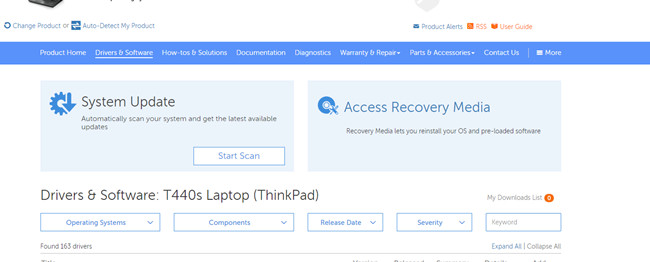
2. Fill in the chart of the properties of your computer for the purpose of finding the compatible drivers.

From the top of the site, we can know what our own computer model is, either by checking our computer in properties or by automatically detecting.
Here take T440s Laptop (ThinkPad) as an example, and as for the operating system, choose Windows 8.1(64-bit), and for Component, fill in “audio”. Besides, there are other options you should fill in, which depend on the actual situation.
3. Download the drivers as you want.
All the above steps completed, the official site will show you all the drivers you can choose. All you need to do is to click the Driver and click the Download button as the image below. For example, here download the Lenovo keyboard driver as follows.

4. Install the drivers downloaded before.
After you have downloaded the drivers on the official site, there will be installation package in Your Computer, you only need to install it on your computer and the process of downloading or updating drivers will be completed completely.
This is the manual way to download and update Lenovo drivers which seems to be a little complicated.
Above all, whatever way you will choose to download and update Lenovo drivers for Windows10, in my personal view, I recommend you to use the automatic way which is a great convenience.
More Articles:
2 Ways to Download HP Drivers for Windows 11/10

