In April 2018, Microsoft has released an updated Windows 10 new version, namely Windows 10 1803. Many users are expecting to experience this Windows update, whereas Windows 10 update 1803 fails to install.
Some people complained that even after downloading this Windows 10 new update when the update makes your PC restart, but to find the computer is stuck at Windows 10 logo in the process of Windows 10 update installation.
In this case, what they can do is to force shut down Windows 10 by pressing the power switch. Hence, feature update Windows 10 1803 version takes forever.
Others denoted that when installing this feature update, Windows 10 just goes back to the previous version, like Windows 10 1709 and 1703. In this way, Windows 10 1803 0xc1900101 pops up and you failed to install Windows 10 feature.
How to Fix Feature Update to Windows 10 Version 1803 Failed?
For some users, even if you stumbled upon Windows 10 v1803 fails to install or nothing happened after checking for updates, there are still some ways to help you get the new update you want.
Whatever the updating error is, Windows update version 1803 failed 0x8024200d or 0x80070002, attempt to fix problems completing the installation of Windows 10 with the solutions below.
Solution 1: Run Windows 10 Update Troubleshooter
If you come into Windows 10 update won’t install, the first thing you can turn to is making use of Windows Update troubleshooter. It is an inbuilt tool which is capable of detecting the problems with Windows 10 feature update.
1. Go to Start > Settings > Update & Security.
2. Then under Windows Update, locate Windows Update and then hit Run the troubleshooter.
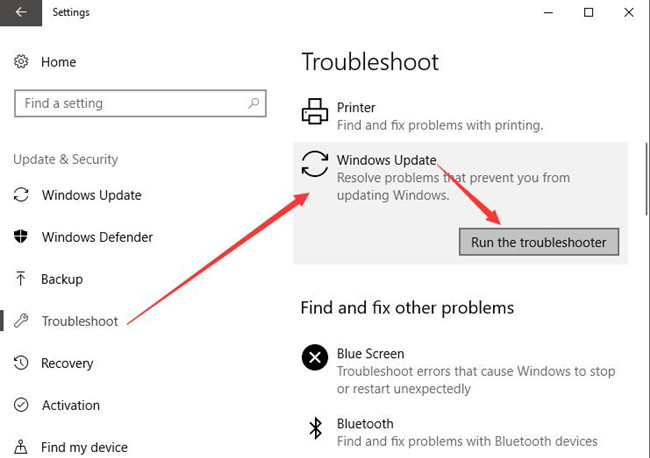
Shortly after that, Windows 10 troubleshooter for Windows Update will begin searching for issues on your PC and fix them for you if possible.
Solution 2: Delete the SoftwareDistribution Folder
Generally speaking, the downloaded Windows 10 feature update 2018 is saved in the folder of SoftwareDistribution. But when the feature update for Windows 10 has not installed correctly, the content in this folder won’t be synchronized on Windows 10.
So if you experienced Windows 10 failed to update to version 1803 due to the erroneous installation process, it is quite necessary to try to manually download it again to see if this time the 2018 Windows 10 update can be installed on your PC.
In the situation where you have got the downloaded Windows 10 v1803 before, but failed, you need to delete the previously downloaded folder and manage to re-try again.
Before you move into the folder to get rid of the Windows 10 feature update 1803, you need at first stop the Windows update service.
1. Press Windows + R to elevate the Run box and enter services.msc in the Run box. At last, hit OK to go to Services window.
2. In Services window, scroll down to find out Windows Update and then right click it to Stop it.
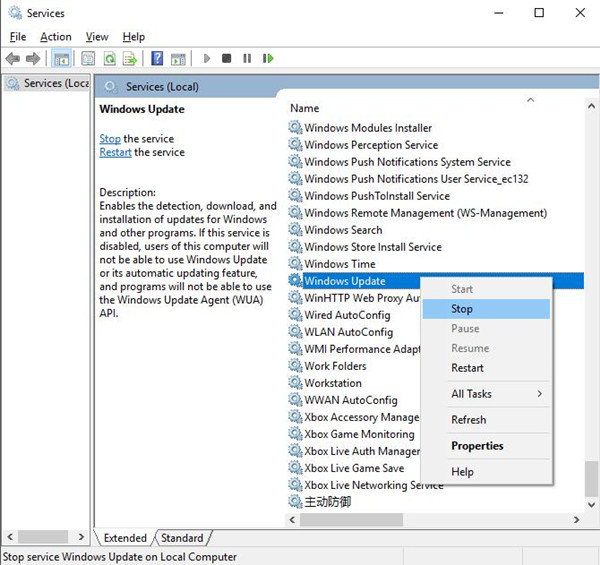
Or here you can also try to set the Startup type of Windows Update service as Disabled in order to end the service.
If you have stopped Windows Update service, it is high time that you managed to locate the delete the Windows 10 1803 setup which has not yet been installed properly.
3. In File Explorer, go to C:\Windows\Softwaredistribution.
This Softwaredistribution folder is where the Windows 10 feature update 1803 has been stored.
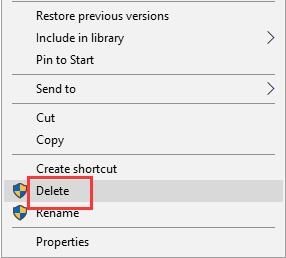
4. Right click the Softdistribution folder to Delete it to remove the Windows 10 v1803 package in it.
In other situations, to clear up the SoftwareDistribution folder, it is also feasible to run certain commands in Command Prompt as this folder is in the charge of Windows Update Agent (WUAgent).
In Command Prompt, enter the commands below and press Enter to run these commands one by one to delete the SoftwareDistribution folder.
net stop wuauserv
net stop bits
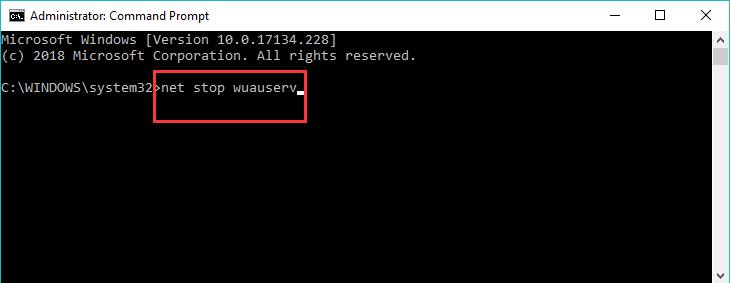
Once you have removed the SoftwareDistribution folder on Windows 10, you can choose to update to 2018 Windows 10 by moving ahead to update to Windows 10 April 1803.
Solution 3: Check Windows 10 Update
If failure to install Windows 10 update version 1803 happens to you and you have just deleted the folder, possibly you should check for updated to see the update v1803 works now.
Normally, after checking for update, Windows 10 April update 1803 can be successfully installed on Windows 10.
1. Go to Start > Settings > Update & Security.
2. Under Windows Update, click Check for updates.

In some cases, Windows 10 will find the updates and install them for you. Therefore, Windows update 1803 fails will be fixed as well.
Solution 4: Download Windows 10 Update 1803 Manually
Lastly, it is also available for you to download the Windows 10 feature update 2018 from Microsoft official site.
For some users, you are able to refer to the following steps to get the hang of downloading feature update to Windows 10 1803.
1. Navigate to the Microsoft official site.
2. On this site, Windows 10 April 2018 Update now available will come into sight. Click Update now.

Then go with the onscreen instructions to finish installing Windows 10 update 1803 version.
3. After that, click Run and the Update Now to install the Windows 10 update version 1803.
Hence there will be no more the error that feature update to Windows 10 April 1803 failed on your PC.
To sum up, by virtue of this passage, you would be entitled to fix updating to Windows 10 version 1803 fails on Lenovo, Dell, HP, etc. By troubleshooting this upgrading error, either by the troubleshooter or re-downloading April Windows 10 1803, you can accomplish this task easily.
More Articles:
Fixed: Potential Windows Update Database Error Detected
We Couldn’t Install Some Updates Because the PC Was Turned Off
Fixed: Windows Could Not Complete The Installation Windows 10 Update

