Undeniably, Java is not frequently used by users nowadays. And it is also said that older versions of Java on PC would pose various threats to the system. Or for some people, you may need Java for a moment, for instance, Java application is required to install the NVIDIA graphics card drivers.
But after that, you just want to remove Java from Windows 10. As per user reports, many of you hope to uninstall Java 11 or 8 on Windows or Mac. What Java version you feel like uninstalling, ways below can help you get rid of Java completely and permanently.
How to Uninstall Java on Windows 10, 8, 7?
To avoid risks brought by Java, especially the outdated Java versions, you may as well completely remove Java from Windows or Mac. And it is worth mentioning that if you do need Java, you can download a newer Java version (Java 8 (8u20 and above)), which would delete all older versions of Java from the system. Or if you hope to remove Java from your PC without leaving any trace, you can choose to uninstall Java manually or automatically via Java Uninstall Tool.
Methods:
Method 1: Uninstall Java Manually
If you prefer to delete Java on Windows 10, 8, 7 on your own, you can finish that with the following steps. While depending on different versions of the Windows system, the steps differ due to the different interfaces. Hence, you can turn directly to the procedure according to your system.
Uninstall Java on Windows 10:
You can completely get rid of Windows 10 Java in Control Panel.
- Open Control Panel.
- Try to View by Categories and then find out Programs > Uninstall a program.
- In Programs and Features window, scroll down to locate and then right click Java application to Uninstall it.
Reboot your PC if prompted. After that, as you can see, Java is nowhere to be seen on Windows 10.
Remove Java from Windows 8:
- In Control Panel, go to Programs > Uninstall a program.
- Locate Java and then hit Uninstall > Yes.
Delete Java on Windows 7:
- Open the Control Panel.
- Then find out Programs and Features > Programs.
- Click the Java app and then choose to Uninstall.
Therefore, you may have completely uninstalled Java from Windows 7, 8, 10 manually. And there will be no risks caused by the Java app. And you can also uninstall Java from Windows XP and Vista. Particularly, if you still need to use Java plugin on browsers, you can also try to enable Java in Chrome.
Method 2: Uninstall Java using Java Uninstall Tool
If you are not proficient in dealing with computer issues manually, it is also viable for you to make the best use of the Java removal tool, Java Uninstall Tool to help get rid of Java application for Windows 10, 8, 7, XP, Vista, Windows Server 2008 R2, Windows Server 2012. While prior to use this automatic Java removal tool, you need to pay attention to the following parts:
1. Ensure there is a network connection on your PC. Since this tool is offered by Java online, it is natural that you need to make sure the network works well to allow you to download it on your device. Besides, this tool needs to check updates for itself, so it would be better to let it run with a high-speed network.
2. This tool is designed for users to remove Java on Windows. Hence, if you wish to uninstall Java on Mac or Linux, you may have to achieve that manually (refer to Method 1 for similar steps on Mac or Linux systems).
3. This tool would remove Java versions 1.4.2 and above on Windows systems, so you need to manually delete versions of Java lower than 1.4.2.
4. You can select which Java versions are to be removed once Java Uninstall Tool scans the system for all Java versions installed on Windows.
5. Once you deleted a Java version via this tool, it can be retrieved from this tool, so you have to re-download it from Java archives.
With these basic understandings about the Java removal tool, it is time to use it to uninstall Java completely and permanently from Windows 10, 8, 7, etc.
Steps to get rid of Java with Java Uninstall Tool:
1. Navigate to Java Uninstall Tool webpage.
2. Click I Agree to the Terms and Want to Continue to Download this tool on your PC.
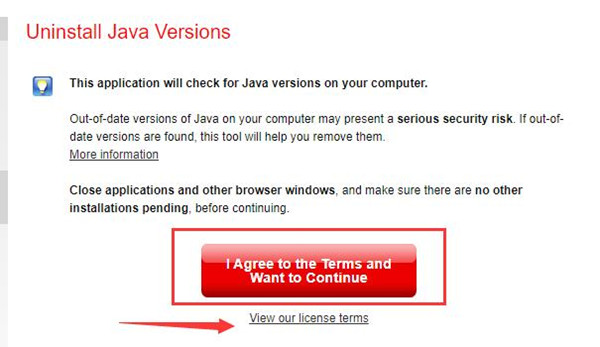
Here, you would better hit View our license terms to ensure you are determined to download it and this tool is safe and useful for you.
3. Hit the downloaded file to activate it.
4. Then in User Control Account (UAC) window, click Yes to permit this operation.
Then you can run this Java Uninstall Tool to check all the Java versions on your PC and then choose to uninstall the outdated or any version you don’t want by this tool.
Note: What if I encountered problems in using the Java Uninstall tool to uninstall Java from Windows? What if this tool failed to remove the Java version for me?
If there are any errors in applying this Java removal tool, try to reboot the system or re-download Java Uninstall Tool. If that could not fix Java Uninstall Tool not working issue, perhaps you have to manually remove it.
In a word, you can learn how to uninstall Java from Windows or Mac with references to this tutorial, either manually or automatically by the Java Uninstall tool. Just find a suitable way to remove Java traces from your system.
More Articles:
Fixed: Microsoft Visual C++ Runtime Library Error on Windows 10