Contents:
- Set a Program Priority Overview
- How to Set an Application to High Priority in Task Manager on Windows 10, 8, 7
- How to Set Priority Automatically?
- How to Set CPU Priority Permanently for a Program on Windows 10, 7?
Set a Program Priority Overview:
When you are opening too many programs and want one program to run faster than others, you can set this program to high priority than other processes, which will allocate system prioritizes resources to that process.
For example, if you want to type while watching the movie, then you can adjust the movie’s process, set it to Below Normal, so the system will make the foreground application high priority. In this way, we can fully let the foreground program occupy the remaining system resources, and achieve efficient utilization of system resources.
There is one thing you should know. A high priority setting can only be reflected when a Windows system finds a physical memory deficit and uses the memory cache.
In other words, if you only open a game such as Warcraft, you don’t open up other big resource-demanding software, it basically doesn’t matter; if you opened the Warcraft and other software that cost a lot of system resources, but you have only set high priority for Warcraft, system will allocate more CPU to this program, thus improving the running speed of the game.
How to Set a Program to High Priority in Task Manager on Windows 10, 8, 7
Besides setting CPU priority for foreground applications and background services, some people may want to allocate high priority to a specific program or game to make it get the best performance.
We know a third-party program or game is a foreground application. So how to set a single foreground program to high priority? You can use Task Manager to do it.
1. Righ-click taskbar and choose Task Manager to open it.
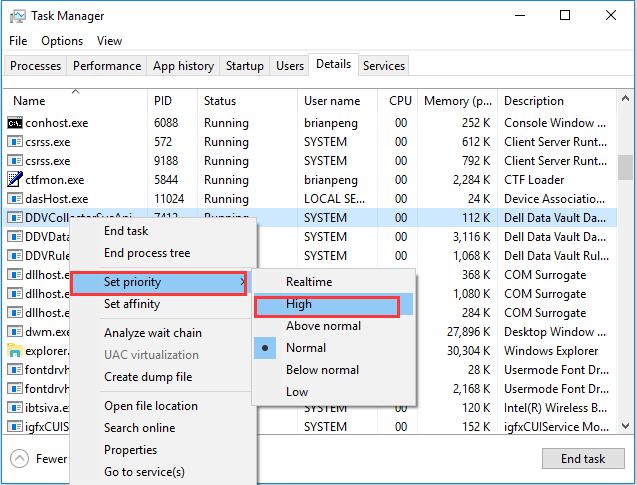
2. Go to Details tab, and find the program you want to set the high priority, then right-click it to set the priority as High.

Of course, you can also reset it back to normal or other Windows 10 CPU priority such as Above normal, Below normal and Low.
These steps are performed in Windows 10. If you are using the Windows 8 or Windows 7, some of the step may a little different.
Tips:
Except the Realtime process priority, others are easy to explain. So you can learn basic things about the Realtime Priority.
What is the Realtime priority? A Realtime priority thread is higher than all the other threads, and it can run all the time and will never be pre-empted by timer interrupts in the system. And it can only set with the administrator account.
If you use task manager to set the priority for a foreground program or a game, it is temporary. After you reboot the system, the program priority will return to the original status. So if you want to permanently set CPU priority for a program, you should use other ways.
How to Set Priority Automatically?
Apart from using task manager to configure priority for some processes, you can also run Advanced SystemCare to set a high or low priority automatically.
That is to say, even if your PC runs slowly and your games are stuck, you can try this tool to make it run at a high priority on Windows 10.
As an all-in-one system optimizer, Advanced SystemCare will allow you to end the process or set high, normal, and low priority just as what task manage works for you.
1. Download, install and run Advanced SystemCare.
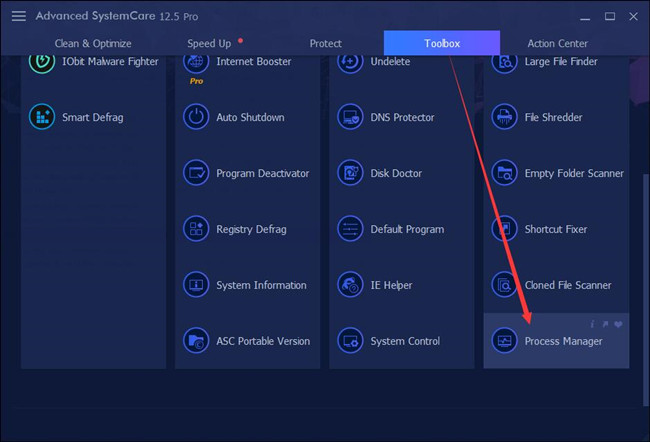
2. Then locate Tooolbox > Process Manager. Hit Process Manager to get it to run within the Advanced SystemCare.

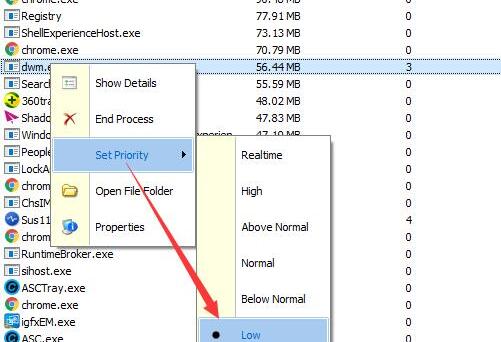
3. In IObit Process Manager, under the Processes tab, find out and right-click the process or service to Set High Priority.

Of course, it is up to you whether to make this process back to run at normal or low priority on Windows 10 with the help of Advanced SystemCare.
How to Set CPU Priority Permanently for a Program on Windows 10, 7?
Microsoft does not provide a way to help you set one foreground program priority to high permanently, so you should install the third-party software. There is much software which can fix this problem.
You can download Prio (Process Priority Saver), Process Hacker, Process Tamer, etc. And I use System Explorer. It is a powerful system checker and manager tool, and it is free, absolutely. It supports Windows 10, 8, 7.
1. Download System Explorer from here, install and run it on your computer.
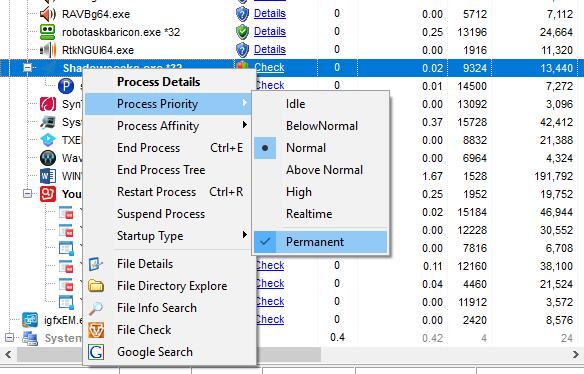
2. In Process tab, find the application, right-click it to choose Process Priority, then select Permanent.

If you want to change more applications’ priority, follow the above steps one by one. Of course, you can also set high CPU priority to prefer background services using this way.
So follow above methods to set up a program to high priority on Windows 10, Windows 8 and Windows 7 to make all the system resource running well.
More Articles:
Fix Windows Driver Foundation High CPU Usage Quickly
Fix WMI Provider Host High CPU Usage Issue on Windows 10
Fixed: Modern Setup Host High CPU and Disk Usage on Windows 10


