Contents:
How to Set Priority to Prefer Foreground Applications on Windows 10/11?
It is common that when running many programs or applications on Windows 10 or Windows 11, your PC goes to be slow or freezing.
Generally speaking, the programs you use on Windows 10 can either be foreground or background.
In this way, to improve the PC performance, you need to do processor scheduling, which is to say, to change CPU priority to prefer foreground applications.
What is Processor Scheduling?
Why are you advised to Processor (CPU) scheduling foreground and background programs on Windows 10 or Windows 11? For the Processor Scheduling is the service managing the priorities between foreground and background programs.
The more programs you would like to process, the slower the preferred applications are running on your PC. So to let the foreground applications have priority, you are to allocate processor resources for the foreground software in order to optimize the performance of applications for Windows 10.
How to Set Priority to Prefer Foreground Applications on Windows 10/11?
There are two ways to change the CPU priority for Windows 7, 8, 10, namely, changing settings in Control Panel and in the registry editor. You can move on to offer better performance to the foreground applications on Windows 10.
Methods:
1: Change CPU Priority in Control Panel
2: Set CPU Priority to Preferred Applications Automatically
3: Modify Win32ProipritySeparation to Setup CPU Priority
Method 1: Change CPU Priority in Control Panel
It is accessible for you to adjust performance for preferred software or programs in control panel. Though it may set as default, it is necessary to check if you have carelessly changed it.
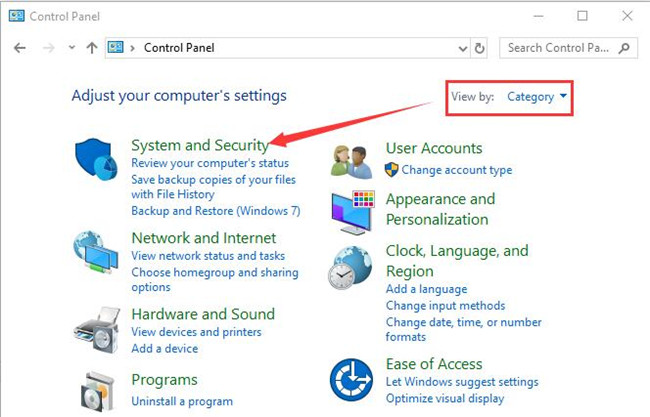
1. Open Control Panel.
2. In Control Panel, choose to View by Category and then click System and Security.
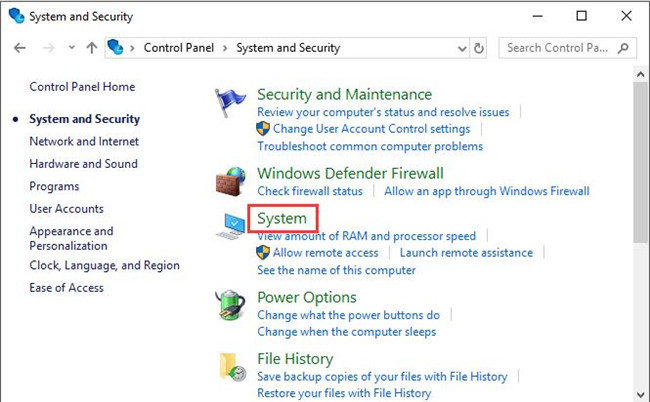
3. In System and Security, select System.
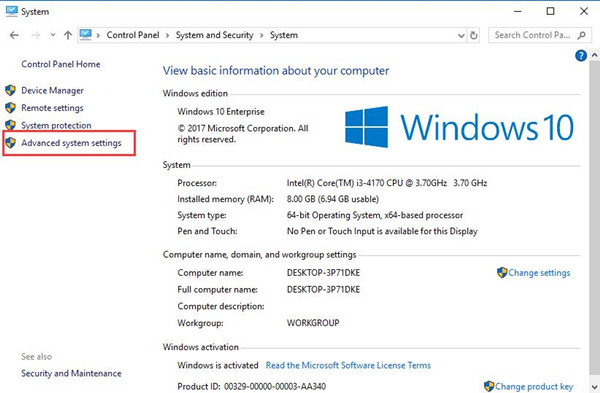
4. In System, pick out Advanced system settings.
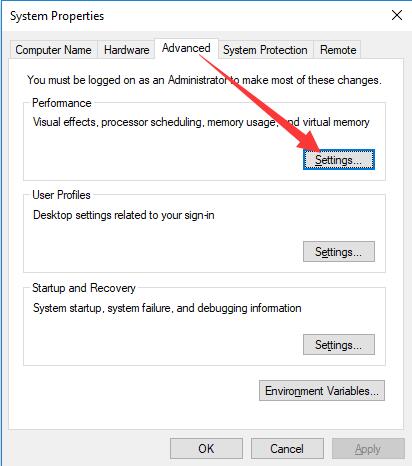
5. In System Properties, under the Advanced tab, click Settings.
6. In Performance Options window, under the Advanced tab, tick the box for Programs to Adjust the best performance of it.
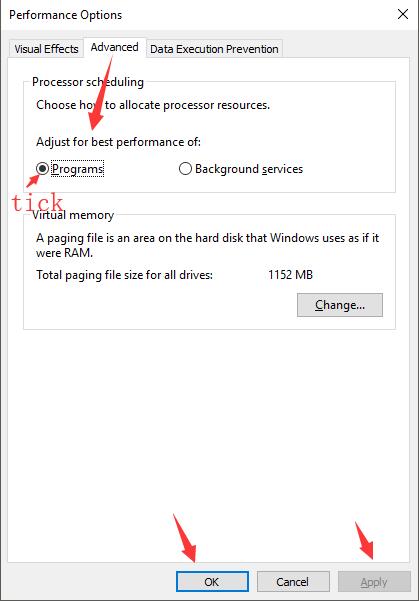
7. Then hit Apply and OK one by one.
As you can see from the screenshot above, you can also decide to adjust the performance of the Background services. It will make Windows 10 allocate processor resources to background services.
Now you will have set processor priority for the foreground applications in Windows 10 in Control panel.
Now that you are free to run some programs, even Avast smoothly. In fact, to adjust CPU priority to prefer foreground applications is to change the DWORD value of Win32PrioritySeparation in the registry editor. So you would better try to alter Win32ProipritySeparation to set CPU priority for some programs.
Method 2: Set CPU Priority to Preferred Applications Automatically
If you are not computer savvy, it is wise and feasible to turn to a professional tool to help prioritize the foreground applications. Advanced SystemCare is an all-in-one system and application optimizer, which will automatically set high, low, and normal priority for programs.
In Advanced SystemCare, you are capable of viewing clearly what application enjoys what degree of priority on Windows 11, 10, 8 and 7. And then bring the background process to the foreground in Windows 10.
1. Download, install and run Advanced SystemCare.
2. Then under Toolbox, find out and click Process Manager.
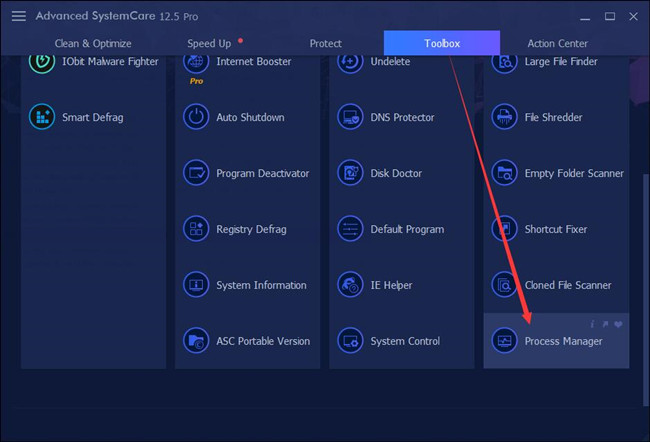
You will observe that Advanced SystemCare is installing Process Manager directly for you.
3. In IObit Process Manager, under Processes, right click the application to Set Priority High for it.

Here you can obviously see how much CPU and what the priority these foreground and background apps have on Windows 10. Just manage to let Advanced SystemCare change the priority automatically.
Method 3: Modify Win32ProipritySeparation to Setup CPU Priority
To change the value for PriorityControl key in registry editor is another way for you to allow the foreground programs to have the priority.
Different DWORD value for this key can greatly affect the performance of both the preferred applications and the background services on Windows 10. For instance, value 26 means the best performance for the foreground programs.
1. Hit the combination key Windows + R to open the Run box.
2. Type in regedit in the box and click OK to go to the Registry Editor.
3. In Registry Editor, follow the path below to find the PriorityControl HKEY_LOCAL_MACHINE\SYSTEM\CurrentControlSet\Control\PriorityControl
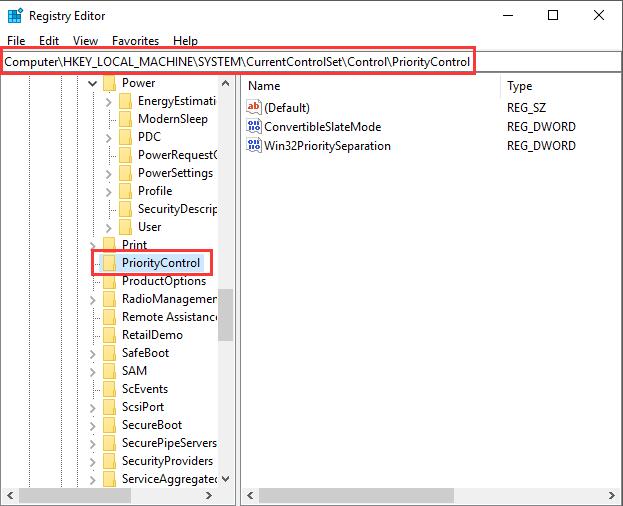
4. Under PriorityControl, on the right pane, right click the Windows32PrioritySeparation to Modify.
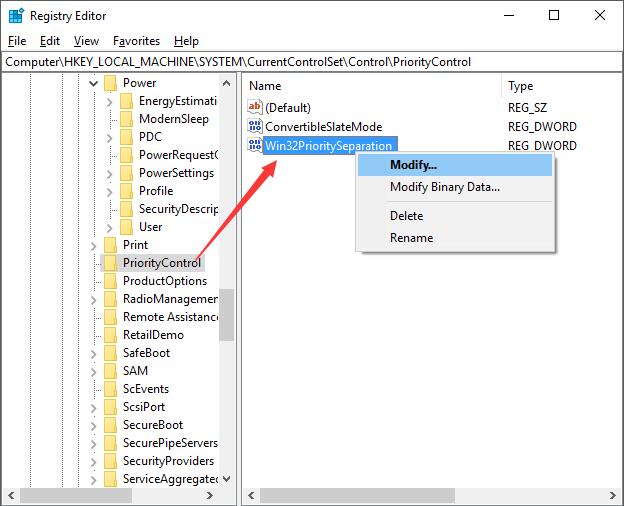
5. In Edit DWORD Value, set the Value data as 26 (38 for Decimal) and then hit OK to save the change.
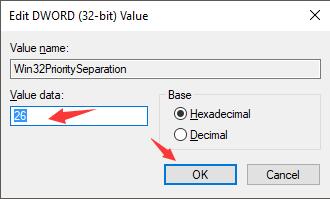
Here if you make the value date for Win32PrioritySeaparation as 26, it is to set priority for the foreground applications. But if you would like to make a priority for the background software, just set the value as 18(24 for Decimal). For this moment, it is obvious that your preferred foreground applications can enjoy the priority.
In a word, no matter you would like to change CPU priority for the prefer foreground or background services, these two ways are always available for you.
Related Articles:
How to Set a Program to High Priority on Windows 11/10