Is your PC freezing or showing down on Windows 10? If your answer is YES, maybe you need to check the CPU usage in task manager. But once you followed this step, only to find that Google Chrome has almost eaten up 100% CPU on Windows 10, just as you can see from the screenshot above.
Don’t worry, this thread will tell you how to solve the high CPU usage or even high memory usage in Google Chrome problem effectively.
How to Fix the Google Chrome High CPU Usage error?
Normally, as the faster and most powerful browser in the world, Google Chrome won’t use up the CPU usage on Windows 10.
But the case is it did. For deeper research and survey, it has been proved that the culprits lie in Google Chrome itself, such as Google extensions and abnormal activities.
Therefore, to solve 100% CPU in Google problem with targeted methods, this post would focus on making changes to this browser which is unlike other high CPU errors on Windows 10, for example, Ntoskrnl.exe cause high CPU usage and WMI Provider Host causes high CPU usage.
Solutions:
1: Check Google Chrome Task Manager
2: Monitor Google Chrome CPU Usage Automatically
3: Remove Google Chrome Hardware Acceleration
4: Set Google Chrome to Default
5: Disable Google Chrome Extensions
Solution 1: Check Google Chrome Task Manager
Like the Task Manager for Windows 10, there is also a built-in task manager in Google Chrome, which is used to manage the CPU, memory and tetwork and processor in Google.
In this way, you can see exactly how much CPU has been used by single extension or activity.
1. Open Google Chrome from your Desktop.
2. On the right of Google Interface, click Setting button and then select More tools, under it, pick out Task Manager from the list.

3. In Google Chrome Task Manager, you can see many extensions, Tabs, and processes and also their CPU, memory usage, Network activities and Processor ID.

Here you are supposed to pay attention to the Tabs or extensions using or exhibiting too much CPU. It is these problematic activities that cause your PC to slow down or crash.
This is the first step for you to deal with the Google Chrome high CPU usage issue on Windows 10.
Move on for further ways.
Solution 2: Monitor Google Chrome CPU Usage Automatically
It is of great necessity for you to check the CPU usage by Chrome now and then in case Google Chrome causes high CPU too often on Windows 10.
Here it is worth a shot to use Advanced SystemCare to monitor the program CPU usage. Actually, there did exist a toolbox named Performance Monitor in charge of performing a real-time scan for different programs, like Google Chrome. It will show you how much CPU, disk and RAM space the program uses and then cut it down to a value causing no trouble.
1.Download, install and run Advanced SystemCare.
2. Then on the right bottom of the Desktop, right-click the program icon of Advanced SystemCare to Open Performance Monitor.

3. In Performance Monitor, click the arrow icon to Maximize Performance Monitor.

4. Then find out CPU to Speed up it.

Now, it is foreseen that Google Chrome won’t cause high CPU usage on Windows 10 as the Advanced SystemCare has boosted its performance and spared up more CPU space.
Solution 3: Remove Google Chrome Hardware Acceleration
Usually, to fasten the browsing speed, Google Chrome would allow users to make use of the hardware acceleration on Windows 10. While this technique can lead to high CPU in Google for many people using it.
Having been aware of this fact, it is advisable for you to disable the hardware acceleration for Google.
1. In Google Chrome menu, pick out Settings.
2. In Settings, scroll down to locate Advanced and then click it.

3. Below Advanced settings, there are many tabs, scroll down to find out System tab and then uncheck the option Use hardware acceleration when available.

When you have disabled the hardware acceleration, maybe your Google Chrome can reduce or avoid high CPU usage on Windows 10.
Related: How to Disable Hardware Acceleration on Chrome, FireFox, Microsoft Edge?
Solution 4: Set Google Chrome to Default
Your last resort can be reset the Google settings for Windows 10, for it will remove all your browser cookies, bookmarks and preferential settings for this Chrome.
So once you find the Chrome still use high CPU in task manager even you have tried all the solutions above, the only explanation is your Google has gone malicious accidentally.
Consequently, you have to set default for the Chrome in order to solve high CPU issue caused by Google on Windows 10.
1. Pinpoint Google Chrome Advanced settings (you can get into it with referring to method 3).
2. Under Advanced setting, scroll down to locate Reset tab, and click reset option.
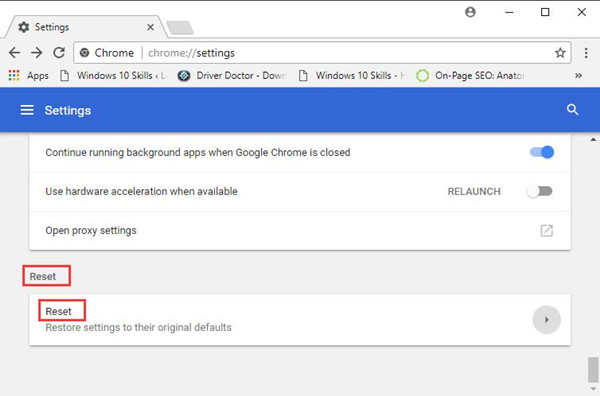
3. Then the Reset window would pop up. Choose to Reset the Google Chrome to default.
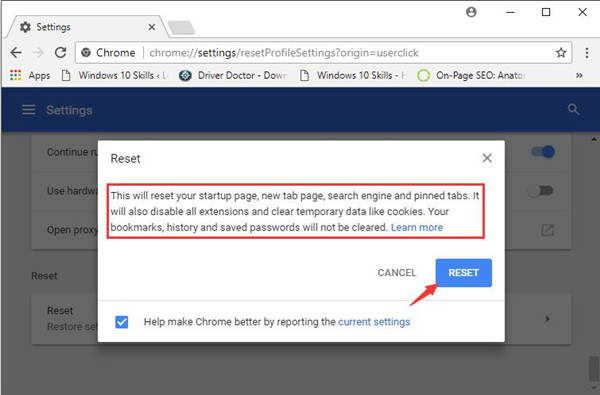
As you can see from the picture above, this action would reset all your startup page, search engine and pinned tabs which may need some CPU to process. Thus this can be also a way out of high CPU or memory in Google Chrome.
Solution 5: Disable Google Chrome Extensions
From the method 1, you may have known for sure which plug-ins in Google have given rise to the CPU spike on Windows 10.
Now what you need to do is to remove these add-ons consuming much CPU usage from your Chrome.
1. In Google Chrome settings, under More Tools, select Extensions.

2. In Extensions, uncheck the box for Enable. That is to disable the extension to fix the high CPU in Google Chrome problem.

For this time, the improper extensions will not be running on Google so as to cause your computer to 100% CPU usage due to the Chrome.
In short, unlike other high CPU error, Google Chrome high CPU usage trouble is supposed to be tackled by changes for this Chrome. You are able to well fix this high CPU problem with the help of this article.
Related Articles:
How to Fix Your Connection is Not Private in Google Chrome