On Windows 10 or Windows 11, various game settings come along with the Game Mode, such as Game Bar and Game DVR. To be more specific, you tend to take advantage of Windows 10 Game Bar to capture videos in gameplay.
Contents:
What are Game Bar and Game DVR in Windows 11/10?
How Do I Disable Windows 10 Game Bar?
Bonus Tip: Run XBox Game on Game Mode
Disable Game Bar Overview
While for some users, if you have no likings to play games or take screenshots during games, it is advisable that you manage to disable the game feature – Game Bar and Game DVR.
To assist you in accomplishing that, this article has prepared some effective ways available on Windows 10 to tell you how to turn on or turn off Game Bar.
What are Game Bar and Game DVR in Windows 11/10?
Both Game Bar and DVR are the new gaming features in Xbox app embedded in Windows 10. And on Windows 10, the Game Bar is enabled by default.
To be more specific, the Game DVR allows you to take screenshots and record videos in gameplay automatically on Windows 10. So long as you start your games, it will record game video in the background recording and save it in a certain location you have just chosen. You can also choose not to save it if you would like to do so.
And the Game Bar is one of the vital of graphics interface that permits you to use Game DVR to record video in games.
In normal cases, once you disabled the Game DVR, the Game Bar would be closed as well.
And recently, it is said that the Game DVR can bring you slow performance in games Windows 10. That is why you may as well try to turn off Xbox Game Bar Windows 10.
How Do I Disable Windows 11/10 Game Bar?
There are two options open to you. The one is that when you feel like disabling Game Bar party not completely. On that occasion, you can attempt to disable Xbox DVR on Windows 10 or Windows 11, in this way, the feature of Game Bar would only be partly closed.
The other one is to completely uninstall Game Bar Windows 10. As for the users who do not play games as all or Windows Game Bar not working, it is feasible that you struggle to remove the Game Bar in Windows 10 games.
You may as well refer to the methods below to disable or enable Windows 10 game recording and broadcasting. Under this circumstance, you will have also disabled the Game Bar Tips “Do you want to open game bar”.
Methods:
1: Disable Game DVR on Windows 11/10
2: Disable Windows 11/10 Game Bar
3: Use Registry Editor to Turn off Game Bar
Way 1: Disable Game DVR on Windows 11/10
Just as you have been suggested, removing Xbox game DVR would also be helpful to remove Game Bar Windows 10.
So you need to uninstall Game DVR at the very beginning. But you are unable to capture videos in games.
1. Go to Start > Settings > Gaming.
2. Then under Game DVR, in the option Background recording, turn off the choice Record in the background while I am playing a game.
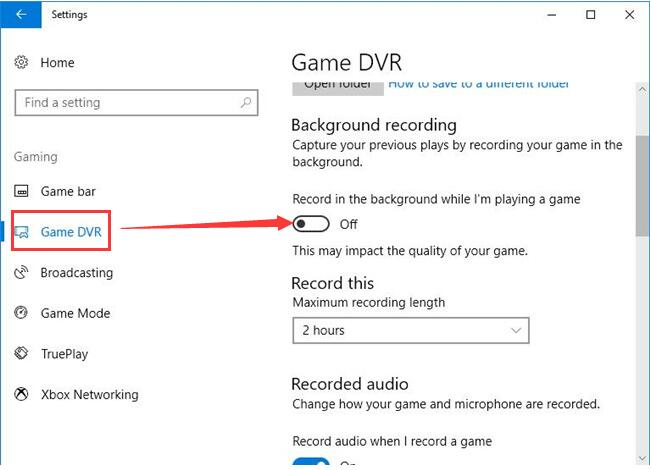
In that sense, games will not be recorded since you have disabled the background recording option Windows 10. In turn, the Game Bar feature you want to remove would also disappear from your PC.
Way 2: Disable Windows 11/10 Game Bar
In terms of the users who encountered Game Bar is still there after removing Xbox app on Windows 10, you are supposed to turn off the Game Bar feature.
Navigate to Gaming settings to enable or disable this game option.
In Gaming settings, under Game Bar, switch off the option Record game clips, screenshots, and broadcasts using Game bar.
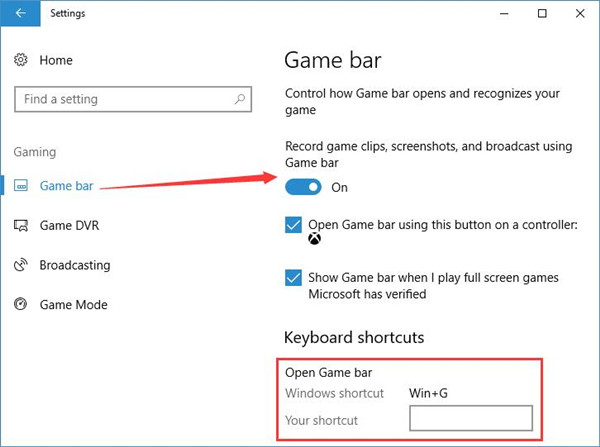
Now Windows Game Bar would be disabled from Windows 10. The Xbox Game Bar not working error is fixed in this way.
Way 3: Use Registry Editor to Turn off Game Bar
Finally, to answer for the call that how to turn off Xbox Game DVR, you can decide to get rid of this game mode feature in the registry editor.
Let’s get ready to disable Game Bar registry editor. In the registry editor, there is an Xbox Game monitoring that controls all your gaming settings in Windows 11 or Windows 10.
When you want to remove Windows Game Bar and Game DVR, you may as well determine to set this Xbox Game monitoring disabled as well.
1. Press Windows + R to open the Run box and then type in regedit in the box. At last, hit OK to go to the Registry Editor.
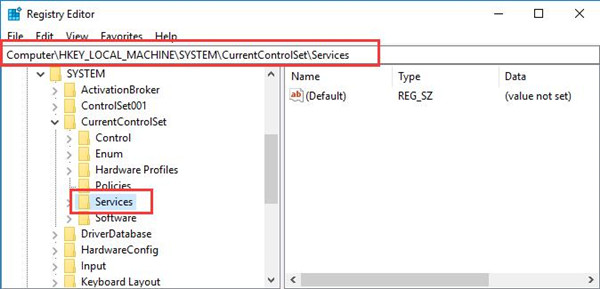
2. Then in Registry Editor, navigate to HKEY_LOCAL_MACHINE > SYSTEM > CurrentControlSet >Services.
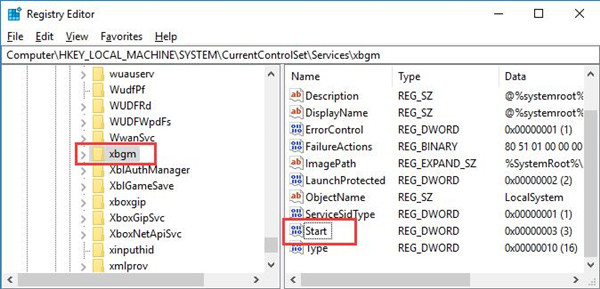
3. Under Services, scroll down to locate xbgm and them on the right pane, find out and double click Start key to open its properties.
4. Then try to Change the Value data to 4. And click OK to save changes.
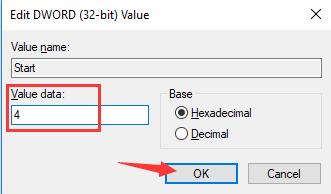
You are to disable the Game monitoring since you have set the xbgm start key as 4. If you wish to enable it, just change the value data to 3.
To make a summarization, in this thread, you are able to learn to get the hang to disable Game Bar and Game DVR in Windows 10 using different ways.
Bonus Tip: Run Xbox Games on Game Mode
All gamers may encounter game screen tearing or cannot be restarted problem. These problems are often caused by game drivers and missing game components. When you are playing a game, you may need some extra help to improve the game experience.
Driver Booster is a professional software that helps you find incompatible or erroneous game drivers, missing or old game components, and turn on game mode to get the best gaming experience.
1. Download, install and run Driver Booster on your computer.
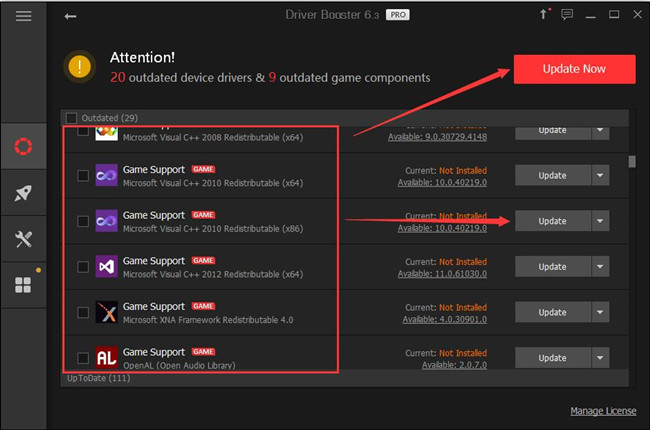
2. Click Scan. Then Driver Booster will scan all the outdated, missing drivers and game components.

3. Find the drivers you want to update especially the game ready drivers, click Update.
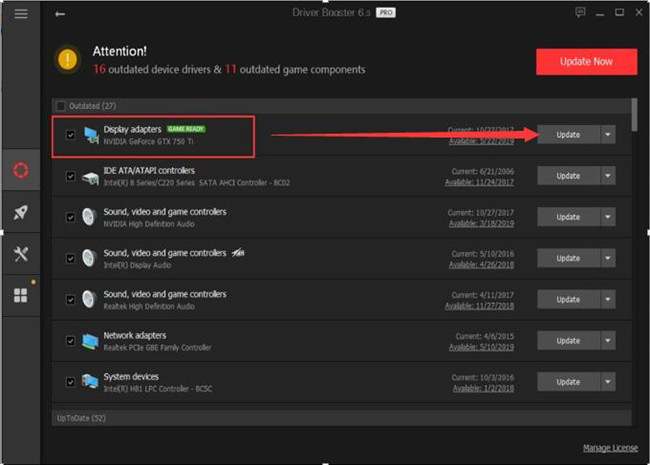
4. Find the game components, and click the Update or Update Now.
Run Games in Game Mode
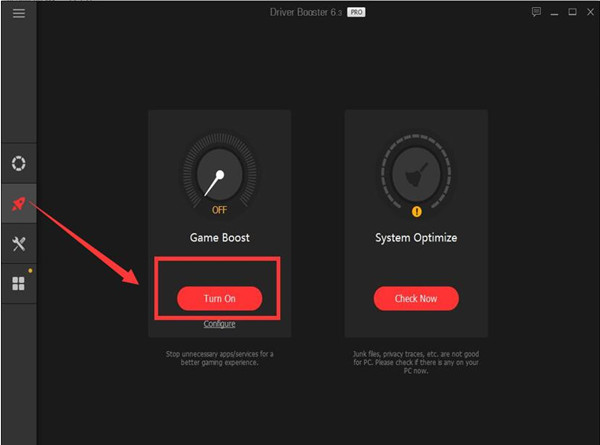
The game mode is another powerful function for Driver Booster. It allows you to maximize your computer hardware resources and software resources to improve the gaming experience.
Click the Tool icon, you will see the Game Mode. Click Turn on to open it. And the configure can helps you to customize it.
Now after you disabled the Game Bar and Game DVR, you can get the best gaming experience with Driver Booster.
More Articles:
Fixed: PVP.net Patcher Kernel Not Working

