Contents:
How to Increase Virtual Memory on Windows 10?
Virtual Memory Overview
Windows 10 RAM (Random Access Memory) goes low while you are running too many applications at the same time, like Google Chrome, Battlegrounds, Microsoft word, YouTube videos, etc. At this moment, the virtual memory is invoked to function on your PC.
But unfortunately, the error that your system is low on virtual memory also appears on Windows 10.
In such a case, you find Windows 10 is slow or freezes as it fails to process with enough virtual memory.
It is said that virtual memory size or to say Windows paging file can be adjusted in accordance with your system basics. So here you might as well increase virtual memory on Windows 10 improve PC’s performance.
What is Virtual Memory?
Simply put it, Windows virtual memory comes to play when there is not enough physical memory (RAM) on your PC. In essence, virtual memory is a tremendous file named PageFile.Sys stored on hard drive, which is why users are prone to call it Page file or Paging file or Swap file.
In this way, to set Windows 10 virtual memory, you are actually adjusting the Page file size.
How to Increase Virtual Memory on Windows 10?
You need to know that no matter you are watching a video or open a webpage in browsers, there will be a program file places in RAM. On this occasion, Windows 10 will use a large amount of RAM, thus easily getting stuck due to slow RAM. Therefore, increasing the virtual memory is quite necessary or sometimes unavoidable.
Nevertheless, since virtual memory on Windows 10 should be managed in line with the RAM, so before you start changing page file size, you would better check the actual physical memory on Windows 10. Then increase virtual RAM on the basis of your RAM.
Step 1: Check Windows 10 RAM
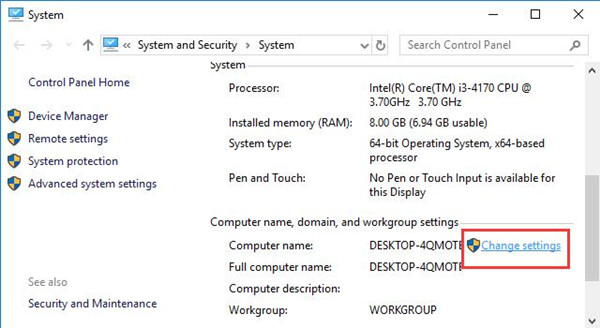
To get to know how much RAM you have on Windows 10, navigate to This PC > Properties > Installed memory.
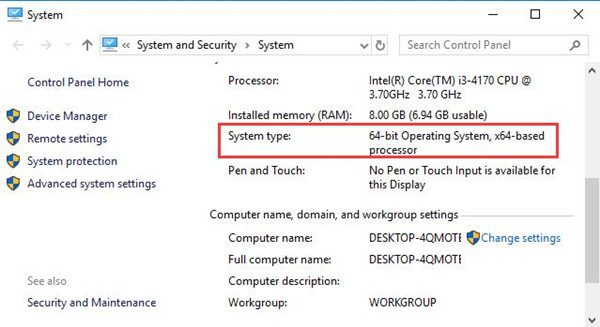
Here it is 8GB. Like what you notice, there are only 6.94 GB left for use. That lies in that some RAM is used by your video card or something else on the system.
Notes:
But here you should pay attention that if it is Windows 10 32-bit, it means the physical memory is no more than 4GB and even if the RAM shows 8GB or more on a PC of Windows 10 32-bit, only 4GB works. So you can only increase the virtual memory from 4096MB to 6144MB.
Upon getting the RAM size and Windows system type, you now are able to set virtual memory on Windows 7, 8, and 10.
Step 2: Increase Virtual Memory on Windows 10
As you know, by default, Windows 10 tend to automatically manage paging file size for all drives. That is to say, virtual memory has already been customized the time you installed the system. But if you have known how much physical memory you have on Windows 10, it is feasible to change Windows 10 virtual memory.
1. Right click This PC to open its Properties.
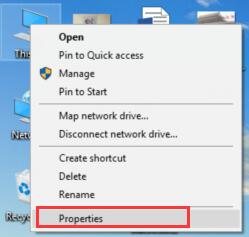
2. In System window, hit Change settings.
3. In System Properties, under the Advanced tab, locate Performance and then choose to change its Settings.
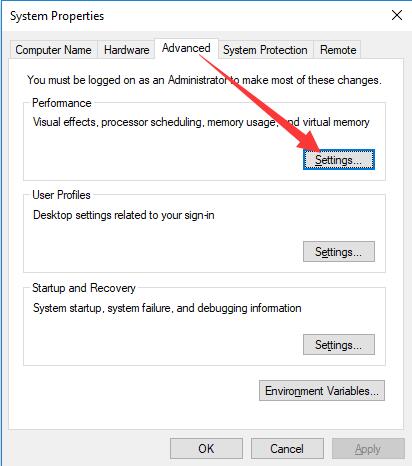
Here you are capable of adjusting the performance of Virtual effect, processor scheduling, memory usage, and virtual memory.
4. In Performance Options, under Advanced, find out Virtual memory and then Change it.
As you have noticed, it shows you that a paging file is an area on the hard disk that Windows uses as if it were RAM. And on this PC, the total paging file size for all drives is 1325 MB.
5. In Virtual Memory, uncheck the option – Automatically manage paging file size for all drives, and then Custom size will be available, begin to set both the Initial size and Maximum size.
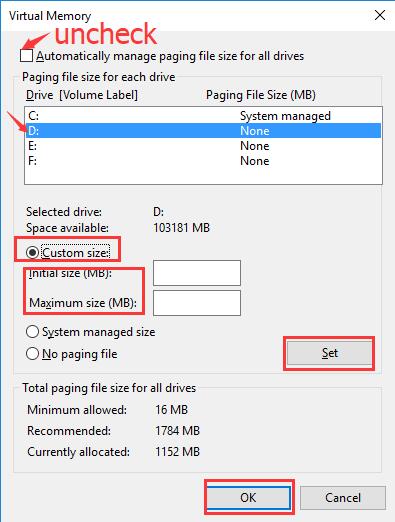
After that, according to the optimal settings, Windows 10 virtual memory should be 1.5-3 times that of the RAM.
If your physical memory is 1GB, you can set your virtual memory as 1536MB, 2048MB or 3072MB.
If your physical memory is 2GB, you can set your virtual memory as 3072MB, 4096MB or 6144MB.
If your physical memory is 4GB, you can set your virtual memory as 4096MB or 6144MB.
If your physical memory is 8GB, you can set your virtual memory as 8192MB.
Here if you are to increase Windows virtual memory, both the initial size and the maximum one should be larger than the Recommended size 1784 MB, which is what Windows 10 automatically sets for you.
6. Click Set and OK to save changes.
Now you will have increased Windows 10 virtual memory and PC screen flickers will disappear as the programs would turn to virtual memory if using too high RAM.
All in all, when you are encountering computer bad performance issue, for instance, Windows 10 monitor flashing or high memory usage by ntoskrnl.exe, there is no need to worry about it as you can increase Windows 10 virtual memory to relieve the burden.
Related Articles:
What is OpenAL and Should I Remove it?
Download Windows Photo Gallery Windows 10
There Is No Email Program Associated to Perform The Requested Action

