To optimize the computer’s gaming performance, many people build PCs with the best graphics drivers and add more memory. However, some Windows users encounter LiveKernelEvent 141 error codes when performing resource-demanding tasks. If you also encounter this error, don’t worry. After reading this article, you will know how to fix this issue easily and quickly.
This article covers the possible causes of the Live Kernel Event 141 error and nine effective solutions.
What causes LiveKernelEvent 141 Hardware Error?
Recently many users have reported encountering the LiveKernelEvent 141 error, which is usually caused by the slow performance of your PC. However, it is difficult to specify a specific reason for triggering this error, but this post has noticed that it is usually caused by:
- GPU Drivers: A prominent cause is inconsistencies caused by corrupt, outdated or incompatible graphics card drivers.
- Graphics card failure: A malfunctioning graphics card may cause a crash if the maximum temperature is exceeded or triggers artifacts that cause the system to crash.
- Overclocking PCs: Overclocking can affect system stability when custom voltages and frequencies cause the system to crash.
Now that you’re familiar with each of the potential causes that could lead to this error, here’s a list of troubleshooting fixes to help you resolve the LiveKernelEvent 141 error:
Solution 1: Update GPU Driver
In most cases, the culprit for the LiveKernelEvent 141 hardware error is an outdated, corrupt, incompatible, or problematic graphics card driver. So, before diving into more complicated solutions, let’s make sure your drivers are updated. You can manually navigate to the graphics card’s official website, find the driver, and download and install it. But if you want to save time and energy, we bring you Driver Booster.
Driver Booster is a tool that allows you to update missing, outdated and incorrect drivers. This software is developed by IObit, one of the leading companies in the PC optimization and security software industry. With an online database of over 6 million drivers from over 1200 major brands, Driver Booster can find even the rarest of drivers. It also protects your system from permanent damage by manually downloading and installing the wrong driver versions.
Also, installing an updated driver requires a full backup of the old driver. Driver Booster automatically backs up previous copies and creates a system restore point before updating in case something unexpected happens. There are specialized tools that automatically find outdated drivers and update them, so if you want to keep your PC running smoothly, definitely give Driver Booster a try.
Step 1: Download, install and run Driver Booster on Windows 11 or Windows 10.
Step 2: Click the icon Scan.

To scan your system for faulty and outdated drives, click the Scan button. You can also click the “Stop” button at any time to stop the scan and restart it later. After the scan is complete, you can see the scan result on the screen. In the results, you can check the number of outdated device drivers and game drivers. The scan results say a lot about the condition of your PC.
Step 3: Update the drivers. There are two ways you can use to update your GPU driver.
Download and update GPU driver individually by clicking the “Update” button to the right of it.

Click the “Update Now” button at the top of the scan results page. Therefore, update all drivers in the list.
Solution 2: Stop Overclocking
If updating your graphics card drivers does nothing, make sure that such system instability is not caused by GPU, CPU, or RAM overclocking. When you overclock your CPU or GPU, you increase the stress on your device to enjoy a temporary boost in performance. Overclocking causes certain hardware to run at a higher frequency than usual, resulting in increased temperatures.
Overall, overclocking can have an adverse effect on system performance, which can lead to this error. To resolve LiveKernelEvent 141 errors, try stopping overclocking or simply closing or uninstalling overclocking utilities.
Solution 3: Check Your Memory
Over time, RAM, one of the most important components of your PC, can become unstable and crash frequently. In general, RAM has a big impact on performance. Memory failure can cause many issues such as computer slowdown, blue screen of death, and LiveKernelEvent 141 error. Therefore, you must check whether the RAM is corrupted. This can be done with the Windows Memory Diagnostic Tool, as follows:
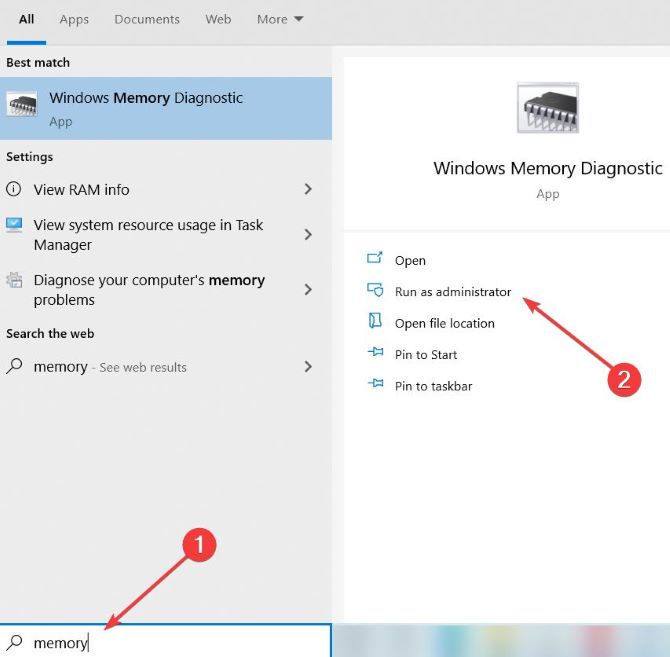
Step 1: Click the Start button, type memory and click Run as administrator to start Windows Memory Diagnostic.
Step 2: Now, click on the first option, Restart now and check for problems (recommended).
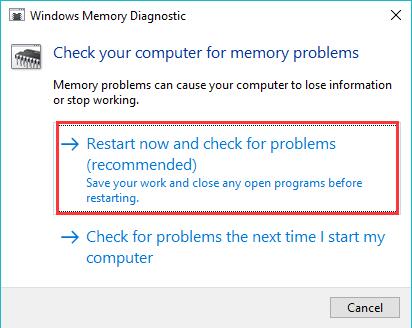
Your computer will restart and boot into the Windows Memory Diagnostic environment. Wait for the scan to finish to check your computer memory for any issues. If you have a problem with your RAM, you will have to replace the bad module. If not, proceed to the next solution.
Solution 4: Run a Disk Check
The hard disk is one of the most important parts of your PC. If your hard disk fails or becomes damaged, you may experience different issues, one of which is a LiveKernelEvent code 141 error. Therefore, you should check and resolve hard disk errors first. You can use the CHKDSK tool for a quick check. Here are the steps:
Step 1: Type ‘cmd‘ in the Windows search box.
Step 2: Then, right-click Command Prompt and select Run as administrator.
Step 3: Click Yes when prompted.
Step 4: In Command Prompt, type the following command and then press ‘Enter’.
chkdsk C: /f /r /xTips: If the scan doesn’t start as expected and the alert pops up as below, type Y and press Enter.

This tool will scan the disk drive automatically and try repairing detected errors. After that, you can see if the LiveKernelEvent 141 error is resolved or not.
Solution 5: Perform a Clean Boot
If your game or application is experiencing issues in the form of LiveKernelEvent 141 errors, it’s best to perform a clean boot to determine if it’s being blocked by Windows or other software.
Try performing a clean boot to determine which processes are incompatible with your Windows. You can then uninstall these conflicting programs to resolve the issue. To start a clean boot, you can refer to the following article: how to perform a Clean Boot on Windows 10/11.
Solution 6: Run Hardware and Devices Troubleshooter
Your Windows 10/11 device has a built-in troubleshooter that you can use to troubleshoot hardware components. Hardware and Devices Troubleshooter will detect any existing issues and provide appropriate solutions to fix LiveKernelEvent code 141 errors.
Here’s how to use it:
Step 1: Press the Win + I shortcut to launch Settings.
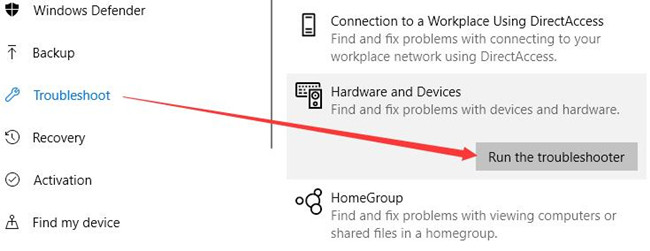
Step 2: Go to Update and Security and select Troubleshoot.
Step 3: Double-click on the Hardware and Devices section and select Run the Troubleshooter.
Once the troubleshooting process completes, restart your computer and see if the LiveKernelEvent code 141 error is fixed.
Solution 7: Set CPU Fan Speed to the Maximum
Some users have reported overheating as the reason behind LiveKernelEvent code 141. So, to make sure your system is well-ventilated and doesn’t overheat, you can set the speed of your CPU fan to the maximum. To edit fan speeds using BIOS setup, follow these steps:
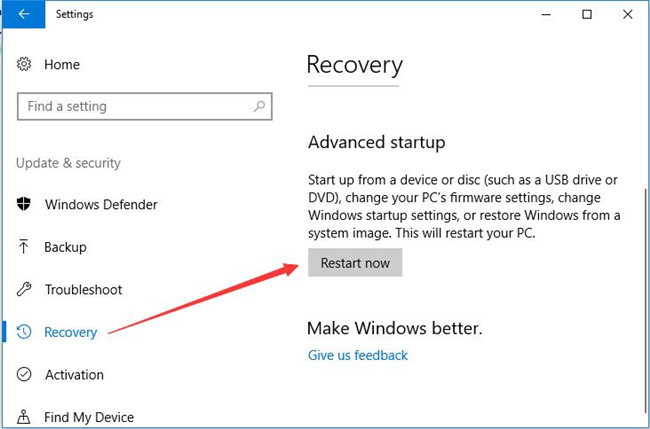
Step 1: Press Win + I to launch Settings, then click Update & security.
Step 2: Choose Recovery from the left menu, then click Restart now under the Advanced startup section.
Step 3: Click Troubleshoot > Advanced options.
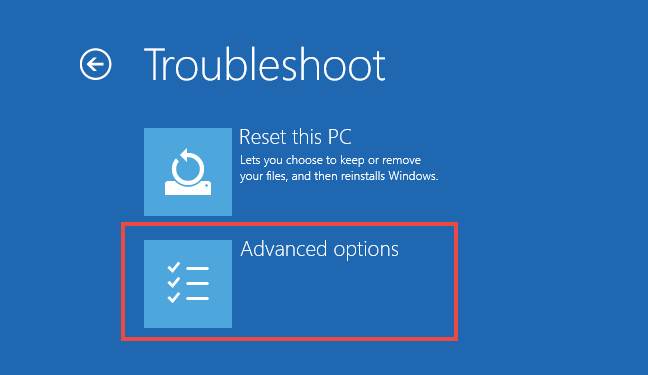
Step 4: Choose UEFI Firmware settings, then click Restart.
Step 5: Then your computer will boot into the BIOS/UEFI settings and you can adjust the CPU fan speed from here.
Solution 8: Uninstall and Reinstall Graphics Card Driver
Drivers control the communication between the operating system and the graphics card. It helps the device interpret video processing instructions. In most cases, LiveKernelEvent Code 141 issues are related to the GPU of the affected computer.
The easiest way to fix this is to uninstall the graphics driver. Follow the steps below to uninstall the graphics card driver:
Step 1: Right-click the Start icon to choose Device Manager.
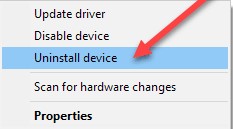
Step 2. In the Device Manager window, expand the Display adapters categories, then right-click the graphics card driver and select Uninstall device.
Step 3: Follow the on-screen prompt to complete this uninstallation.
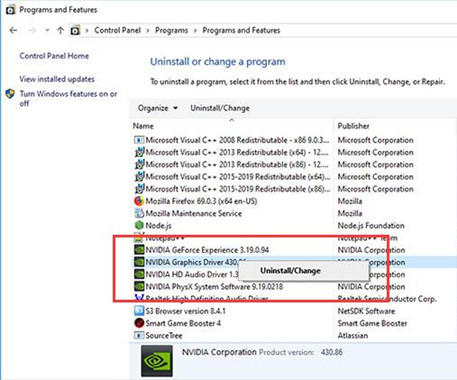
Step 4: Open the Control Panel.
Step 5: Choose to View by Categories and then locate Programs > Uninstall a program.
Step 6: In Programs and Features, right-click your graphics driver to uninstall it. Then you should uninstall all the related software one by one.
Step 7: Go to the manufacturer’s website and manually install the latest driver for your graphics card device.
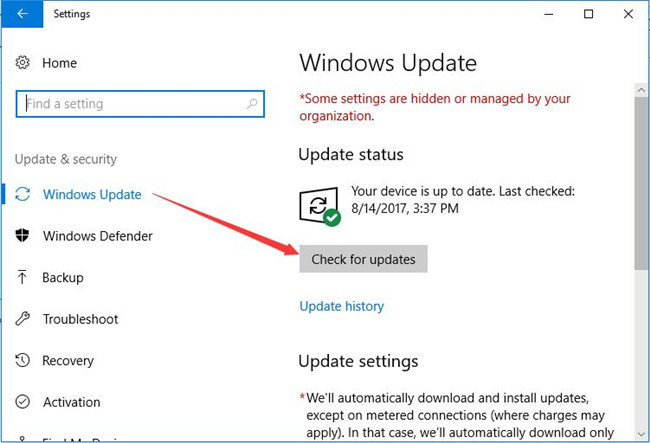
Solution 9: Check for Windows Updates
If your system is not running the latest version of Windows, you may experience Windows issues, including LiveKernelEvent 141 hardware errors. Therefore, always check for any available Windows updates and apply them as soon as possible. The steps to do this are:
Step 1: Type Update in the Windows search box and then click on Check for updates.
Step 2: Click Check for updates.
If there are any available updates, it will download and install them automatically.
Step 3: After it completes, reboot your system to normalize the changes.
Conclusion:
Hopefully one of the solutions above resolves the LiveKernelEvent 141 error. You don’t need to try them all, just follow the order until you find the one that works for you.