For some users, it is likely that your PC freezes accidentally on Windows 10. And when you turn to open the Task Manager, just to find there is a process named Local Security Authority Process (lsass.exe) that stopped from working and used much of your CPU and disk.
Here for the purpose of solving high Lsass.exe CPU utilization on Windows 10, you might as well manage to go ahead to take a closer look at this Lsass.exe high CPU or disk usage problem.
What is Lsass.exe Process on Windows 10?
This LSASS is the abbreviation for Local Security Authorization Subsystem Service or LSA Shell, which is mainly used to implement the security policy for Windows systems. It is a kind of system process managing your passwords if you log onto Windows 10.
Simply put, this Lsass.exe process identifies the user accounts on your system, configures your password changes, creates the access tokens, and writes to Windows Security log, etc.
Why Does Lsass.exe High CPU and Disk Usage Occur to Windows 10?
As you have been suggested, this Local Security Authorization Subsystem Service is responsible for the changes of Windows passwords.
While in the case where you find there are two same processes called LSASS.exe in the Task Manager in different locations, which may be the reasons for Windows process Local Security Authorization Subsystem Service using lots of CPU or disk. In other words, it means your PC is meeting certain virus or threat on Windows 10.
And normally, the Lsass.exe is located in C:\Windows\System, but if you find it elsewhere with the similar name, it is high time that you managed to deal with Local Security Authorization Subsystem Service taking up high CPU or memory usage.
Here if you run into the LSASS.exe terminated error, perhaps your accounts on Windows screen have been lost and Windows 10 needs to restart. It can in some sense be caused by the problematic system files and the malware on your PC.
And the time you encounter the problem that Local Security Authorization Subsystem Service stopped, Windows system will show you an error message as below:
The system is shutting down. Please save all work in progress and log off. Any unsaved changes will be lost. This shutdown was initiated by NT AUTHORITY\SYSTEM. Shutdown will begin in 60 seconds. Shutdown message: The system process “C:\WINDOWS\system32\lsass.exe” terminated unexpectedly with status code – 999. The system will now shut down and restart.
Is Lsass.exe Safe?
It is by default of course safe on Windows 10. But over time, as one of the executable files on Windows system, Lsass.exe may encounter viruses and threats, resulting in duplicate Lsass files or corrupting the original Lsass files.
That is why some of you will hit upon two Lsass.exe files with different locations.
Once you find there are two same LSASS files on Windows 10, it is about time to remove the Lsass.exe error for your PC.
Can Lsass.exe Be Deleted on Windows 10?
Even if the Local Security Authorization Subsystem Service is listed in Task Manager under the disguise of the threatening program, it is not advisable that you choose to uninstall it from Windows 10 as it is on the system responsible for Windows security policies.
Upon the time you stumble upon high CPU or disk with Lsass.exe on Windows 10, what you really need to do is taking measures to fix this Lsass.exe system error.
How to Fix Lsass.exe High CPU and Disk Usage Error and on Windows 10?
In some cases, Windows process Lsass.exe stops and uses high CPU and disk at the same time.
Whatever your situation, this process terminating suddenly or running out of your CPU or disk usage, to get rid of this Lsass.exe generating high CPU, you are mainly to make sure there is no malware causing this error.
After that, you are to take advantage of the Active Directory Data Collector to troubleshoot Lsass.exe high CPU usage issue deeper.
Solution 1: Run SFC in the Safe Mode
The problematic software is to blame for the system problem of Lsass.exe high CPU usage. Now that this “Local Security Authorization Subsystem Service terminated trouble” would automatically restart your PC, why not go into safe mode to let the computer run in a minimal set of programs to scan for software on Windows 10.
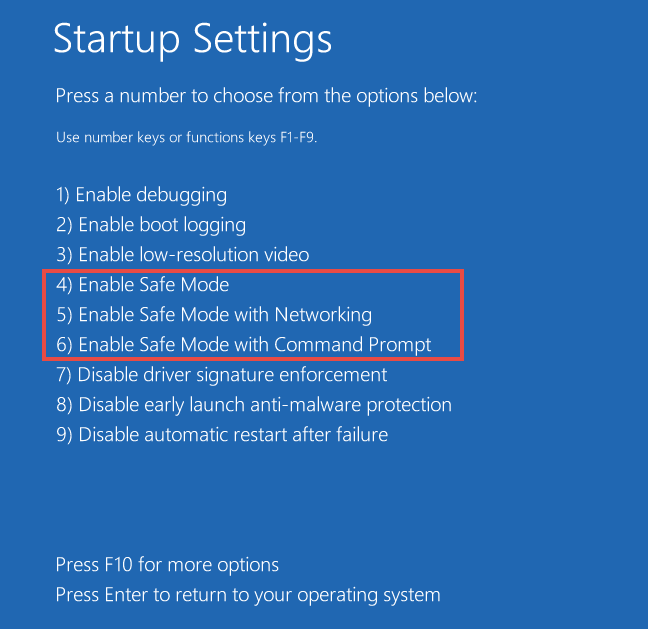
Here to activate the System File Checker, you are supposed to Enter Safe Mode with Command Prompt.
1. Click Shift and Restart combination key until the options list pops up.
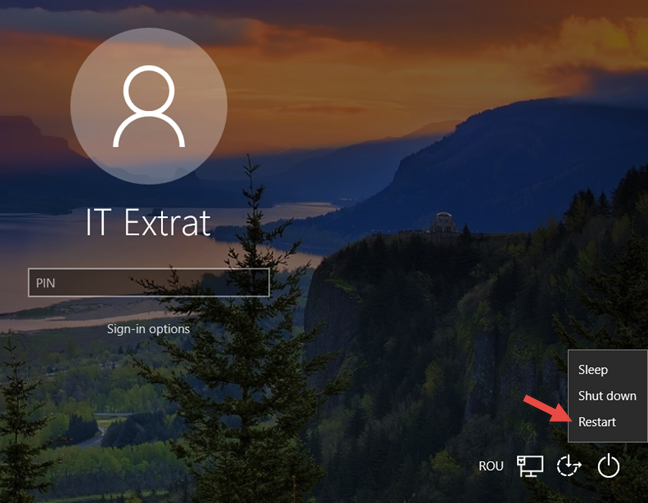
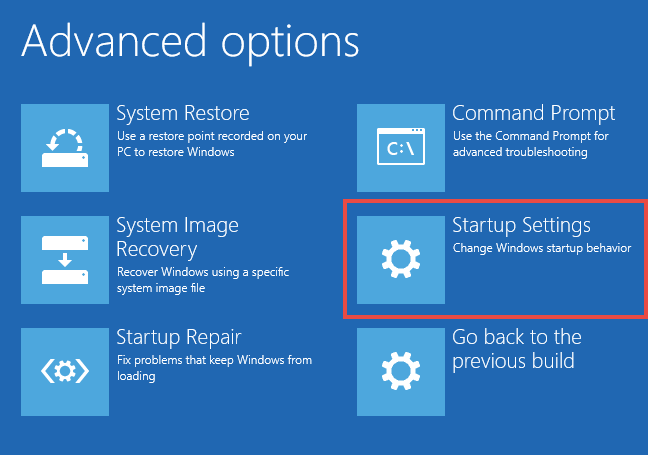
2. Then navigate to Troubleshoot > Advanced options > Startup settings.
3. In Startup settings, press F6 to Enter Safe Mode with Command Prompt.
4. Then in Command Prompt elevated, enter the command sfc/scannow and then hit Enter to run this command.
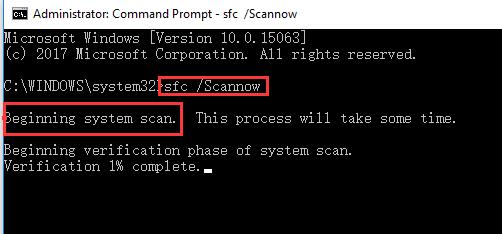
Once SFC finished scanning, you can know exactly what leads to the Lsass.exe high CPU or memory error on Windows 10.
It is up to you whether to uninstall the erroneous software in Control Panel or try the method below.
Solution 2: Run Performance Monitor’s Active Directory Data Collector
In terms of Lsass.exe using lots of CPU, apart from ascertaining what makes it, you can also turn to Active Directory Data Collector, namely, Active Directory Diagnostics.
What Is the Active Directory Diagnostic?
In short, this AD (Active Directory) Data Collector will collect the diagnostic reports of PC performance.
In this way, you may as well start this tool to troubleshoot your Local Security Authorization Subsystem Service high CPU and disk usage and terminated unexpectedly error on Windows 10.
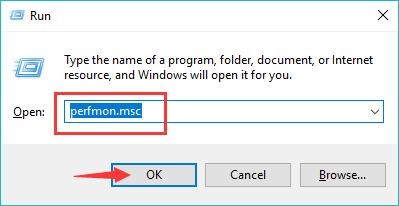
1. Press Windows + R to open the Run box and then type Perfmon.msc in the box. Once done, click OK to Performance Monitor.
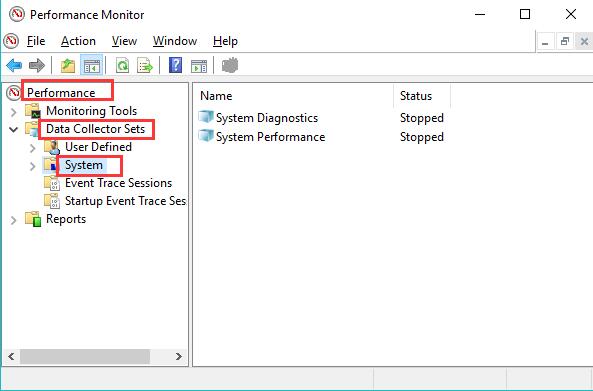
2. In Performance Monitor, on the left pane, Performance > Data Collector Sets > System.
3. Under System on the left pane, on the right pane, locate and right click System Diagnostics to Start it.
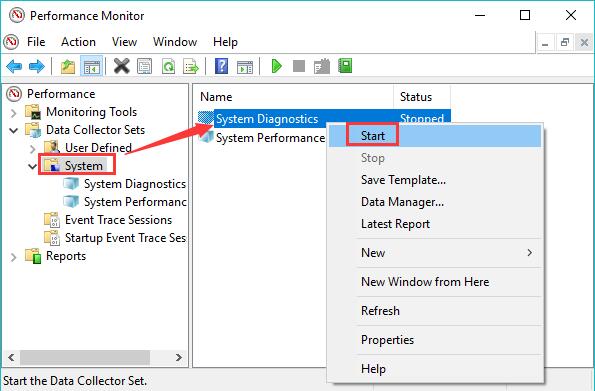
4. You can see the System Diagnostics will last for about 5 minutes to collect the performance data from Windows 10.
5. Once the diagnosis gets finished, the performance reports will come into your sight in Reports > System > System Diagnostics.
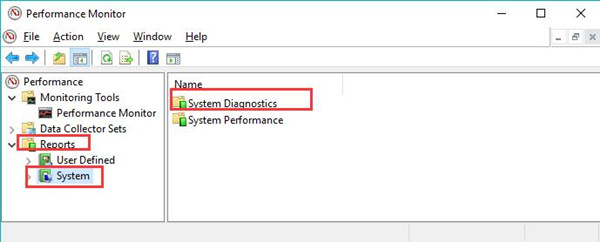
6. Move into the System Diagnostics to see what affects negatively the performance on Windows 10.
It is likely that the cause for Lsass.exe Windows process error will show up, hence you are able to get the high CPU with Local Security Authorization Subsystem Service removed.
In summary, when you are confronted with Lsass.exe terminated error and high CPU or disk usage on Windows 10, the main solution is to make sure there is not malware. Ideally, safe mode can be a good circumstance where you troubleshoot this Local Security Authorization Subsystem Service system error.
Related Articles:
How to Fix Microsoft Office Click to Run High Disk Usage



I chased this problem for months, tried several suggested solutions. The final and easy solution was within the task schedule. Disable any scheduled tasks that are unknown or suspicious. If that doesn’t work, disable all and turn them on one at a time. You may need to reboot after change b/c once it’s triggered, it won’t stop until reboot.