In Task Manager, you see that the Desktop Window Manager (DWM.exe on Windows 7 or previous Windows Version) is high on CPU usage. This thread will remove all your confusion about this CPU issue on Windows 10 or Windows 11.
Contents:
What is Desktop Window Manager (DWM.exe) on Windows 11/10?
6 Ways to Fix Desktop Window Manager High CPU on Windows 11/10
How to Disable the Desktop Window Manager on Windows 11/10?
What is Desktop Window Manager (DWM.exe) on Windows 11/10?
The Desktop Window Manager is the manager controlling various features for Windows 10, such as visual effects, glass windows frames, and 3D Windows transitions animations.
Normally, the Desktop Window Manager is running in the background with little CPU or memory usage. But to make smoother animation, the DWM.exe has to make use of some kind of hardware acceleration which would need CPU to run well on Windows 10.
Recently, as the complaint from users, this DWM.exe process gradually takes up high CPU usage on Windows 10 along with a high RAM or high disk usage.
How to Fix Desktop Window Manager High CPU on Windows 11/10?
Just as the high memory and CPU by Ntoskrnl.exe, high CPU by DWM.exe can also lead to slow performance for Windows 10. That is to say, you are supposed to solve this high CPU issue as soon as possible.
After long time researching, the reasons for this Desktop Window Manager high CPU are mainly:
Display driver incompatibility.
Windows 10 performance issues.
Problematic software or applications.
On the basis of the causes of the high CPU by DWM.exe, this thread comes into being.
Solutions:
- 1: Update Display Drivers
- 2: Change Wallpaper and Theme
- 3: Adjust for Best Performance
- 4: Check DWM.exe CPU Usage in Real Time
- 5: Troubleshoot Windows Performance
- 6: Scan for Malware or Virus
Solution 1: Update Display Drivers
Now that it is the Desktop Window Manager that gives rise to the high CPU usage on Windows 10, if it is really the driver error, the graphics card driver is to blame.
For many novices, it seems to be difficult to find out the exact display driver for Windows 10 on the official site.
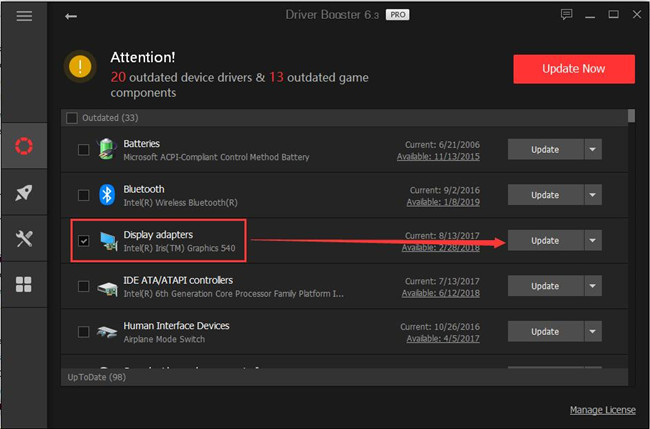
In this way, you might as well take advantage of Driver Booster, the automatic tool for Windows 10 drivers update.
You can rely on Driver Booster to update the graphics driver in order to tackle this Desktop Window Manager using too much CPU problem on Windows 10. Besides of graphic driver, Driver Booster can also find other missing, faulty and outdated drivers and then update them automatically.
1. Download, install and run Driver Booster on your computer.
2. Hit Scan and Update one by one by referring the instructions on Driver Booster interface.

Within clicks, Driver Booster will have downloaded all the display drivers for you on Windows 10, the embedded one or integrated graphics card drivers, such as Intel, AMD driver.
Equipped with the newest drivers, you can try to reboot your PC to see if the Desktop Window Manager causing high CPU trouble vanished from Windows 10.
If not, you are to get down to fix the CPU issues with regard to performance on your computer.
Solution 2: Change Wallpaper and Theme
As you have been told, Desktop Window Manager is used to manage desktop utilization. So if the high CPU is caused by the DWM.exe on Windows 10 (as you can check it in task manager), you can try to make some adjustments for some related settings, such as desktop wallpaper and theme.
1. Right click your Desktop and choose Personalize from the list.

2. In the left pane, pick out Theme and then Apply a theme to your computer.

Here you can also manage to change Background, Colors, Lock screen and Taskbar, too.
Then close this Personize Settings window and open Task Manager to check the CPU usage again. Maybe the Desktop Window Manager high CPU error is corrected for Windows 11/10.
Related: How to Download Themes on Windows 10
Solution 3: Adjust for Best Performance
As for the performance issues concerning the high CPU caused by the DWM.exe, there is another way available for you. To be more specific, it is to tinker the performance options.
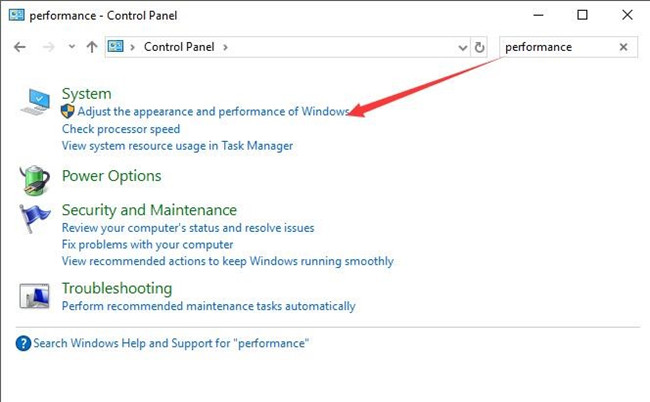
2. In Control Panel, search Performance in the search box.
Then choose to Adjust the appearance and performance of Windows from the results.
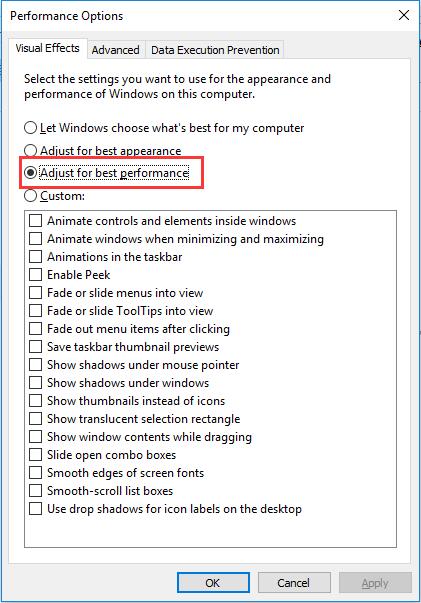
3. In Performance Options, under Virtual Effects, pick out Adjust for best performance. Then hit OK.
At this moment, the high CPU in task manager by Desktop Window Manager will no longer result in Windows 10 slow performance or freezing.
Solution 4: Check DWM.exe CPU Usage in Real Time
Upon meeting with Desktop Window Manager high CPU, it is necessary to monitor when and what programs using it take up high CPU. Speaking of this factor, Advanced SystemCare into handy. There is much need for you to use Advanced SystemCare Performance Monitor to supervise the CPU usage by DWM.exe on Windows 10.
In this case, try Advanced SystemCare to troubleshoot Desktop Window Manager high CPU.
1. Download, install and run Advanced SystemCare.
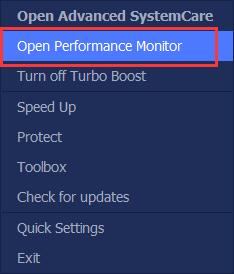
2. Then at the right bottom of the Desktop, right-click the program icon of the launched Advanced SystemCare to Open Performance Monitor.
3. On the desktop, locate Performance Monitor, and then click the arrow icon to Maximize Performance Monitor.

4. In Maximized Performance Monitor, find out CPU and then hit the Speed up icon to free up more CPU usage.
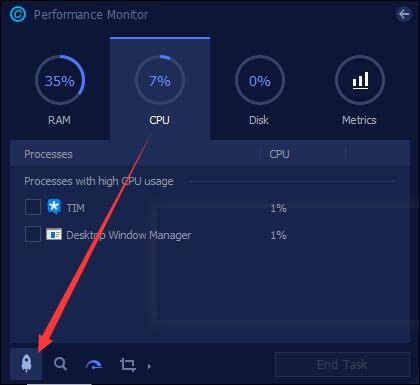
Here if you are plagued by DWM.exe high CPU usage error, you can notice how much CPU the Desktop Window Manager is using on Windows 10.
If possible, you would better make full use of Advanced SystemCare to monitor the CPU usage from now to now automatically.
Solution 5: Troubleshoot Windows Performance
If the ways above are infeasible for you to solve the DWM.exe high CPU issue on Windows 10, try to troubleshoot with the windows command.
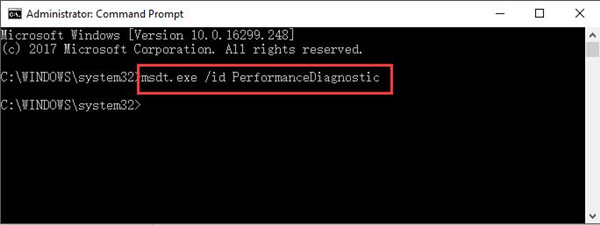
1. Search Command Prompt in the search box and right click the best-matched result to Run as administrator.
2. In Command Prompt, type in the command below and then press Enter to perform it.
msdt.exe /id PerformanceDiagnostic
3. The Performance window would pop up. Click Next to continue the performance troubleshooting.
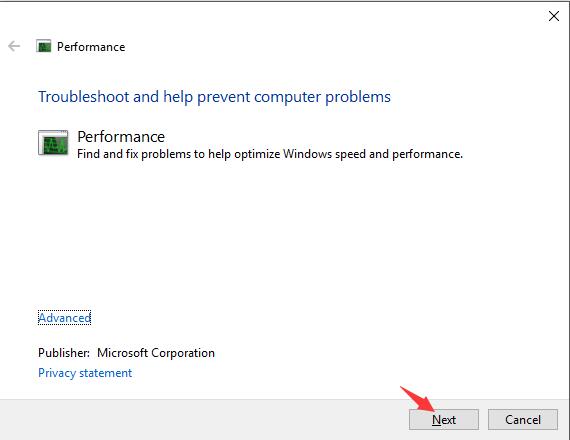
If lucky, Windows 10 would inform you of the specific performance errors. Maybe it can also fix it and in this case, the high CPU in Desktop Window Manager will disappear from your PC.
Solution 6: Scan for Malware or Virus
It is held that the Desktop Window Manager is an official Microsoft service for Windows system, it is anything but virus on Windows 10. But the case is some malware or applications replace it.
That is way though running in the background, sometimes, the DWM.exe can cause so high CPU on your PC.
To be safer, it is not advised that you decide to scan your computer with any third-party software.
You are to make full use of Windows Defender, the Windows 10 built-in tool for protection to scan for virus.
1. Click Start button and then input Windows Defender in the search box.
2. Hit Enter to open the Windows Defender Security Center.
3. Choose Virus & threat protection in Windows Defender.
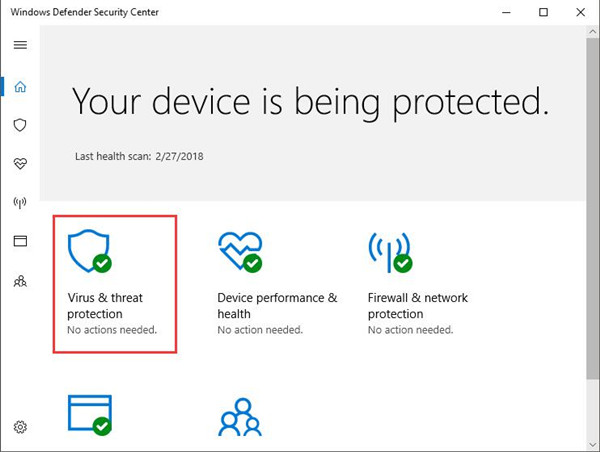
In the searching result, Windows Defender Security Center would let you know which software is accompanied by viruses or threat for Windows 10.
Once it prompts you any problematic applications, manage to uninstall it in Control Panel.
Apart from the effective solutions to deal with the Desktop Window Manager (DWM.exe) high CPU usage on Windows 10, some users would rather know the way to disable it permanently as so to let this high CPU issue perish.
Related: How to Run Windows Defender on Windows 10
How to Disable the Desktop Window Manager on Windows 11/10?
It is extremely simple for you to stop the Desktop Window Manager service. If you feel like to do that, just obey the following procedures.
Disable DWM.exe in Services:
1. Press Windows + R to activate the Run box.
2. Type in service.msc in the box and click OK to run the Service window.
3. In Services, locate Desktop Window Manager and right click it to open its Properties.

4. In Properties window for the Desktop Window Manager, under pinpoint Startup type under General tab, choose to see it as Disabled.
5. Restart your computer to take effect.
Disable DWM.exe Automatically:
For some users, if you can’t find DWM.exe in Services widget, it is advisable that you resort to Advanced SystemCare as well. This all-in-one tool will help end the Desktop Window Management process automatically. In this sense, even if you encountered DWM.exe high CPU usage on Windows 10, you can directly stop it from running to get rid of the DWM.exe error.
1. After downloading Advanced SystemCare, under Toolbox, find out and click Process Manager.
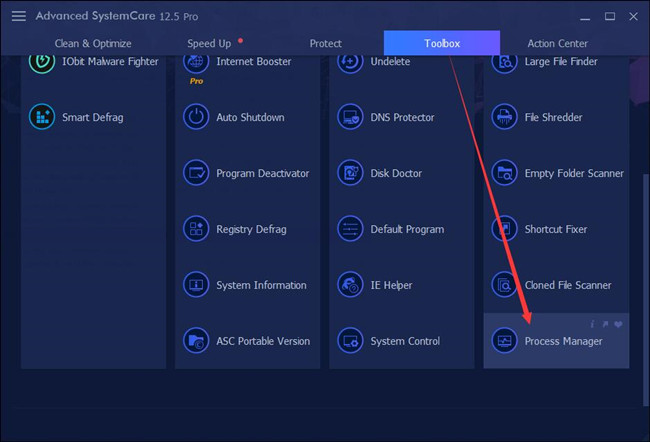
As you can see, Advanced SystemCare is installing the Process Manager immediately.
2. In IObit Process Manager, under Processes tab, on the right side, locate dwm.exe and right click it to End Process.
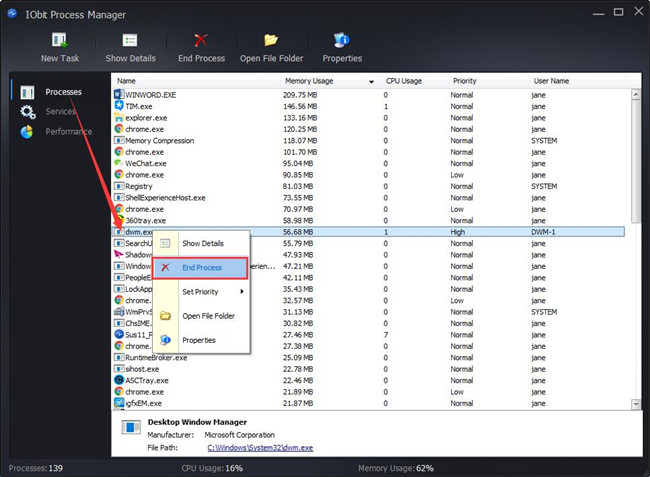
Or here you can also try to Set Priority for the Desktop Window Manager process, either making it run at High or Normal or Low priority.

By way of this action, it is likely that Desktop Window Manager high CPU usage will perish for some time.
In a word, high CPU issue are common on Windows 10, for a voluminous of factors can result in it, such as WMI Provider Host and Ntoskrnl.exe.
As regards to the high CPU problem in task manager by Desktop Window Manager, may this article can help you. If not, contact us without hesitation.
Related Articles:
Fixed: Modern Setup Host High Disk and CPU Usage