Is it possible to record a Disney Plus movie? If yes, how to do it? Many people tend to ask these questions and make up their minds to screen record a particular moment of their favorite Disney Plus content.
In this tutorial, we’ve developed a detailed guide to providing you with five efficient ways to screen recording on Disney Plus. You’ll be able to record on different devices including Windows, Mac, iPhone, Android, and smart TV.
Disney Plus is a new and creative streaming platform founded in 2019, there are many wonderful movies and TV shows on it from Disney, Pixar, Marvel, Star Wars, and more.
Can you screen record Disney Plus?
Yes.
Though Disney Plus does not provide a built-in recording feature, you’ll be able to record Disney Plus videos with the help of specialized recording software and applications.
In the following section, we will describe the detailed process for recording video content on Disney Plus using these different methods. Continue reading to learn more!
How to Screen recording Disney Plus using Xbox Game Bar on PC
Windows 10 and 11 users can utilize the built-in Xbox game bar to record Disney Plus content directly. This tool was initially designed for game players but can also work as an efficient recorder.
However, Game Bar only works within a single app and doesn’t accept the whole desktop or file explorer. Also, the maximum video capture length is four hours.
If you’d like to record the on-screen activity of Disney Plus with no region or time limit, see Way 2 directly.
Now, let’s find out how to screen record Disney Plus using this Windows built-in tool.
Steps to record on Disney Plus with Xbox Game Bar
1. Open Disney Plus in your Chrome, Firefox, or Edge web browser and select the video that you want to record.
2. Press Windows + G keys to launch the Game Bar on your Windows computer.
3. Once you get ready, press the record button or press the Windows + Alt + R keys to start recording on Disney Plus.
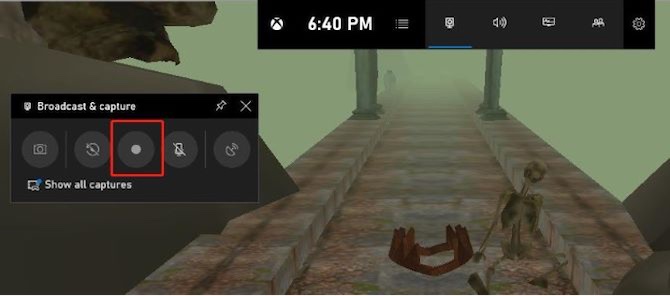
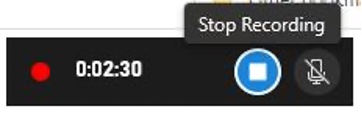
4. A timer will appear in the upper-right corner of your screen once the Game Bar begins recording on Disney Plus.
5. To stop screen recording Disney Plus, just press the Windows + Alt + R keys together again or hit the stop button.
6. You can find your recorded Disney Plus video from Videos > Captures.
On condition that you don’t have much requirement on recording settings and effects, and are unwilling to download a screen recorder, Game Bar will be an ideal choice. Otherwise, you’d better go for a feature-rich screen recorder.
How to Record Disney Plus on PC Without limitations
If you are looking for a much more effective way to screen record Disney Plus without any limitations, it is recommended to use a professional third-party screen recorder like iTop Screen Recorder.
iTop Screen Recorder is a powerful and easy-to-use screen recorder for Windows 10 / 7 / 8 /11. You can easily record popular movies and shows from Disney Plus with HD video and audio, no lagging, no time limits, via iTop Screen Recorder.
Besides, you can use the video editor to enhance your Dsiney Plus recordings and the video compressor to shrink file size for emailing or sharing online hassle-free.
Benefits of iTop Screen Recorder:
- Screen record Disney Plus videos with HD video & audio
- Record Disney Plus on your screen flexibly and easily
- Captrue Disney Plus screens with no lagging & time limit
- Create stunning videos with the built-in video editor
- Save recordings to different output formats and share in one click
Follow the step-by-step guide to record Disney Plus movies without any restrictions.
Steps to screen record on Disney Plus using iTop Screen Recorder
1. Download and install iTop Screen Recorder, then run it on your PC.
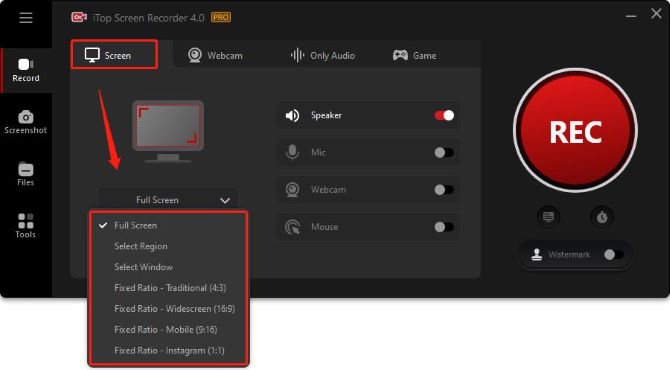
2. Choose the recording area. Click the drop-down arrow behind Full Screen. You can screen record Disney Plus with the entire desktop screen (by default), an active window, or record part of the screen as you like.
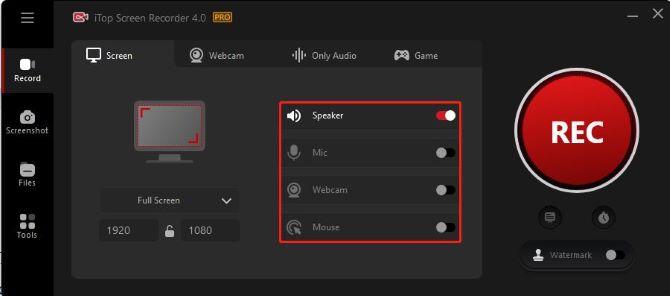
3. Enable your Speaker, and turn off Mic, Mouse and Webcam.
4. Configure the screen recording settings. Click the three lines on the top right corner, select Settings.
- To avoid a black screen issue while recording, adjust Record settings, toggle on the enable “enhanced mode” option.
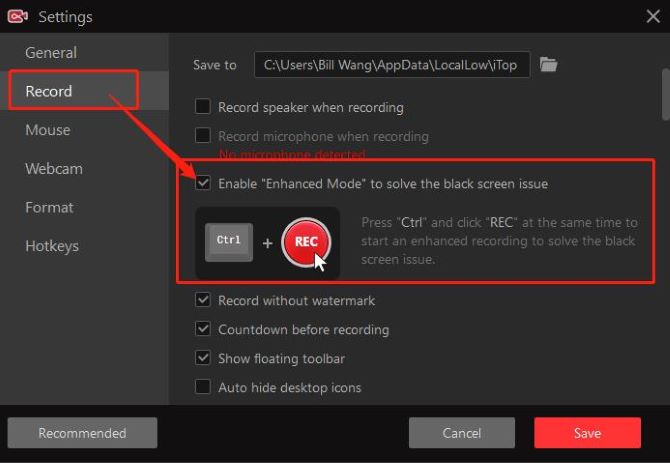
- To record a 4K video of the show on Disney Plus, adjust Format settings, select “4K (4096 ✖ 2106)” for Size, “Original” for Quality.
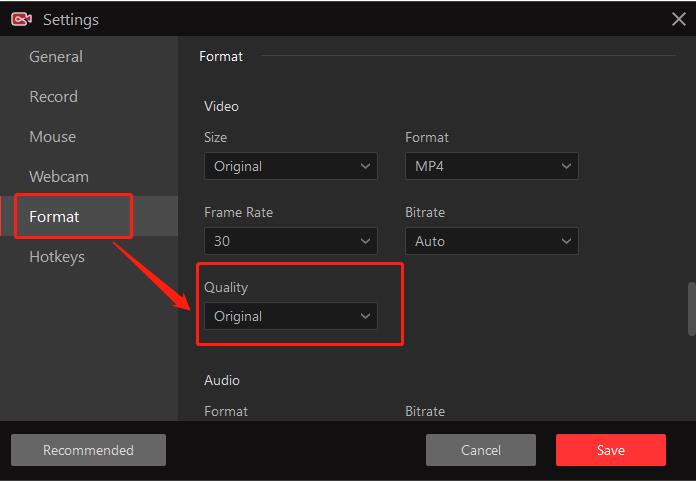
5. Go to Disney Plus website, select and start playing the video you want to record.
6. Hit the REC button to start recording on Disney Plus. It will start after a countdown of 3 seconds by default.
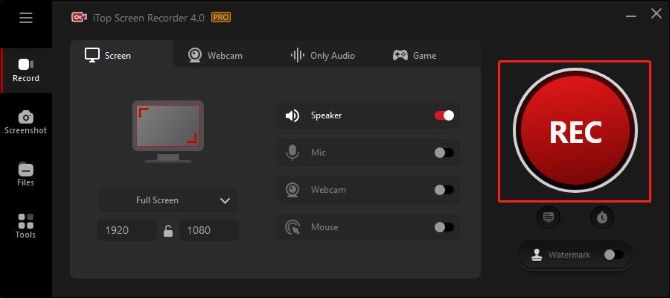
7. Stop screen recording on Disney Plus. Click Stop (the red square icon) from the toolbar on your screen. Click the Pause to temporarily stop screen on Disney Plus.

Tips: The recording on Disney Plus ends the moment you click on the stop button.
8. Find all your recorded Disney Plus video. All your recorded videos will be saved in the Files > Video folder. Now preview, edit, denoise, or view it in the local file by right-clicking the selected video.
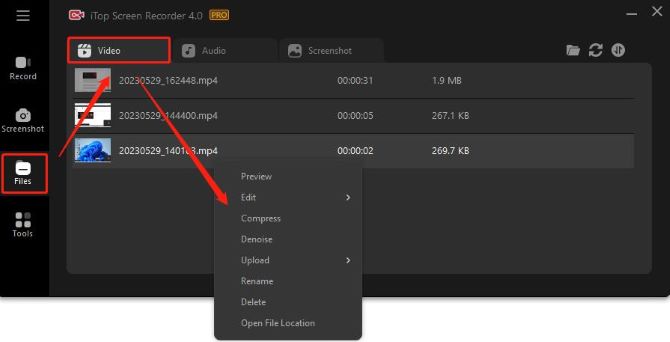
It’s extremely easy and efficient to screen record Disney Plus on PC with iTop Screen Recorder, it has a concise and user-friendly interface and offers you multiple benefits.
How to Capture screen on Disney Plus on Mac
For Mac users, you can rely on the free and built-in screen recorder, QuickTime Player to record your preferred Disney Plus movies and shows. It is widely used to record different types of videos on various streaming platforms.
Here are the detailed steps for how to record Disney Plus on Mac below:
1. Hold shift + cmd + 5 simultaneously. At the bottom of your screen, you’ll find a control bar appears.
2. From the control bar, choose whether you want to record entire screen or record selected portion. Drag over the section you want to record a customized part of your screen.

3. Adjust your recording settings by clicking Options from the control bar. Choose the built-in microphone to record audio, select the timer as 5 or 10 seconds to have a delay for recording, and choose a location to save the recorded video.
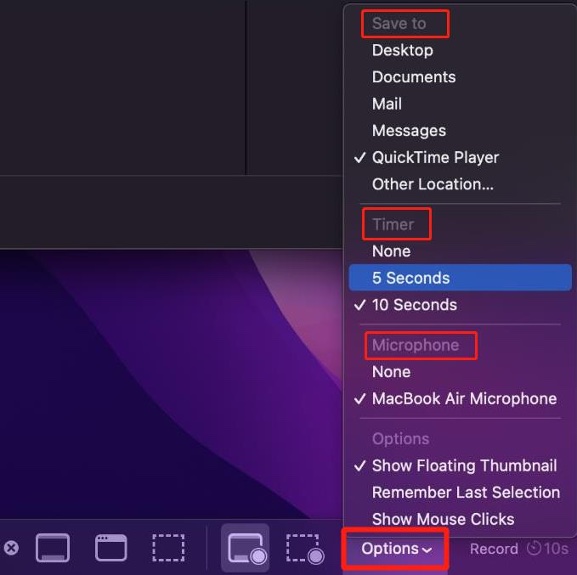
4. Start recording on Disney Plus. Click on the Record button on the toolbar. The record will start in 5 or 10 seconds.

5. Go to the Disney Plus website on your browser and play the video you want to record.
6. Stop recording on Disney Plus. On the top right corner, click the stop icon. Once the recording ends, the recorded video will pop up, click on it to view and play.

How to Screen record Disney Plus on iPhone and Android
If you want to stream Disney Plus videos on your iPhone or Android, you can turn to its default screen recorder to capture the screen when playing a Disney Plus movie or episode. But you might encounter a black screen issue while using this method.
In this case, apart from using the built-in recorder, you can also choose PlayOn Cloud to capture screen on Disney Plus with ease.
PlayOn Cloud is a popular mobile application that brings various mainstream video platforms together and enables users to watch videos with friends and record them easily for offline use.
But be aware that PlayOn Cloud only provides free storage for seven days, and it will require credits for each recording after that.
Step to screen record Disney Plus via PlayOn Cloud
1. Visit the App Store on your iPhone (or Google Play Store on your Android) to download PlayOn Cloud app.
2. Open the PlayOn Cloud app on your smartphone and select Disney Plus from its Channels tab.
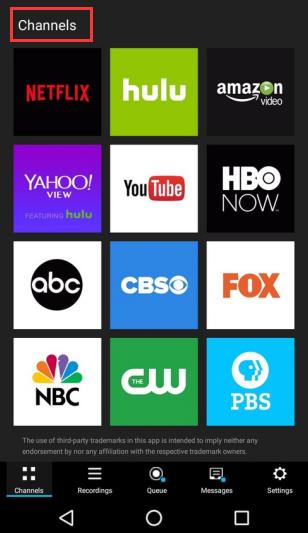
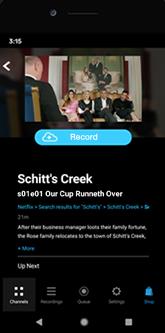
3. Select the Disney Plus video you to record. You can click the video title to see the details.
4. Click the blue Record button to start recording.
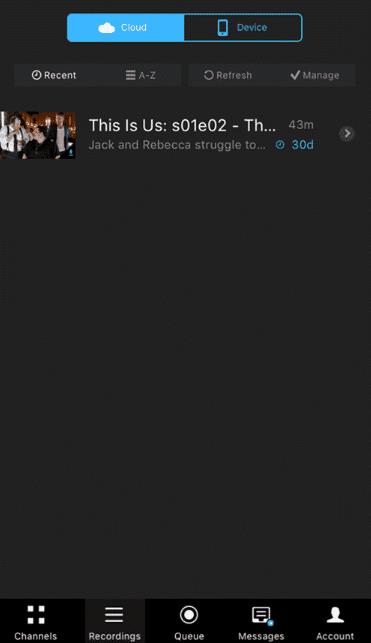
Once it is finished, you can visit the Recordings tab to verify the recorded Disney Plus videos.
FAQs about screen record Disney Plus
A: If you are recording Disney Plus for personal use such as saving the video to watch it offline, it is legal. However, if you’d like to share and distribute recorded content from Disney Plus for commercial purposes, it will be illegal.
A: Like other media services platforms, Disney Plus owns and protects its available content, including shows, movies, and more. With DRM (Digital rights management), it prevents you from recording the screen on its app. But using web browsers does not have such strict restrictions.
A: Disney Plus can detect screen recording if the recording is done through its app. Since Disney Plus prevents the users from taking screen captures of the content, you are likely to encounter a black screen. However, if you use a third-party screen recorder that is separate from the app, it will not be able to detect them.
A: Since Disney Plus does not provide a built-in recording feature, the best way to record Disney Plus videos in 4K / HD is to use a professional third-party recording tool like iTop screen recorder. You can adjust the video quality from standard, high to original, and set the frame rate and bitrate from Settings > Format.
A: Yes, you can schedule a screen recording on Disney Plus with the help of a screen recording software. Simply choose a screen recorder in the market that provide you with the schedule recording feature, now schedule a time for screen recording on Disney Plus.
A: Few Smart TVs have the ability to record streaming video content from Disney Plus. Though you can try to record Disney Plus on a smart TV, it is generally preferred to directly download the shows or movies from Disney Plus on your smart TV, and enjoy the contents with friends after that.
More Articles:
How to Record Streaming TV on PC and Smart TV

