Users reported that they encountered the error message “The current input timing is not supported by the monitor display” when opening certain applications or at the beginning of their Windows 11 or Windows 10 system startup process. The main triggers for this issue are problems with the monitor connection or monitor settings that exceed its allowed resolution or refresh rate.
In this post, we will help you fix the error and get your monitor back to normal by providing the top five solutions you can try to avoid this issue.
# The reasons for causing the current input timing is not supported by the monitor display
We researched what was causing “the current input timing is not supported by the monitor display” issue by investigating various user reports and the solutions they took to resolve the issue. Coming to the conclusion that there are 3 different situations that could cause this particular problem:
- The monitor is set outside its allowed resolution or refresh rate: This is one of the most common reasons for this error to occur. This error can appear if your system is working fine but when trying to open any game or third-party graphics application. Then the game resolution should be changed or the monitor should be changed.
- Faulty connecting cables: The cables that connect our PC to the monitor may start to fail. If your computer or any application suddenly stops working, the cable may be faulty.
- Outdated graphics card driver: The graphics card driver plays an important role, so if it is outdated, you may experience this problem.
If you are currently looking for a solution to this particular issue, this article will give you 5 basic troubleshooting guidelines. Just follow.
Solution 1: Use a different cable

As has been determined, the issue with the monitor display on your Windows 11/10 computer does not support the current input timing could be a case of a loose connection cable between the PC and the monitor.
Therefore, we would first recommend that you switch to another cable to connect your system to the monitor. Several users claim success, so you might try this. If you decide to buy a new cable, look for shorter but higher quality cables, not length.
If the problem persists, skip to the next solution.
Solution 2: Change your monitor settings
As mentioned above, to fix this issue, you should change the current input timing to a specific resolution and refresh rate as suggested in the error message. Therefore, we recommend that you change your monitor settings and follow the guidelines below:
For Windows 11, 10, 8:
Step 1: Right-click on any empty area on your desktop, then select Display Settings.
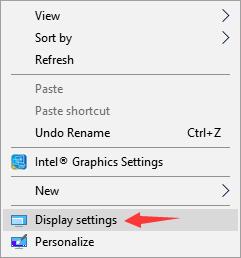
Step 2: In the Display section, scroll down and find the Display resolution choice, and change it to the specific resolution as the error message indicates.
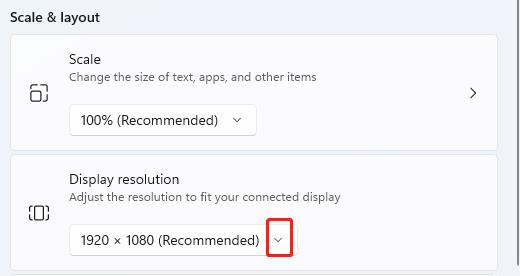
Step 3: Click Keep changes to confirm the change.

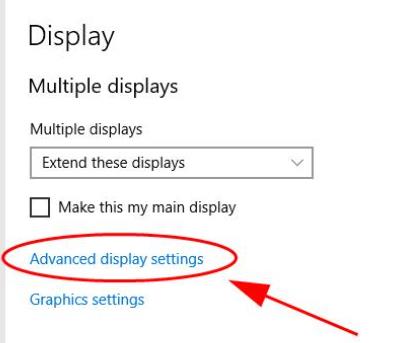
Step 4: Then click Advanced display settings on the same screen.
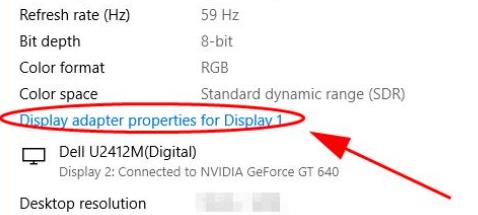
Step 5: Click Display adapter properties for Display.
Step 6: Go to Monitor and set the screen refresh rate to 60 Hertz.
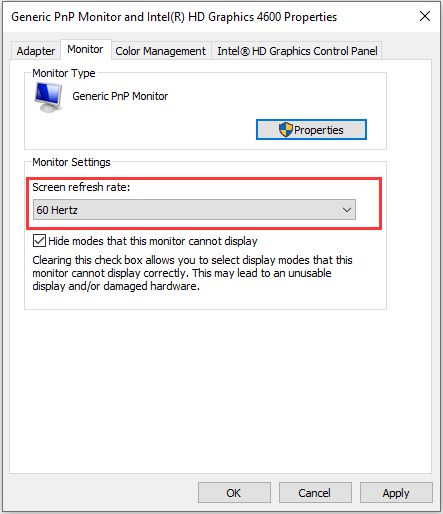
Step 7: Click Apply and OK to save the changes.
For Windows 7:
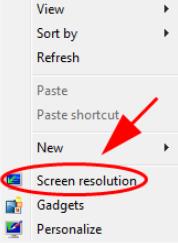
Step 1: Right-click on any empty area on your desktop, then select Screen resolution.
Step 2: Change Resolution to the specific resolution just like the error message says.
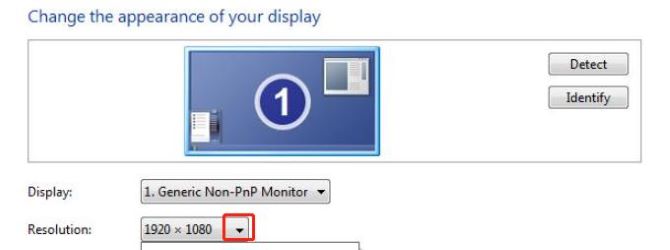
Step 3: Click Apply and Keep changes.
Step 4: On the Screen Resolution interface, click the Advanced settings link.
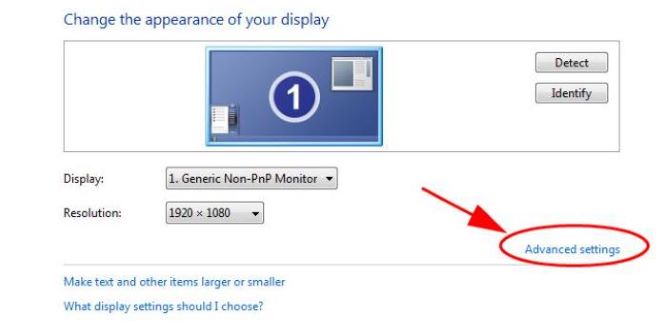
Step 5: Under the Monitor tab, set the Screen refresh rate to 60 Hertz.
Step 6: Save the changes by hitting Apply and OK.
Now, you can check whether the error message disappears. If not, skip to the next solution.
Solution 3: Update graphics card driver
A damaged graphics card driver will also cause your input timing not supported error, so it is necessary to update it from time to time. You can update your video card drivers manually through Device Manager, in the Optional Updates section under Windows Update, or from the graphics card hardware manufacturer’s website. But these three manual methods are likely to make mistakes for novices. Therefore, we will highly recommend you an automatic driver tool.
Driver Booster will update your drivers without investing time, patience or technical skills on your part. The tool does all the work for you with just a few clicks. Driver Booster is a must-have utility designed to update all outdated drivers on Windows. The program scans your computer’s drivers and automatically updates them as needed from a database of over 3,000,000 drivers and game components.
It can even identify missing drivers and up-to-date but faulty drivers. This driver update software is easy to use and has several customization options to give you more control over your computer. Besides updating drivers, Driver Booster also introduces several powerful tools to improve system compatibility and stability.
Step 1: Download, install and run Driver Booster on Windows 11 or Windows 10.
Step 2: Scan for all outdated drivers.
Click the icon Scan in the center of the page and then Driver Booster will scan the outdated, missing, and faulty drivers and give an outdated driver list.

Step 3: Update Drivers.
Look for the graphics card and click the icon Update next to it. Then Driver Booster will download and install the latest graphics card driver for you.
Tips:
You can click the option Update Now at the top right to update all outdated drivers at one time.
Solution 4: Boot your computer in low-resolution mode
Many people say that using low-resolution mode in the computer to match the resolution of the monitor can effectively fix the “the current input timing is not supported by the monitor display” error. Therefore, you can also try to start your computer in a low-resolution mode to match the resolution of your monitor.
Windows 11/10/8:
Step 1: Turn off your PC.
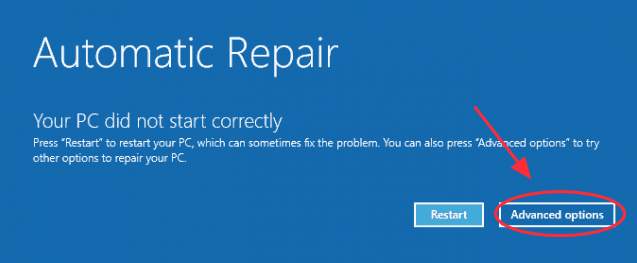
Step 2: Press the power button to turn on your PC, then hold the power button down until the PC shuts down automatically (about 5 seconds). Repeat this more than 2 times until you see the Preparing Automatic Repair as the picture shows below.
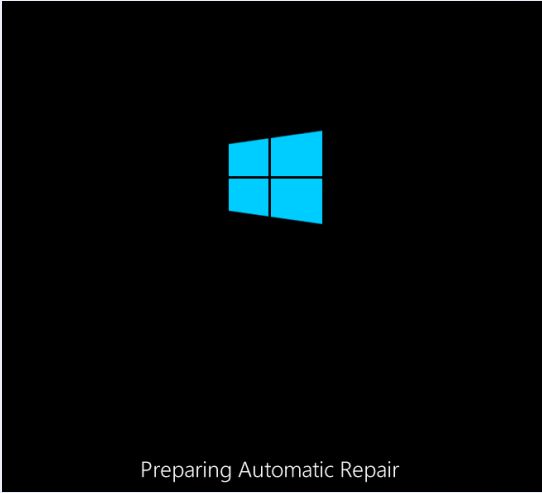
Step 3: Then wait for Windows to diagnose your PC.
Step 4: Click Advanced options, then the system will bring up the Windows RE (Recovery environment) function.
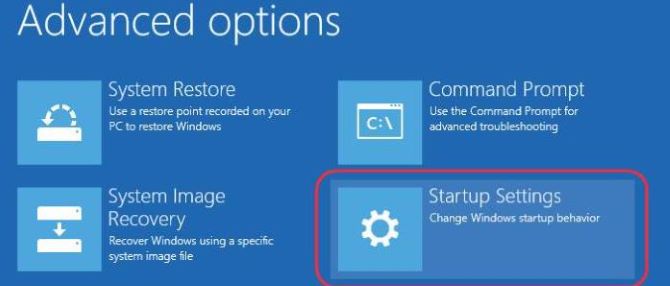
Step 5: Go to Troubleshoot > Advanced options > Startup Settings > Start.
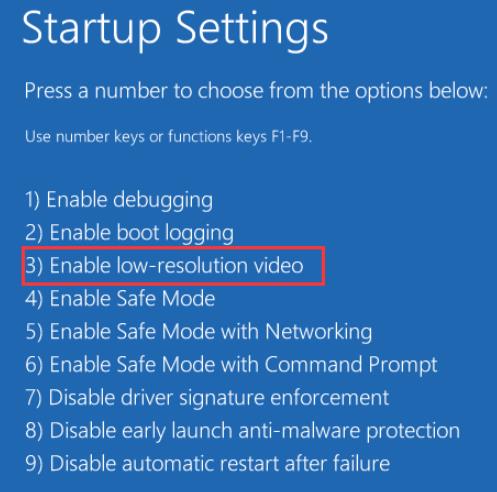
Step 6: Press F3 to choose Enable low-resolution video.
Windows 7:
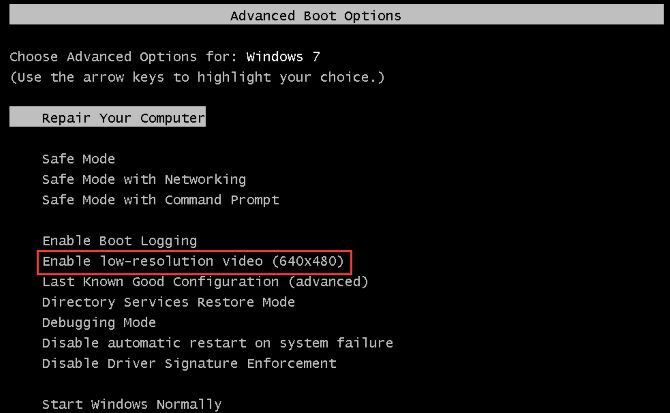
Step 1: Reboot your PC and press F8 after the monitor displays its logo or post screen and before the Windows logo appears.
Step 2: Under the Advanced Boot Options window, select Enable low-resolution video to boot the computer.
Now, your issue should be fixed. If you’re still experiencing this issue after following the steps above, please move on to the next solution below.
Solution 5: Disable Custom Scale factor settings
If you are still troubled by the fact that the current input timing is not supported by the monitor display, then you can try to disable the custom scale factor setting. Some users have reported that the problem is due to a wrong scale factor in the display settings. To do this, follow the steps below:
Step 1: Boot your system in safe mode.
Step 2: Press Win + I key at the same time. Once the Windows settings appear, click System settings.
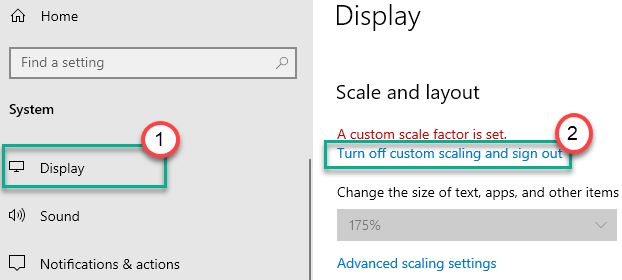
Step 3: On the left side, click Display when the system settings appear.
Step 4: On the right side under the Scale and Layout settings, click Turn off custom scaling and sign out.
Step 5: You will be signed out from your current account. Log in to your account and restart your computer normally.
Conclusion:
Hope the five solutions given in this article will come in handy and resolve the “the current input timing is not supported by the monitor display” error in your computer.
More Articles:
How to Add Clock on Windows 10 Desktop


