Recording Zoom meetings can be a huge help. You can view, reconfirm and practice every detail that has been discussed in the meeting from the recorded Zoom video, or you can record the entire meeting and share it with the attendees who couldn’t be there.
Are you looking for a way to record Zoom calls? In this post, we are going to give you comprehensive solutions on how to record Zoom calls on Windows, Mac, Chromebook, iOS, and Android in easy steps. Especially when you are not the host or didn’t get permission from the host. Read on to learn more.
Can I Record a Zoom Meeting?
Yes.
You can record on Zoom with its built-in recorder (Zoom Local Recording for Desktop devices and Zoom Cloud Recording for Mobile devices) easily and fast.
Even you are a participant or bystander without recording permission, you can still record Zoom calls using different methods.
The recording feature of Zoom is available for a free user or a paid subscriber. The recorded video and audio can be saved to the local system, and they can be uploaded to cloud storage like Google Drive, Dropbox. The recorded video can also be shared over different streaming platforms like YouTube.
Reminder:
If you are going to be recording a Zoom meeting, you should pay attention to the privacy of other people. It is advisable to inform the attendees that you will be recording them, what the recording will be used for, and how long the information will be kept for. Share a link to attendees after the session with the recording if necessary.
How To Record a Video On Zoom With Permission?
Here we will show you the steps on how to record a Zoom meeting if you have permission. If you are the host or co-host, then you will have the control to record meetings.
But if you are a participant, you should get the recorded permission from host at first.
Tips: How to enable permission to a participant?
Click the Participants at the bottom of the meeting window → Select the name of the participant to whom the ant to authorize the recording permission → then click on More → Allow to Record Local Files.
#1 Use Zoom Local Recording On Your Computers (Windows, Mac)
As a popular tool, you can record meetings on your HP, Lenovo, Surface, Chromebook, and Mac computers with Zoom Local Recording function. Recording Zoom meetings on computer is totally free, so it has limits. You should notice the limitations for local recording.
Limitations:
- You can not record Active Speaker, Gallery View and shared screen separately
- It does not support Audio transcription
- It does not support Shared screen recording layout with active speaker thumbnail or without any thumbnails (local recordings will always show a thumbnail gallery view with the shared screen)
- It does not capture nonverbal feedback or meeting reactions.
So if you want to customize the recording Zoom or get the full control of whole recording process, you can directly view here: record Zoom meetings without any limitations.
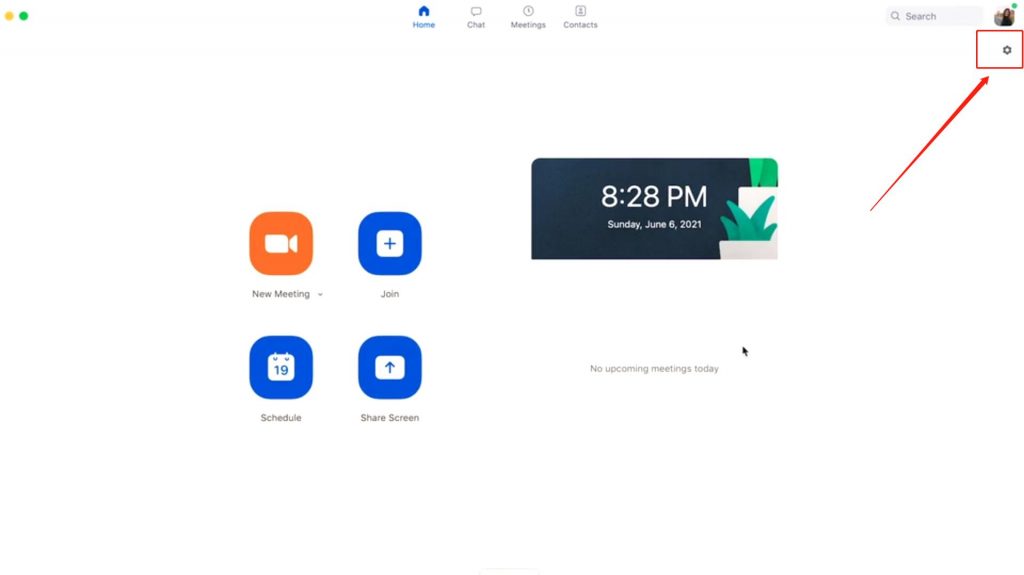
Step 1: Click the settings in the top right corner beneath your profile picture.
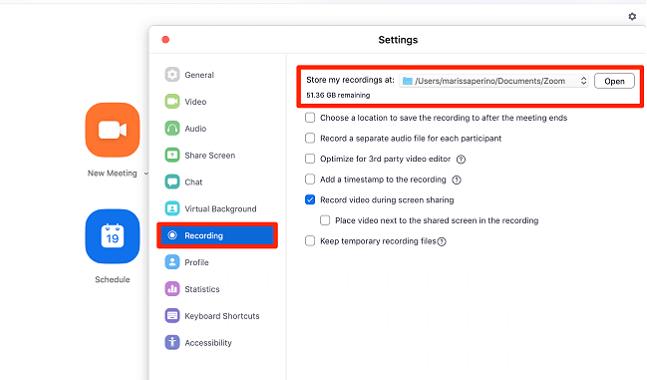
Step 2: Click recording, go towhere my recordings at, and click open to choose where you’d like to save your recordings. Choose your recording preferences from the options given below.
Step 3: Launch the Zoom app andstart a Zoom meeting as a host.
Step 4: Click the record button on the control bar at the bottom of the screen to start recording.
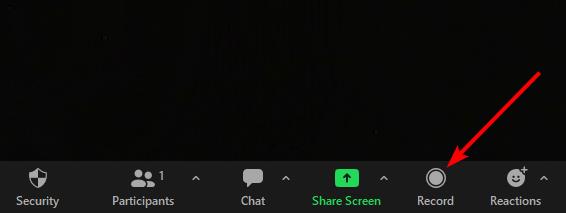
Tips: You can select “record on this computer” or “record to the cloud”.
Step 5: After clicking that button, a “Recording…” message will appear in the upper left corner. Click to pause or stop the recording by clicking the different icons whenever you want.

Step 6: After the meeting ends, Zoom will convert the recording to an MP4 file and open the folder that contains the file so that you can easily access it.
#2 Use Zoom Cloud Recording to Record Calls on iPhone/Android Phones
And for mobile devices such as iPhone, iPad, and Android phones and tablet, the built-in Zoom Cloud Recording can provide help.
Reminder:
You can’t record a Zoom call from your iOS or Android device with a free account. You’ll need to buy the Pro account. Also, Zoom only supports cloud recording on smartphones.
Step 1: In the control toolbar, tap More.

Step 2:Tap Restore to the cloud.
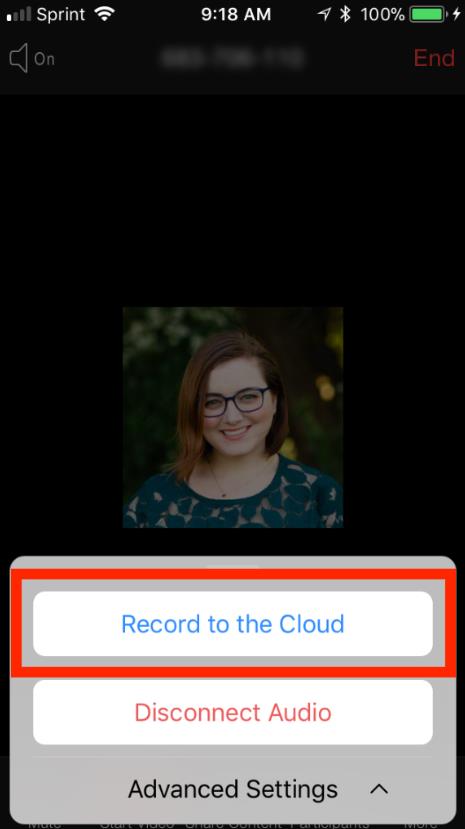
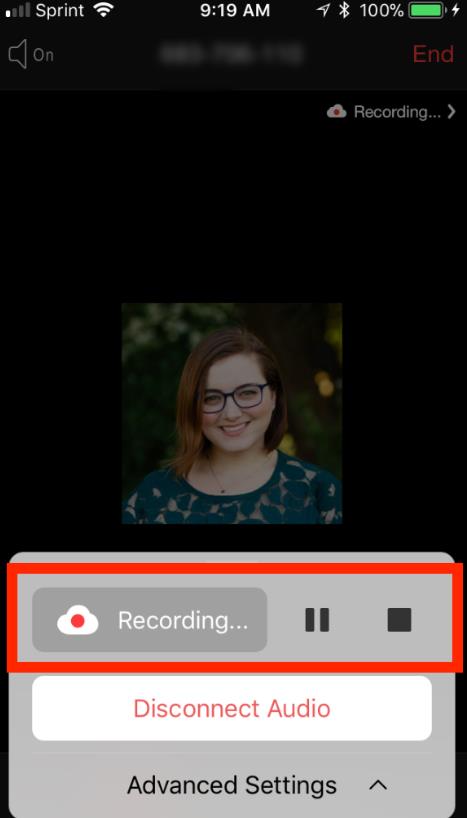
Step 3: In the top-left corner, Zoom will indicate its recording. To pause or stop the recording, tap the More again, and tap different icons to Pause or Stop Recording.
Step 4: After the meeting ended, the recording will process and appear under Recordings on the Zoom web portal.
Tips:
If you record the Zoom meeting in the cloud, you will get notified via email when the process is done. After that, you can access or manage your cloud recording as you want.
How to Record on Zoom without Permission
Sometimes, asking your host for permission to record the call may not be allowed or you don’t want to do it for some reason. Fortunately, recording Zoom without permission is possible. There are different methods to achieve this depending on what devices you are using. Read on to choose which method suits you.
You can record Zoom meetings without the approval of your host using the Windows built-in Xbox Game bar or an easy-to-use third-party tool. However, Game Bar is only available to users of Windows 10 and higher versions, and for a more convenient and efficient recording, a third-party tool is a more ideal choice.
#1 Record Zoom Meeting on Windows with Screen Recorder [Recommended]
If you are looking for a more secure, high-definition, and professional video recorder to record a meeting on Zoom, iTop Screen Recorder is highly recommended. iTop Screen Recorder brings you an intuitive way to record a Zoom meeting without permission.
The best thing about iTop Screen Recorder is that even the output files do not have any promotional watermark and are in 1080p HD/4K with no lagging and no time limit. You can record any part of the screen with multiple output formats and share in one click. Besides, you can edit the recorded Zoom videos using its built-in video editor and decorate them with various filters, transition effects, stickers, and elements.
With iTop Screen Recorder, you will enjoy an easy and smooth recording experience.
- Record Unlimited Meetings Even without Permission
- Record Videos Without Watermark
- Record Zoom Calls with the Audio
- Edit and Share Your Zoom Recordings
- Upload Videos to Google Drive and Dropbox Automatically
Here are the easy steps to record Zoom meetings efficiently using iTop Screen Recorder:
Step 1: Download and install iTop Screen Recorder, then open it.
Step 2: Join a meeting in your Zoom.
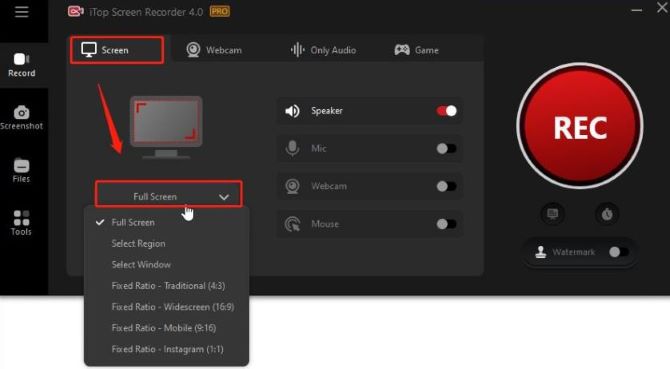
Step 3: Select the area where you want to record Zoom meeting. You can choose from Full Screen, Select Region, Select Window, Fixed Ratio (4:3), and Fixed Ratio (16:9) by clicking the drop-down arrow behind Full Screen.
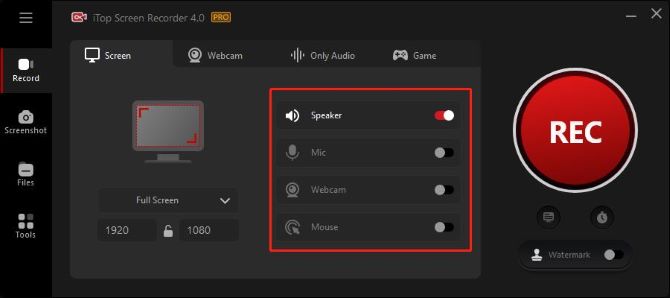
Step 4: Choose to open Speaker, Mic, Mouse, or Webcam if you need them.
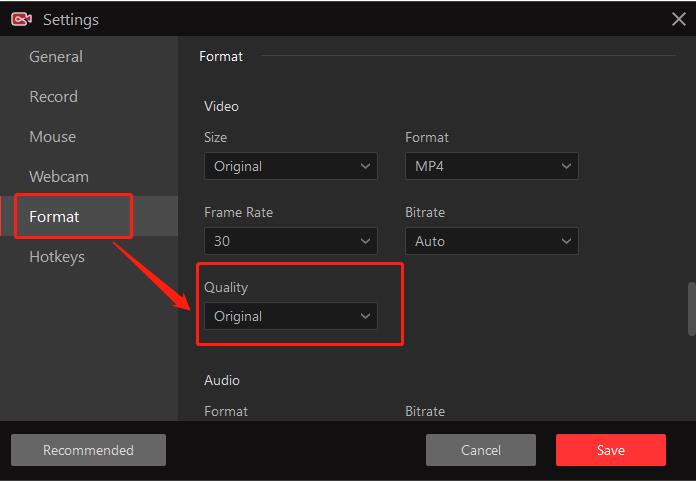
Step 5: You can also click Settings on the top left corner, and select Format > Quality > Original to record higher-quality Zoom meeting videos.
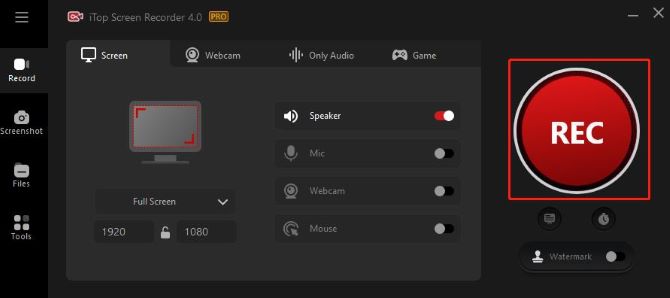
Step 6: Click REC to start the recording. It will start recording after a countdown of 3 seconds by default.
Step 7: A red control bar will appear on the bottom right corner of the screen. You can click the Pause icon to temporarily stop and click Stop (the red square icon) to finish the recording.

Step 8: Check the Recordings in the Files > Video section. You can right-click the video, and select Open File Location to find out where it is stored on your PC. You can then preview, edit, or view the recorded Zoom meeting in the local file.
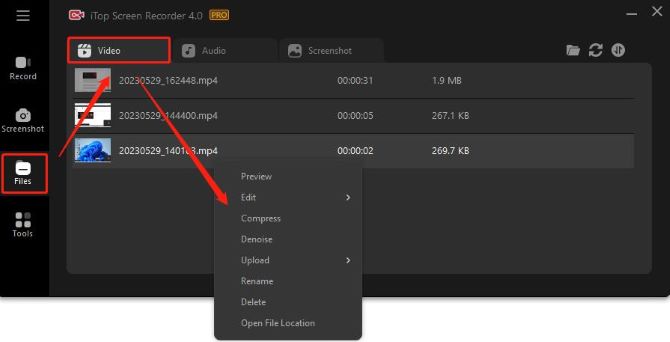
You will be able to record your Zoom call once you complete the steps. The whole recording process with iTop Screen Recorder is quite simple and time-saving.
#2 Using Xbox Game Bar to Record Zoom Video Calls
Another way how to record on Zoom without permission on a PC is to use Windows 10 built-in screen recorder Xbox Game Bar. However, Windows 7 and Windows 8 don’t come with this built-in tool. Even with Windows 10, it still consumes a lot of CPU.
Step 1: Press Windows Key + G to launch the Game Bar.
Step 2: Join in the Zoom call.
Step 3: Navigate to the Capture bar on the top-left screen and click Start Recording.
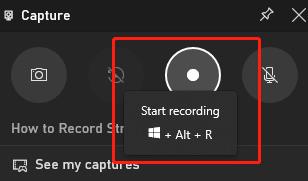
Step 4: Press Windows Key + Alt + M to record the microphone.
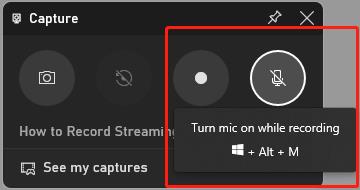
Step 5: After the Zoom call, click on Stop or press Windows Key + Alt + R to stop recording.
#3 Record Zoom Call Without Permission On Chromebook
You can take a record a Zoom call with your Chromebook. After recording the call, you can also view, edit, delete, and share video.
Here are the easy steps to record your Zoom calls on Chrombook:
Step 1: Press Shift + Ctrl + Show windows.
Step 2: In the menu at the bottom, select Screen record .
Step 3: Select an option:
- Record the full screen.
- Record a partial screen.
- Record a window.
Step 4: To stop recording, at the bottom right, select Stop recording.
Tips: How to find your Chromebook recordings?
1. Press Shift + Ctrl + Show windows.
2. At the bottom, select Settings and then Select folder. Recordings or screenshots you take are added to the folder you select.
#4 How To Record on Zoom Meeting Without Permission On Mac
If you’re a Mac user, like Windows users, you can record Zoom meetings without permission in two ways: using Mac’s built-in screen recording feature or using a screen recording software. Here we’ll discuss how to record Zoom videos in easy steps by using the powerful Quick Time player.
Step 1: Join the Zoom call.
Step 2: Go to the application folder and open Quick Time Player.
Step 3: Navigate to File > New Screen Recording.
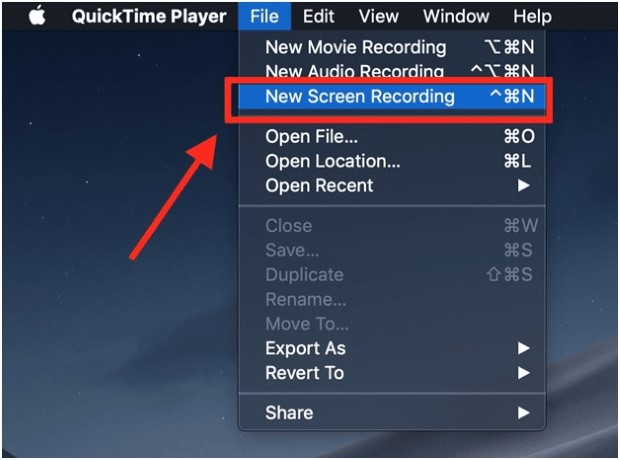
Step 4: Click the Red Button to start recording your Zoom call.
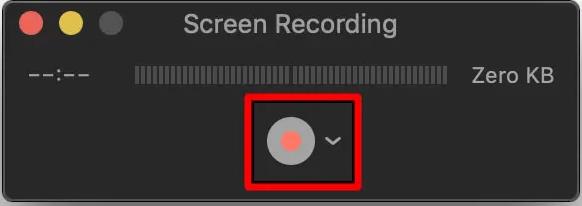
Step 5: Click the Stop button to stop recording.
#5 How To Record on Zoom Meeting Without Permission On iPhone
Now let’s take a look at recording Zoom meetings on iPhone without permission. It is convenient since you can use the screen recorder provided by the iOS system itself. See the steps below:
Step 1: Go to Settings, and scroll to Control Center. Tap on it and go to More Controls. Scroll down to find Screen Recording, and tap on the + icon to add it to the Control Center.
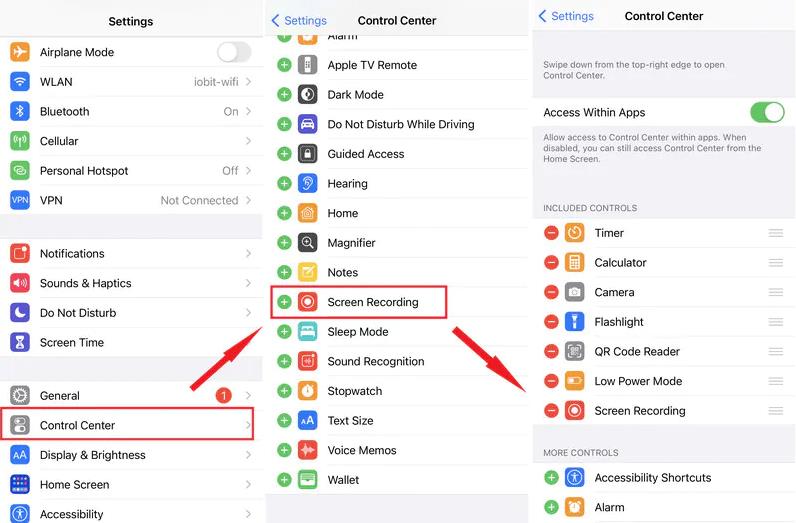
Step 2: Join a Zoom meeting.
Step 3: Pull up your iPhone’s Control Center from the bottom and look for the Screen Recorder Icon. Click on it to start recording your Zoom meeting.
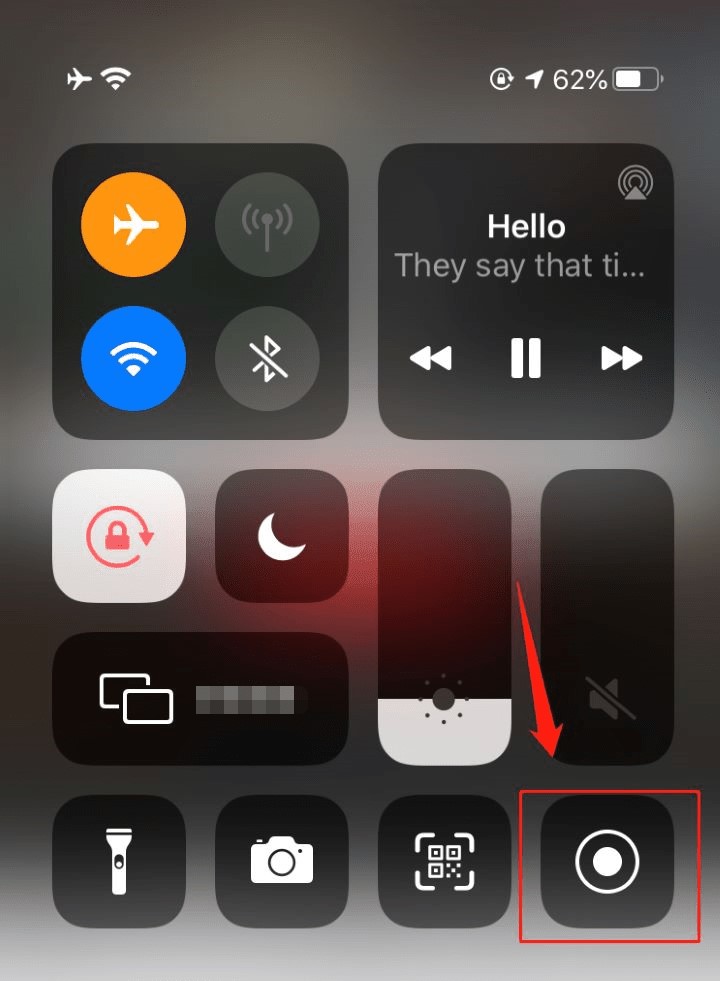
Step 4: Click the Red Record Button to Stop recording. You could find your videos in the Photos app.
#6 How to Screen Record on Zoom Call Without Permission On Android
To record a Zoom call without host permission on your Android device, you can use the built-in screen recorder of your phone. Or you can install another screen recording app and record the meeting using that app.
Here are the steps to start recording on Zoom using the built-in recorder:
Step 1: Join a Zoom call.
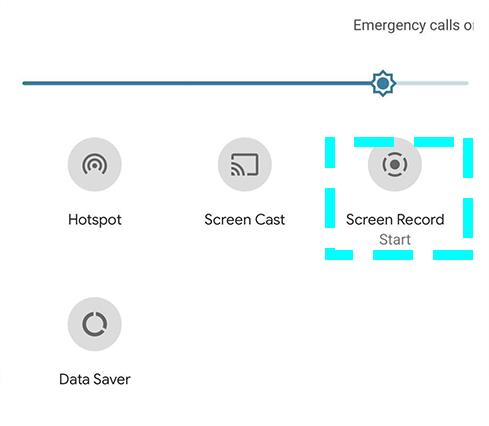
Step 2: Go to Quick Settings > Screen Record, then tab it. It will ask for your confirmation, click Start.
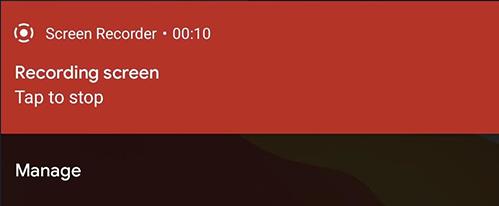
Step 3: Click the Red Banner in the notification panel to stop recording on Zoom.
Step 4: Open the Google Photos app, and tap Library to find the recorded Zoom call in Movies.
#7 How to Screen Record on Zoom Without Permission Online
If you do not have permission, and also do not like to install software to record your Zoom meeting, an online screen recorder will be your ideal choice.
iTop Online Screen Recorder gives you a one-stop solution to screen record Netflix online for free. It fully supports Chrome, Firefox, and Opera. You can use it to record Zoom meetings without permission on both PCs and Macs for free.
However, iTop online screen recorder has its limits: it will add a default watermark on your recording, and it can only record for 5 minutes and twice per day. If you want to screen record your Zoom meeting with no watermark and no time limit, see iTop Screen Recorder for more details.
Step 1: Open iTop Online Screen Recorder.
Step 2: Select recording options. Select a webcam, system audio, and microphone to record Zoom meeting according to your preference.
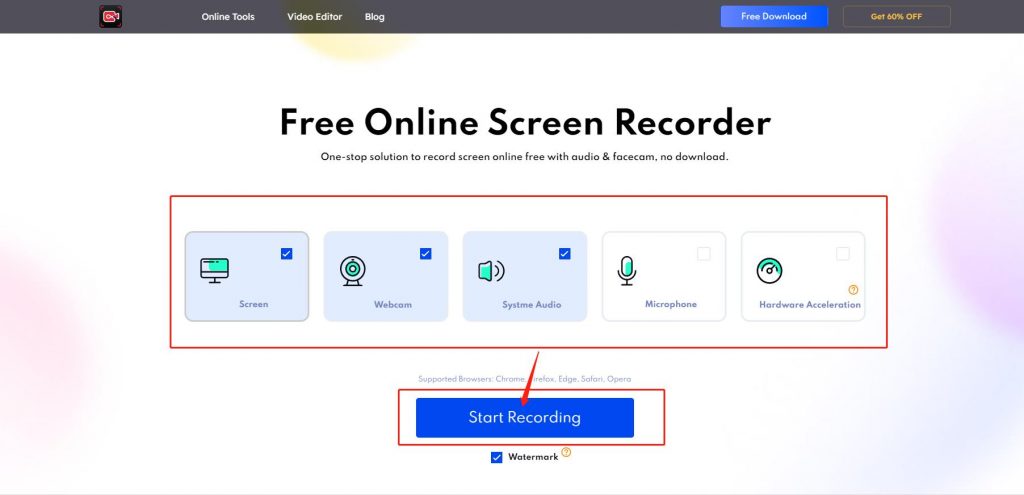
Step 3: Click start recording.
Step 4: Choose the recording region, and click Share. After a 3-second countdown, it will automatically record Zoom meeting without permission.
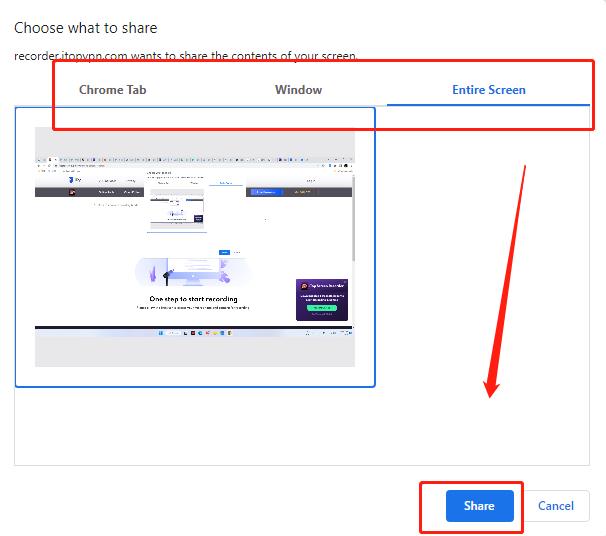
Step 5: Click stop when the meeting is finished. You can download the recording to your hard drive.

In this complete guide, we have introduced different available ways to record a Zoom meeting on various devices including PC, Mac, iPhone, and Android. We hope it is helpful and informative to you. You can decide to use any of the methods above based on your preference and device.
FAQs About Record Zoom Meeting
A: Yes, but the host must first give you recording permission. Ask your host to click manage participants at the bottom of their window. This will show them a list of participants. The host must click your name, tap more, and select allow record.
A: Zoom will notify everyone in the meeting that they are being recorded. The recording sign will appear on a red box on the screen. If any participants object to the recording, you won’t be able to access it after the meeting. But if you record Zoom meetings using a third-party screen recording, the participants won’t be notified.
A: Zoom automatically converts recorded videos to MP4 files after recording. You can also transform manually by clicking on Recorded > Meetings, choosing the preferred file, and selecting Convert. If you want to output your Zoom video in various formats (MP4, AVI, MKV, MOV, MP3, FLAC, etc), iTop Screen Recorder will be a great choice.
A: There are generally two reasons for it. You are not the host or have not been granted permission by the meeting host. Or you are a free user and want to record Zoom on a mobile device.
A: Go to Settings > Recording, and select record a separate audio file for each participant. Or you can choose to optimize for a third-party video editor to work with separate audio tracks.


