Contents:
Windows Has Detected an IP Address Conflict Overview
What is My IP Address and How Can I Find it?
How to Fix Windows Has Detected an IP Address Conflict?
Windows Has Detected an IP Address Conflict Overview:
Whether you try to connect to the wireless network or Ethernet one, Windows has detected an IP address conflict is likely to show up unwittingly.
Furthermore, it will tell you that another computer on this network has the same IP address as this computer. As you know, so long as a PC connects to a network, wireless or Ethernet, it will have its unique IP address, which distinguishes it from other devices on the same network.
But actually, this IP address conflict will come to Windows 10 even if there is only one device connecting to the network. That is why now you are supposed to figure out and then fix an IP address conflict on Windows 10, 8, 7.
What is My IP Address and How Can I Find it?
An IP address is the unique identity of your PC when it connects to a network, by which a device differs from the other.
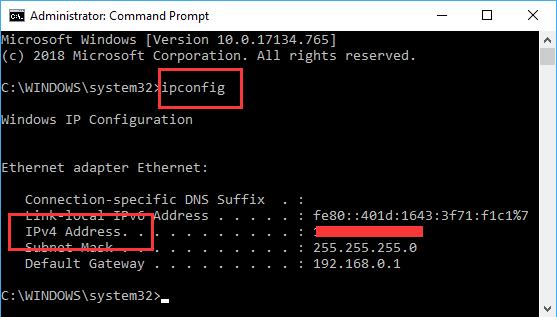
As for how you can find it, the simplest way is through Command Prompt.
In Command Prompt, enter the command ipconfig and then press Enter. You can see what the special IP address is on your PC.
Related: How to Fix Command Prompt Not Working on Windows 10
How to Fix Windows Has Detected an IP Address Conflict?
Windows has detected an IP address conflict and another computer on this network has the same IP address as this computer. This error can happen to two or more devices connecting to the same network and more often than now, it does occur when only one device uses the network.
Simply put, an IP address conflict denotes that your IP address has been used by another device, so one of the ways to fix it is configuring another IP address for it. What’s more, Windows IP address conflict can also be caused by other factors like network router and network driver. You may as well make them targets as well.
Solutions:
3: Release, Renew and Reset IP Address
4: Obtain IP Address Automatically
5: Assign an IP Address Manually
Solution 1: Reboot the Network Router
The instant Windows 10 warns you that Windows has detected an IP address conflict, the very first thing you are prone to do is powering off the wireless Router or the modem and then powering it on after several minutes.
It can also fix many network errors, including your connection was Interrupted a network change was detected and server DNS address could not be found. There is a high probability that restarting the router can also tackle Windows IP address conflict.
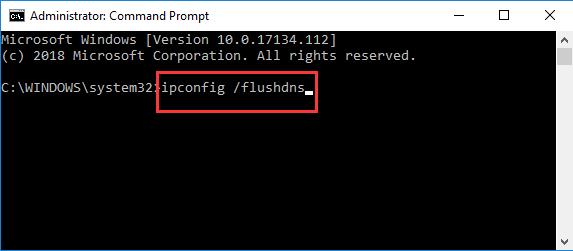
Solution 2: Flush DNS
You can try to flush the DNS cache on your PC to check whether the IP address conflict can be removed.
1. Type in Command Prompt in the search box and then right click the best-matched result to Run as administrator.
2. In the Command Prompt, input ipconfig /flushdns and then hit Enter to flush the DNS.
At this moment, you would better connect to the WIFI or Ethernet network to see if Windows has detected an IP address conflict error will still pop up.
Solution 3: Release, Renew and Reset IP Address
Now that Windows IP address conflict happens, there is much need for you to configure the IP address on your PC. Here you can choose to release, renew and them reset it in hope of fixing an IP address conflict on Windows 7, 8, and 10.
Release IP Address:
In Command Prompt, type in command ipconfig /release and then press Enter.
Renew IP Address:
In Command Prompt, enter ipconfig /renew and then stroke Enter key.
Reset IP Address:
In Command Prompt, input netsh int ip reset reset c:\resetlog.txt.
Or you can choose to reset the IP address and then refresh and renew it.
Solution 4: Obtain IP Address Automatically
If another computer on this network has the same IP address, you might as well determine to obtain the IP address automatically by disabling the static IP.
1. Go to find Control Panel > Network and Internet > Network and Sharing Center > Change adapter settings.
2. Right click the network you are using to turn on its Properties.
3. Then double click Internet Protocol Version 4 (TCP/IPv4) to go to its Properties as well.
4. Tick the circle of Obtain an IP address automatically and the circle of Obtain a DNS server address automatically.
5. Click OK to save changes.
Now you can try to connect to the network and surf online. Perhaps IP address conflict has been removed successfully.
Solution 5: Assign an IP Address Manually
If using the automatic IP address failed to resolve computer IP address conflict, it is also feasible to assign a static IP address for Windows 10. But before you get to change the IP address manually, you would better find your computer IP address in Command Prompt and note it down.
In Internet Protocol Version 4 (TCP/IPv4) Properties, choose to Use the following IP address and Use the following DNS server addresses.
For instance, in terms of IP address, you can set it as 192.168.1.111, and Subnet mask 255.255.255.0, and Default Gateway 192.168.0.1.
Upon assigning the IP address for Windows 10, it is likely that you can search online or enjoy your games without Windows IP address conflict.
Solution 6: Disable IPV6
As few programs support IPv6, you might as well stop it on Windows 10 to let IPv4 work alone. That can greatly avoid interruption, thus can also be regarded as a way to fix Windows has detected an IP address conflict on Windows 10.
You need to disable IPv6 protocol in registry editor.
1. Press Windows + R to activate the Run box and then type in regedit in the box.
2. In Registry Editor, navigate to HKEY_LOCAL_MACHINE\SYSTEM\CurrentControlSet\Services\Tcpip6\Parameters.
3. Under Parameters, on the right pane, right click the blank space to Create a New DWORD Value.
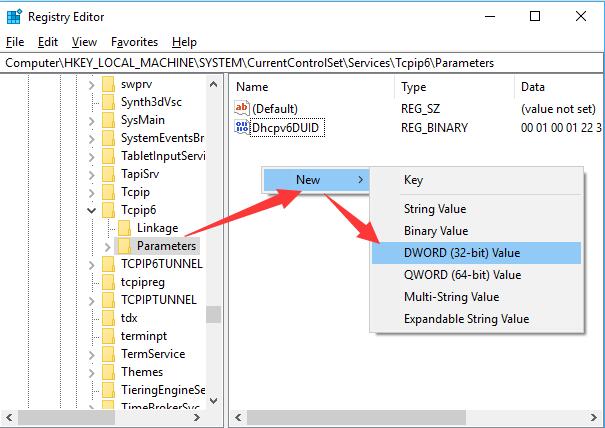
4. And then right click the newly created value to Rename it as DisableComponent.
5. Double click DisableComponent to change its Value data to 0ffffffff to disable IPv6.
6. Here value data 0 for DisableComponent means enabling IPv6.
7. Restart Windows 10 to take effect.
Hope it will get rid of Windows 10 IP address conflict, thus removing a network Cable is not properly plugged in or may be broken on Windows 10.
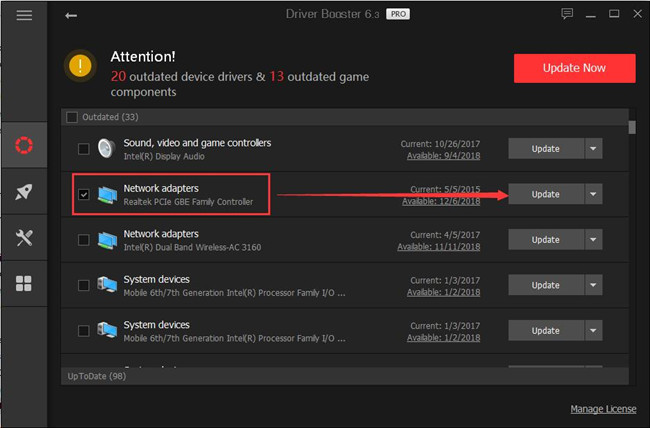
Solution 7: Update the Network Driver
Working as a plus option, updating the driver for the network adapter can’t be avoided as well. Much as you have done, if you are tired of resolving this IP address error by yourself, you can turn to Driver Booster to use it update the network driver automatically for you. Unlike Device Manager and the official site, Driver Booster is more capable of fixing network failure on Windows 10 with no exception for Windows IP address conflict.
1. Download, install and run Driver Booster on Windows 10.
2. Click the Scan button. Driver Booster will immediately start scanning for the missing, outdated, corrupted and even faulty drivers.

3. In the search result, pinpoint Network adapters and then decide to Update the network driver for Windows 10.
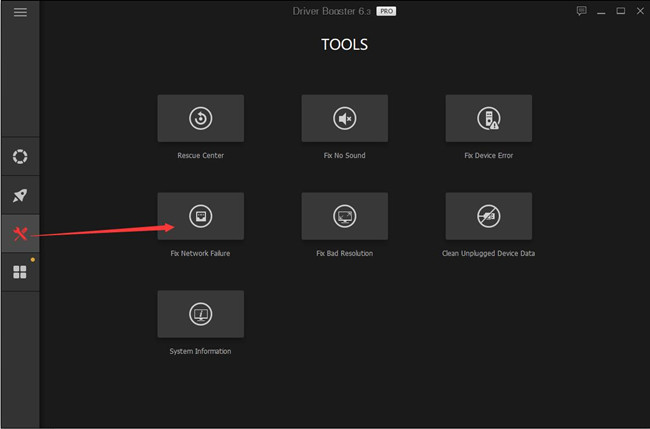
Tips: You can firstly utilize Driver Booster to fix network failure.
After the scanning, on the left pane of Driver Booster, hit Tools > Fix Network Failure.
In some cases, Driver Booster is the perfect tool to help fix another device on this network is using your IP address.
In summary, you can find feasible ways towards Windows has detected an IP address conflict from this article.


