Contents:
Server DNS Address Could Not Found Overview
What Does It Mean When Server DNS Address Could not be Found?
Why Couldn’t Server DNS Address be found?
How to Fix DNS Address Could Not Be Found on Windows 10?
Server DNS Address Could Not Found Overview:
Sometimes, you may suddenly come across a DNS error showing you server DNS address could not be found on Chrome when you are browsing a webpage, especially on Windows 8.1 and Windows 10.
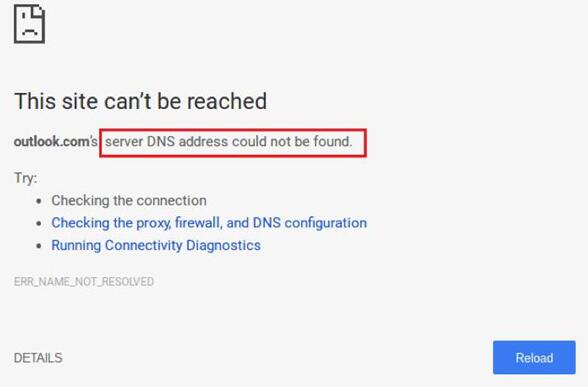
In some cases, you found this site can’t be reached, whereas some other websites are accessible. For instance, you can’t open Facebook or YouTube in particular. Of course, just like encountering the error that server IP address could not be found, you may feel annoyed due to DNS server unavailable, which makes you unable to surf smoothly.
Now, you would better try to dive into this DNS unfound issue to see what causes the DNS not discovered and how you can do to fix DNS address could not be found on Windows 10.
What is a DNS Server?
DNS, short for Domain Name System, contains a directory of domain names and translate these names into IP address. It matters in network connections. That’s why many of you run into network issue due to the DNS error.
What Does It Mean When Server DNS Address Could not be Found?
As you all know, short for Domain Name System, DNS works like a Phone book to translate computer hostnames into IP addresses. For instance, this Domain Name System can deliver the domain name www.example.com to its corresponding IP address, thus letting you access this website.
From this perspective, while DNS is unable to translate correctly the domain name into the IP address, Google Chrome will inform you that your DNS server might be unavailable.
Why Couldn’t Server DNS Address be found?
Generally speaking, you may run into this DNS error mainly because of two aspects, either the problems with the website you try to open or issue of the network you are using on Windows 8 or 10.
Or in some special cases, perhaps the DNS server address has been hijacked by a virus. Hence your frequently visiting webpages will be tampered and prompt you with pop-up windows.
On the ground of the above analysis, it is time that you managed to take measures to get the DNS server found and available for your use.
How to Fix DNS Address Could Not Be Found on Windows 10?
Normally, according to what causes the DNS error, you can try some targeted methods to eradicate the DNS server not available issue on Windows 8.1 and 10. Now, try the methods below in accordance with your specific error with the DNS server address.
Solutions:
1: Delete Host Cache on Chrome
2: Prevent Malware from Modifying DNS Addresses
3: Manually Configure DNS Settings
Solution 1: Delete Host Cache on Chrome
For website troubles leading to DNS server not found, which means you can access other websites except the one or ones meeting with the DNS address error, you would better refresh the webpage for several times or visit it in another time.
For users who hit upon this DNS problem on Google Chrome solely but runs well in other browsers like Firefox, Safari, etc. there is much need for you to tweak settings in Chrome, such as deleting the host cache in Chrome.
1. Double click Google Chrome from the Desktop to launch it.
2. In Google Chrome search bar, type in chrome://net-internals/#dns and press Enter to get in.
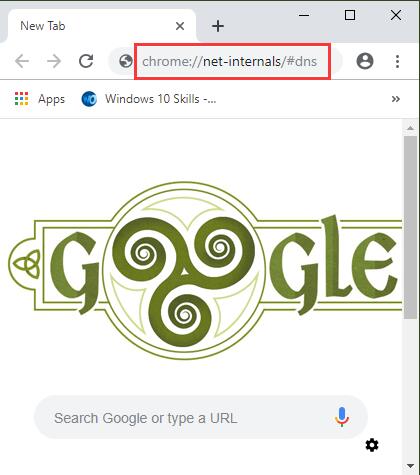
3. Then click Clear host cache in Chrome DNS settings.
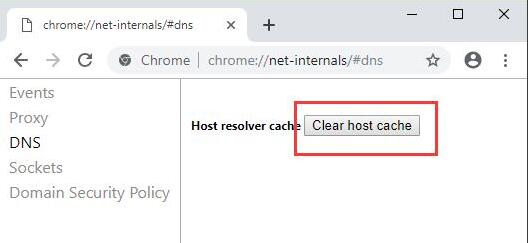
4. Restart Google Chrome app.
When Chrome opens again, make attempt to re-open the website to see if DNS address error will appear to it this time. For some people, you may come across another DNS error called DNS server not responding. On that occasion, perhaps you need to move forward.
Solution 2: Prevent Malware from Modifying DNS Addresses
As per the culprits of this DNS address not found error, Google Chrome can’t find your server DNS address as it is modified by malware. In this way, it is strongly recommended and highly effective that you take advantage of Advanced SystemCare to protect your DNS address. DNS Protector is proficient in safeguarding your DNS address. Especially for Google Chrome users, Advanced SystemCare will enable you to use Chrome DNS particularly.
1. Download, install and run Advanced SystemCare.
2. Under Toolbox, click DNS Protector to install it immediately.
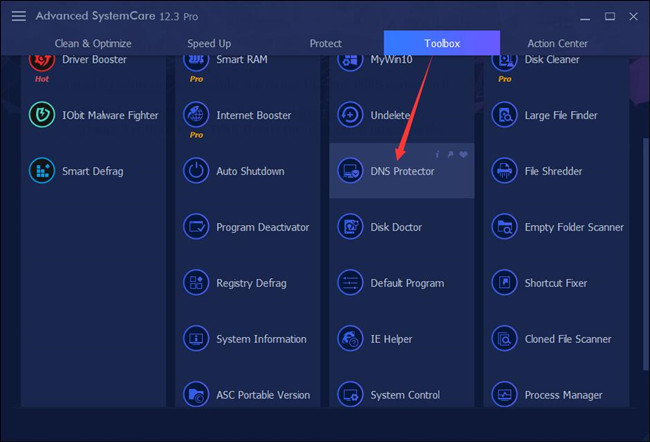
3. Switch on DNS to make sure DNS is protected.
4. Then Choose the DNS settings you want to protect and you need to Use the following DNS Providers, like Google Public DNS Servers.
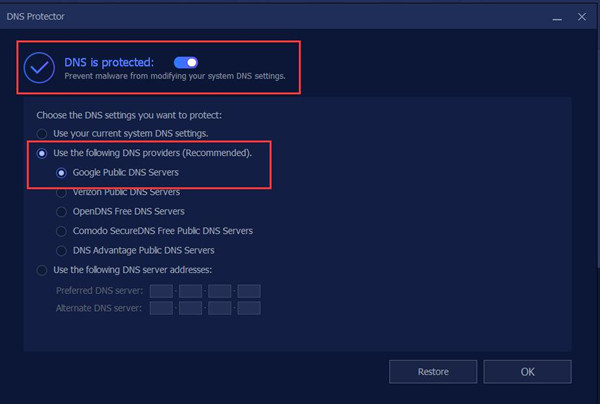
From them on, your DNS address is protected and won’t be modified by any malware. In doing so, server DNS address could be found on Windows 10 warning message will disappear as well. If not, perhaps you have to change the DNS settings on your own.
Solution 3: Manually Configure DNS Settings
For client meeting with the unavailable DNS and not working network on other applications at the same time, like Twitter or Facebook, it is high time that you fix the network error on your PC instead of the website or Google Chrome. For example, refresh the DNS.
As it is known all, customers tend to set PC to obtain an IP address and DNS server address automatically. While, in some situations, you need to configure a specific DNS address on your own when searching online.
1. Head to Control Panel.
2. In Control Panel, find out Network and Internet.
3. Locate Network and Sharing Center and then Change adapter settings in another window on the left pane.
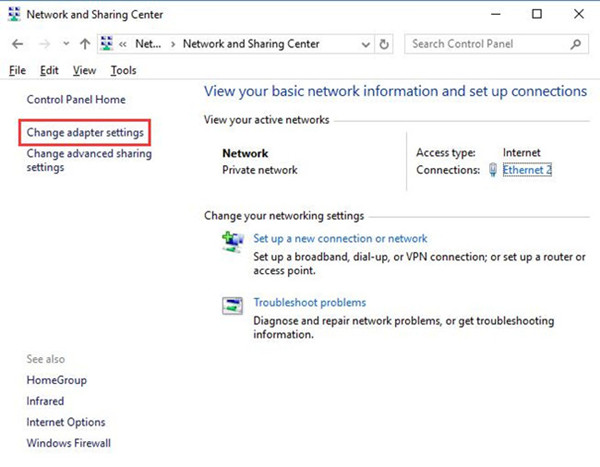
4. Right click the network you are connecting to open its Properties.
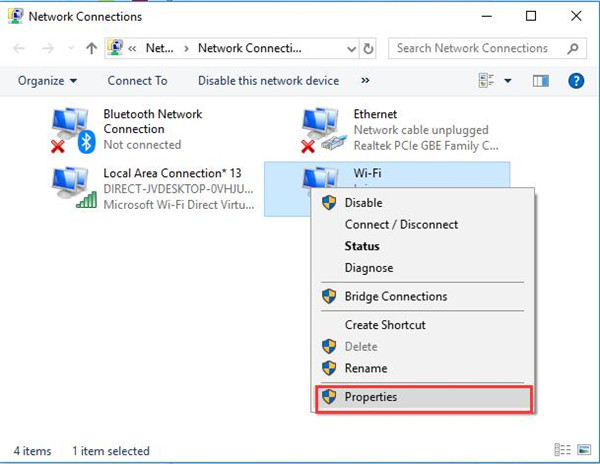
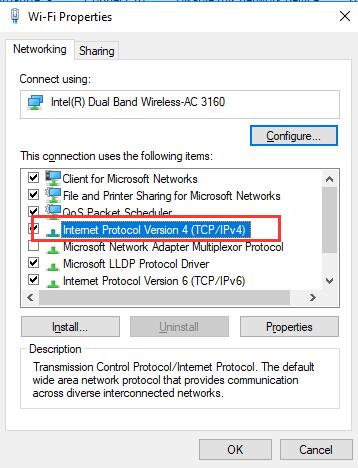
5. Then double click Internet Protocol Version 4 (TCP/IPv4) to open its Properties.
6. Tick the circle of Use the following DNS server addresses and then set Preferred DNS server as 8.8.8.8 and Alternate DNS server as 8.8.4.4.
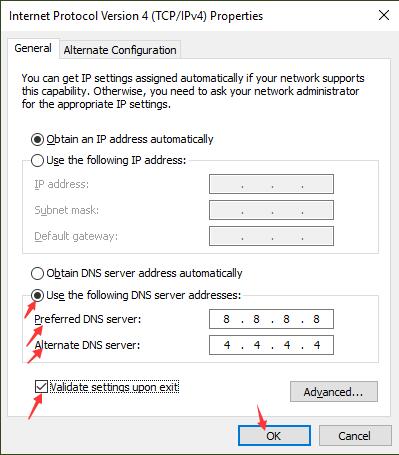
7. Then remember to check the box of Validate settings upon exit and hit OK to save changes.
In this way, you will have configured the DNS server for Chrome manually.
Try to open Google Chrome and enter a website. Probably, DNS server error has disappeared from Windows 10. If necessary, you would better let your PC use the DNS server automatically after the DNS problem is solved.
Solution 4: Refresh DNS on Windows 10
Every time you surf online, there will be DNS caches left on your PC. Now in case of DNS cache corruption, it is a necessity for you to flush or reset the DNS.
1. Type in Command Prompt in the search box and then right click it to Run as administrator.
2. In Command Prompt, input ipconfig /flushdns and then stroke Enter.
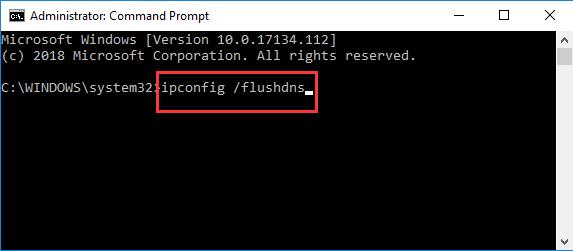
3. Again, in CMD, enter ipconfig /renew and run it by pressing the Enter key.

4. Reboot Windows 10 to take effect.
At this moment, it is likely that the DNS server not working will be fixed successfully. Chrome will find the DNS server address and there is no error when you are accessing websites.
Solution 5: Delete Files in etc Folder
In normal circumstances, the information of internet protocol will be stored in under the folder C:\Windows\System32\drivers\etc, in which there are mainly find folders, including hosts, networks, protocol, imhosts, and services. Different folders consist of different content. For instance, hosts folder manages various IP addresses.
For purposes of getting rid of any network or file corruption, it is suggestible that you manage to remove all the five files in the etc folder on Windows 10.
1. Double click This PC from Desktop to navigate to File Explorer on your PC.
2. Then go to C:\Windows\System32\drivers\etc.
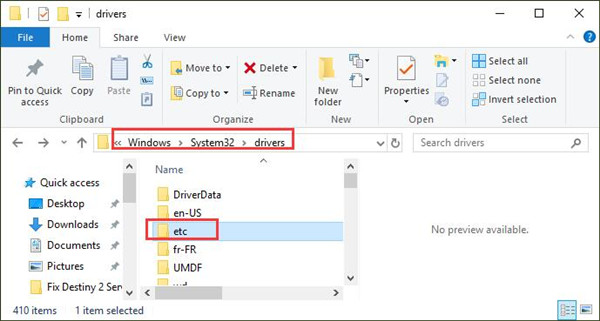
3. Double click etc folder to open it.
4. Right click the files in the etc folder to Delete them all.
After that, heading for a site on Chrome to check whether or not the site can be reached and DNS address can be found on Windows 10.
Solution 6: Restart DNS Client Service
There is a service in charge of DNS server named DNS Client on Windows 10. Therefore, once your DNS address could not be found, you should consider making changes to this DNS service, for example, manage to restart it.
1. Press Windows + R to open the Run box and then enter services.msc in the box. After that, hit OK to bound for Services dialog.
2. In Services, scroll down to find DNS Client and then right click it to Restart.
The time the DNS service is re-launched, surf online to see if your DNS is unavailable now.
Solution 7: Scan for Malware
Last but not least, for people who have not yet taken advantage of any program to scan for virus or threats after installing Windows 10, you are supposed to do a full scan for the services, applications, files for your PC. There is the probability that your PC is attacked by virus or malware, so DNS server is not working on Windows 10. That is why sometimes you will be asked to scan for the virus for your PC now and then.
Here for the sake of PC safety and fixing the DNS error, you need at least make full use of Windows inbuilt scanning tool Windows Defender to safeguard Windows 10.
1. Go to Start > Settings > Update & Security.
2. Under Windows Defender, try to Open Windows Defender Security Center.
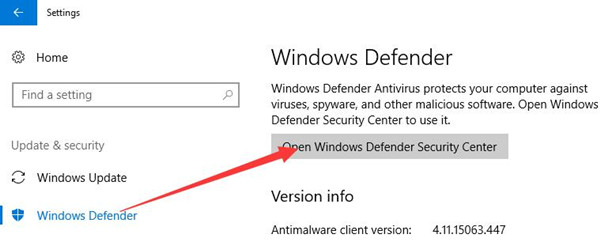
3. Then you are capable of running Windows Defender scanning functions, including Virus & threat protection, Device performanc3e, etc.
If lucky, Windows Defender will detect what virus causes DNS server unavailable.
Or, you can attempt to get certain third-party antivirus software to help troubleshoot Windows 10 and resolve server not found issue with DNS.
Solution 8: Update the Network Driver
Last but not least, you may as well make sure the network driver on Windows 10 is up-to-date and can work well. Only when drivers are compatible can clients search online as usual without any issue like DNS address could not be found.
1. Open Device Manager.
2. Expand Network adapters and then right click the Network driver to Uninstall device.

The moment your network adapter driver is removed from Windows 10, it is high time that you managed to reinstall a compatible one.
As there may be no network on Windows 10 because of the DNS sever not found error, you may turn to Driver Booster to utilize it to download or update the network driver automatically. From its 3-million plus driver database, Driver Booster is capable of updating your driver accurately and quickly.
3. Download, install and run Driver Booster on Windows 10.
4. Click Scan to urge Driver Booster to start searching for any missing, corrupted, or faulty driver.

5. Pinpoint Network adapters to Update the network drivers.
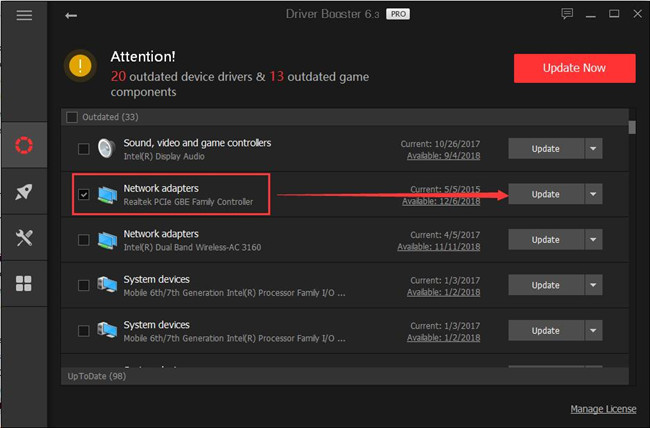
Tips: You can Fix Network Failure in Driver Booster
In the left side of Driver Booster, choose Tools and then try to let it Fix Network Failure.
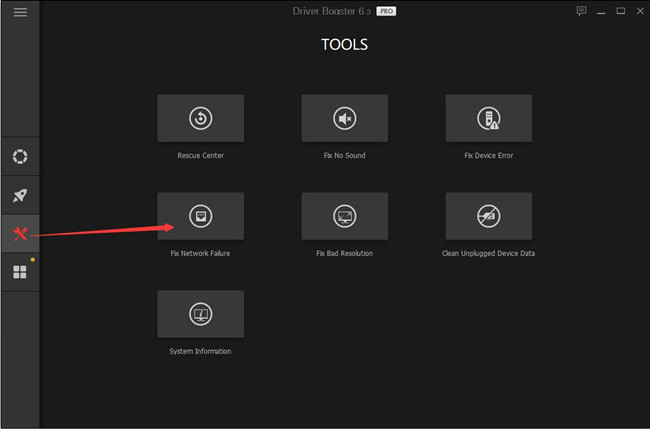
Or here you can also go to the official site to download and install the updated network driver for Windows 10 in order to resolve server DNS address could not be found.
With the latest network driver, in some cases, you will find the server DNS address unavailable has perished automatically.
Solution 9: Use a VPN
Or in some cases, you need to make sure you have used VPN when browsing on some browsers on some websites. If you haven’t opened the VPN, like ExpressVPN or NordVPN, it is understandable that sometimes DNS address could not be found will come to Windows 10.
In a word, in terms of DNS error, like server DNS address could not be found, you can try the above methods to fix it as soon as possible. What’s more, if you stumble upon another DNS problem the webpage is not available NS PROBE FINISHED BAD CONFIG, some of the solutions can often be helpful.
Related Articles:
Solved: Enter Network Credentials Access Errors on Windows 10

