Google Meet is a new player in the video conferencing market, offering video and audio conferencing capabilities along with compelling features like HD Audio, HD Video, and more. However, like any other online video conferencing application, it requires a microphone and speakers. But what if your microphone isn’t working in Google Meet and you can’t be heard in meetings?
If you want to know why this problem occurs and how to fix Google Meet Microphone not working on Windows PCs, follow this post. We’ll show you the main reasons and 10 proven solutions to help you fix the issue step-by-step.
# Why is My Microphone Not Working on Google Meet
In fact, there could be several reasons why the Google Meet microphone might not be working on your Windows computers. Some possible causes are listed below.
- The faulty input device is selected as the default microphone.
- Windows has blocked browser access to the microphone.
- Hardware or microphone may be faulty.
- The microphone is muted.
Solution 1: Unmute Yourself in Google Meet
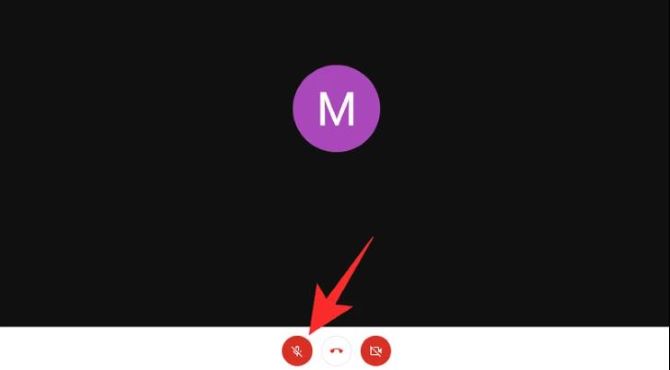
The first solution you should try is that you don’t lose sight of the fact that you can mute yourself in Google Meet. In addition to muting yourself (intentionally or not), connecting to a meeting in Google Meet after at least five participants have joined will also automatically mute your microphone.
Additionally, hosts can remotely mute your microphone. In both cases, only you can unmute yourself.
Look at the bottom of the screen during a meeting – a red microphone icon with a slash indicates that the microphone is muted. Click it to unmute yourself. This will allow your meeting members to hear you loud and clear.
Solution 2: Restart Web Browser and PC to fix Microphone Not Working in Google Meet
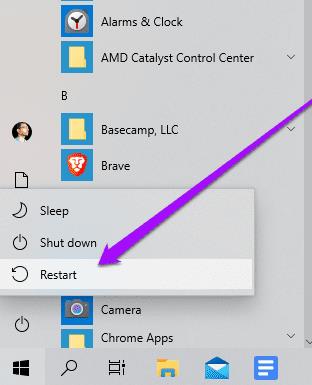
Simply restarting the browser can also fix microphone issues. This method clears the cache, restarts the extension in the background, and more importantly frees up any extra space that might be causing issues with the microphone.
If restarting the browser doesn’t help with the microphone issue in Google Meet, you can try restarting your PC. This will get rid of system cache files and background processes that can interfere with microphone functionality. This action also helps fix various microphone anomalies in Google Meet.
Solution 3: Check Your Hardware Connection
If you’re using a desktop computer, chances are your CPU has two different ports (microphone and speaker). It won’t work if you’re using the speaker port as a microphone.
Beyond that, if you’re using an external microphone, either connected to the headset or on its own, you should first check the physical connection of the headset/mic to the system. First, check for any cuts or unusual bends in the wires.
Any bumps in the wire could also indicate an internal bend in the wire, which could damage the microphone and prevent it from working properly.
If everything works, try disconnecting and reconnecting the headset/mic from the system. Not only will this reset the connection on the system side, but it will also remove any hardware connection issues that might be preventing the microphone from working properly.
Solution 4: Allow Access to Your Microphone
For your microphone to work properly, you also need to allow the operating system, browser, and applications to use your microphone. If you previously disabled microphone access in Windows settings when managing application permissions, Google Meet will not detect the microphone when needed.
Therefore, it is important to verify that you have the correct microphone access. Make sure the permissions are turned on, especially if you just connected a new microphone to your computer.
Here are the steps:
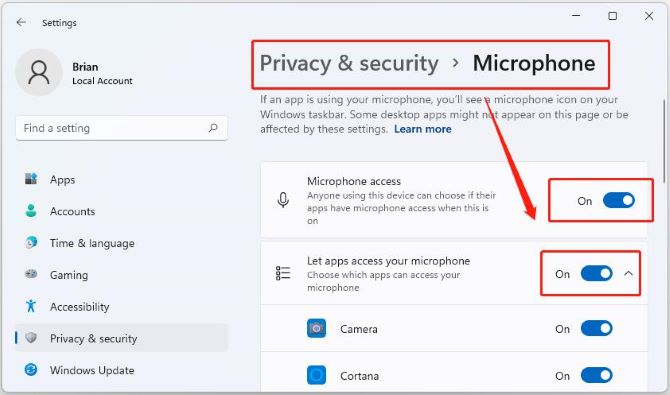
Step 1: On your keyboard, press the Windows logo key and I at the same time to open the Settings menu.
Step 2: Select Privacy & security on the left panel.
Step 3: Select Microphone on the right pane.
Step 4: Turn Microphone access On.
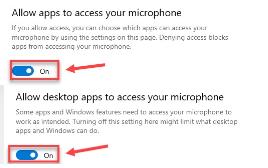
Step 5: Scroll down and make sure the button under Allow apps to access your microphone and Allow desktop apps to access your microphone is set to On. This makes it possible for your browser to access the microphone.
Solution 5: Check Google Meet’s Settings
Normally, your browser and Google Meet will use the microphone that you have set as the default on your computer, but if there is a problem, you can manually check that Google Meet is recognizing and accessing the correct audio device.
Below are the steps:
Step 1: Enter your online meeting on Google Meet.
Step 2: Click the lock icon at the far right of the Google Chrome search bar, and toggle on the permission to your microphone.
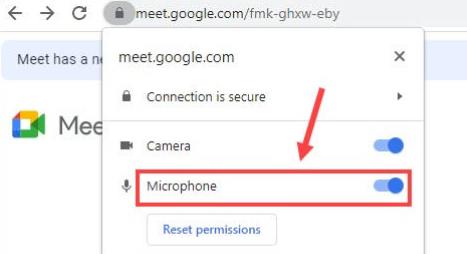
Step 3: Make sure your microphone is not turned off.
Step 4: Click the vertical ellipsis icon at the top left and select Settings.
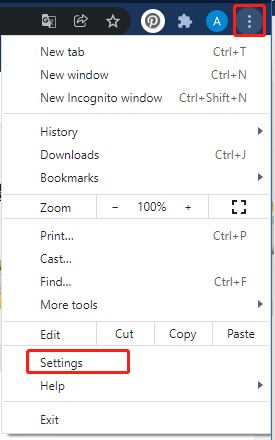
Step 5: From the drop-down menu under Microphone, select your primary microphone.
Solution 6: Check Your PC Sound Settings to fix Google Meet Microphone Not Working
Windows allows users to set the volume level for their system’s microphone, just like on their audio output devices. Other people in a Google Meet call won’t be able to hear you properly if your microphone volume is low.
Therefore, it is recommended that you check the level of your microphone when you encounter this issue of Google Meet Microphone not working on your PC.
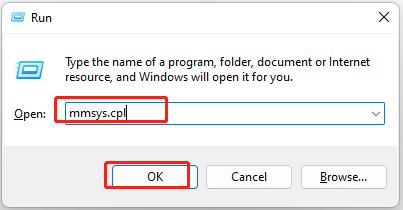
Step 1: On your keyboard, press the Windows logo key and R at the same time to invoke the Run command.
Step 2: Then type mmsys.cpl and click OK.
Step 3: Navigate to the Recording tab. First, make sure your microphone is enabled.
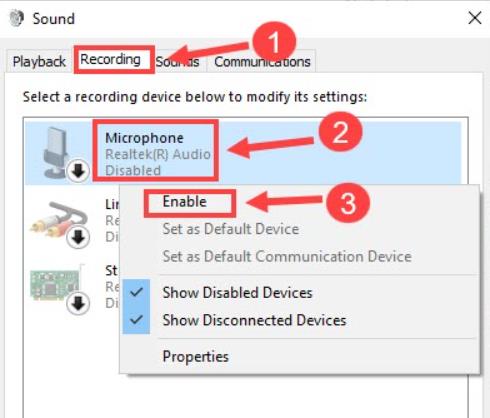
Tips:
If it’s not and displays a grey down-arrow icon, right-click it and click Enable.
Step 4: Click the Microphone you would like to use and click Set Default.
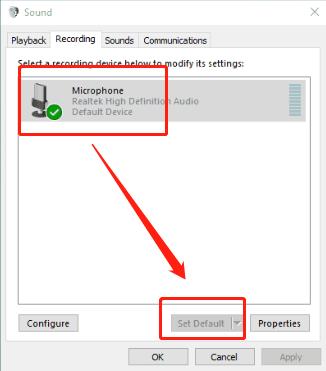
Step 5: You also need to set the microphone volume to a proper level: right-click the microphone and select Properties.
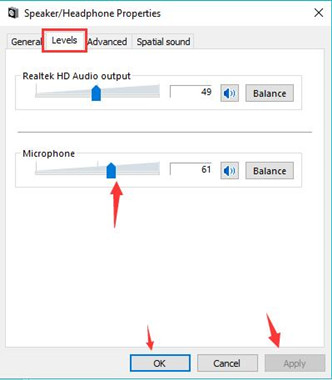
Step 6: Click the Levels tab and drag the microphone slider to turn the volume to the max. Then click OK to save the changes.
Solution 7: Update Your Audio Driver
Occasionally, the microphone drivers on your Windows system may be outdated, which may prevent your microphone from working properly in Google Meet. You should try updating your audio drivers to fix these issues.
You can manually update the driver with the built-in device manager on the Windows system, but this requires you to be familiar with computer hardware and is time-consuming.
Alternatively, you can choose to download and use Driver Booster to automatically update your audio driver. Driver Booster is a free driver updater for Windows that regularly checks for outdated drivers for your hardware and can even download and update all drivers with one click.
In addition, it supports more than 6,500,000 device drivers and the driver sources are from original hardware manufacturers, and it has passed the Microsoft WHQL test and IObit test.
Follow the guide below to help you easily update audio drivers on your computer.
Step 1: Download, install and run Driver Booster on Windows 11 or Windows 10.
Step 2: Click Scan.

Then Driver Booster will start to detect all the drivers, and give an outdated, missing, and faulty driver list for you.
Step 3: Find out your audio device and click the icon Update next to it.
Step 4: Wait for the updating to be completed.
Tips:
If you have more than one microphone device connected to your PC, you can click the option Update Now at the top right, and then Driver Booster will download and install the newest drivers for your audio devices.
Solution 8: Troubleshoot Microphone
If you have a problem with your computer’s microphone, Windows will be able to figure out what the problem you might be having, and if possible, might even fix it for you. This is done using the native troubleshooter tools available on Windows 10/11, which you can use to troubleshoot computer microphone-related issues.
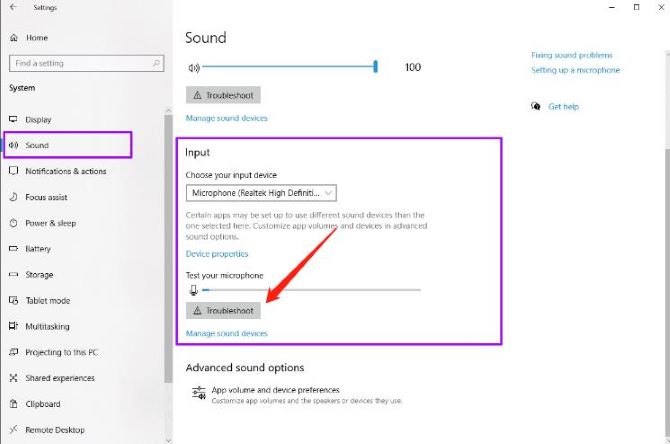
Step 1: Head to Windows Settings > System > Sound.
Step 2: Scroll down to the Input section, select your preferred microphone using the menu under Choose your input device, and then click Troubleshoot.
Solution 9: Restart Windows Audio Service
You can also try restarting the Windows Audio service to fix microphone issues you’re having with Google Meet.
Follow the guide below to help you get started.
Step 1: Press Windows+R to open your Run dialog box.
Step 2: Type services.msc in the Run dialog box and hit Enter.
Step 3: Now find Windows Audio in the list.
Step 4: Right-click on Windows Audio and click on Properties from the sub-menu.
Step 5: Click on Stop.
Step 6: Once stopped, wait for a few seconds and then click on Start again.
Step 7: Restart your PC and check whether your Microphone can work properly in Google Meet or not.
Solution 10: Disable Audio Enhancements to solve Microphone Not Working in Google Meet
There is an option to enable audio enhancements for the microphone on Windows. While this helps improve audio quality from the microphone, this setting has been known to interfere with the functionality of Google Meet.
If you’re having trouble with your microphone, it’s possible that the Audio Enhancement feature is enabled for your microphone on Windows.
Follow the guide below to help you disable your microphone’s audio enhancements.
Step 1: Open the control panel on your Windows PC.
Step 2: Click on Hardware and Sound, and select Sound.
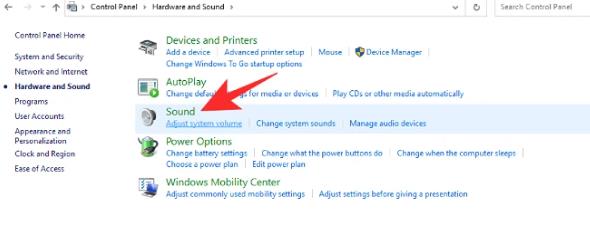
Step 3: Click on the Recordingtab at the top of your screen, select the microphone you wish to use during Google Meet meetings from the list, right-click on it, and select Properties.
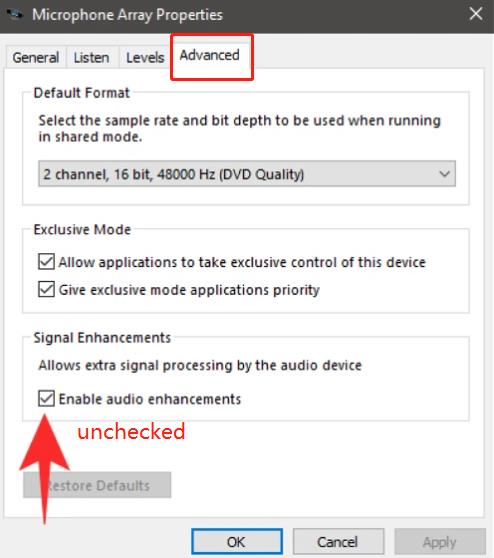
Step 4: Now in the Microphone Properties window, select the Advanced tab from the list at the top. Under the Single Enhancements option, uncheck the box beside Enable audio enhancements.
That’s all for this article. Hopefully one of the solutions above helped you resolve your Google Meet microphone not working issue.
More Articles:
Fix Microphone Not Working on Windows 11/10
Solved: Blue Yeti Microphone Not Recognized Windows 10/11
Fixed: MacBook Speakers (Internal and External) Has No Sound


