Contents:
- WIFI Connection Overview
- Solution 1: Update wireless adapter driver
- Solution 2: Check IP Address on Windows 10
WIFI Connection Overview
You may encounter problems that Wi-Fi drivers not working in Windows 10 or Wi-Fi Connection not available in Windows 10 after Windows 10 update from Windows 7, 8.
Without WIFI, you must be very upset about it. Because you cannot use browsers to search for information, cannot watch movies and play games, etc.
But the disconnection of WIFI in Windows 10 is familiar to many users who own laptop, desktop, tablet, etc. Or you need to use the Ethernet network to do all the things.
To help you solve WIFI connection issues, here come two simplest and most effective ways. And it can solve these common WIFI disconnected issues:
WIFI Drivers Not Working on Windows 10
Windows 10 not Connected to WIFI (Wireless)
Windows 10 No WIFI Connections Available
Windows 10 WIFI Connected but No Internet
First of all, WIFI problems may be caused by your improper settings, you may have set “Disable” for the WIFI driver, so you can check your settings of the wireless adapter in Device Manager. If it is disabled, the problem will be solved when you enabled it.
But it may not solve your WIFI connection issues because there are so many reasons which cause these Windows 10 WIFI problems. Maybe WIFI drivers are outdated or the IP address is not the right one, etc.
Here the solutions below may be a great help for solving the problem that WIFI is not working, WIFI is connected but have no internet, WIFI connection is not available on Windows 10, etc.
Solution 1: Update wireless adapter driver on Windows 10
After you have upgraded your system to Windows 10 from Windows 7,8, it is very common that WIFI cannot connect the internet, for drivers may be outdated and not compatible with Windows 10, so after you have upgraded your laptop to Windows 10, you should also update your WIFI adapter drivers.
Step 1: Open Device Manager.
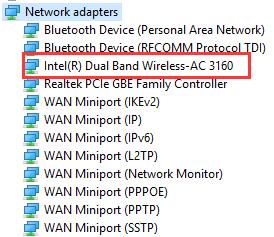
Step 2: Find out Network adapters and double click to expand it.
Step 3: Locate the wireless adapter driver.
There will appear various options about the network, it is obvious that there is a wireless adapter. In this laptop, it is Intel Dual Band Wireless-AC 3160.
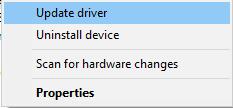
Step 4: Right-click the wireless adapter and choose Update Driver.
So if there are any WIFI issues, you can at first update your WIFI adapter drivers. It will help you with many WIFI problems in most cases including WIFI not connected on Windows10, WIFI drivers not working on Windows 10, WIFI connected but have no internet on Windows 10.
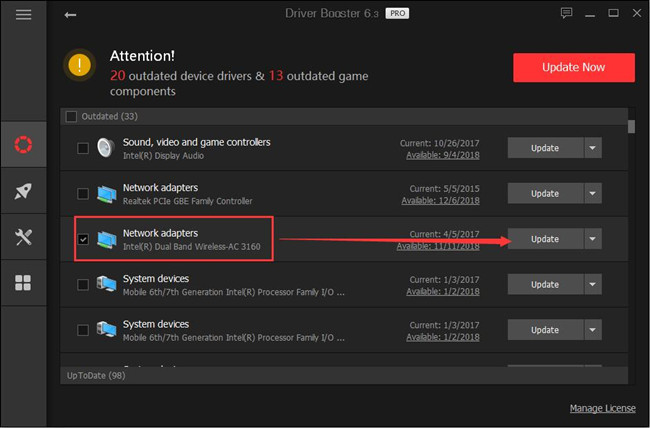
There is another way for you to automatically update WIFI drivers for Windows 10, it mainly uses professional and convenient driver tool for Windows 10 — Driver Booster.
Driver Booster, an automatically drivers download and update tool, can help users to get the latest graphic driver, audio driver, USB driver, mouse driver etc. with one click. And as the best driver scanner, it can detect the most outdated and missing drivers for your computer.
With Driver Booster, you can solve the driver issues within just 2 clicks, only through three steps can you solve WIFI not connected on Windows 10, Windows 10 no WIFI connection available and WIFI drivers not working on Windows 10, WIFI connected on Windows 10 but no internet issues, etc.
1. Download, install and run Driver Booster on Windows 10.
2. Click Scan. After that, Driver Booster will scan all the drivers including the wireless driver.

3. Click Update. Find the wireless adapter and click Update.
Related article: 3 Ways to Download and Update Wireless Drivers
Solution2: Check IP Address on Windows 10
To solve the problems that wireless adapter not working on Windows 10, 7, 8, wireless adapter not showing up and WIFI not connected on Windows 10, etc., it naturally occurs to us that we should check our IP address of our laptop on Windows 10. So how to check IP address is our first concern.
Step 1: Open up Settings of your laptop on Windows 10.
Step 2: Click Network & Internet.
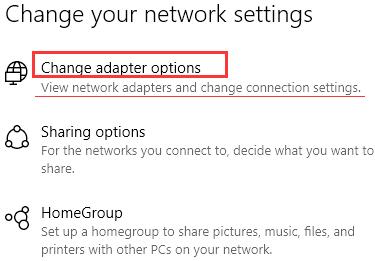
Step 3: In Status window, click Change adapter option in Change your network settings options list.
After that, you can view network settings for your laptop, Kindle Fire, Tablet, etc.
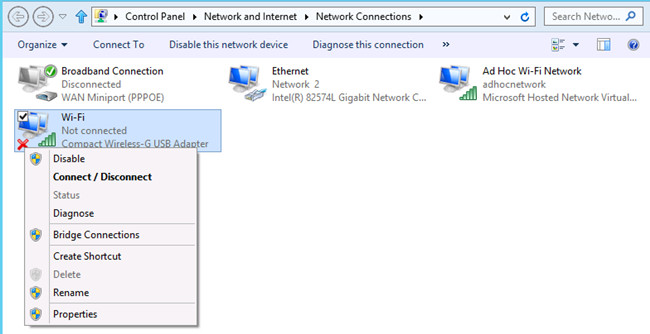
Step 4: Right click Wi-Fi and then select Properties from the options.
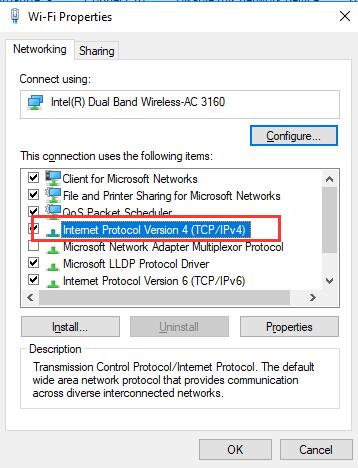
Step 5: then locate Internet Protocol Version 4 from the items and then double-click it.
Step5: Select “Obtain an IP address automatically” and “Obtain a DNS address automatically” one by one. After that, click OK.
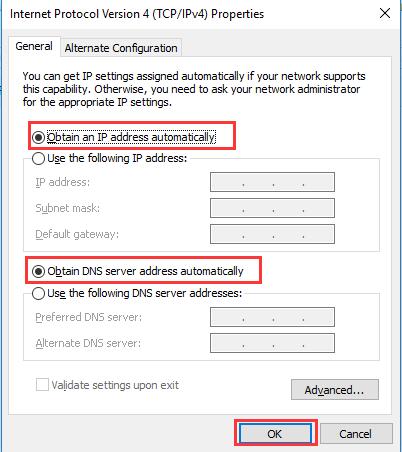
In this case, Windows 10 will automatically provide a compatible IP address and a proper DNS address for you, thus, your laptop, Gaming Book can be connected to WIFI on Windows 10 easily.
If you are not sure whether the WIFI issues are solved or not, you can try to search in the browser, if it can work, it means that you have just solved the WIFI issues on your own.
More Articles:
Fix WiFi Does Not Automatically Connected on Windows 10