In normal, after you set the WIFI connecting for your computer the first, the wireless network will automatically connect to Windows 10 the next time, so you can surf the Internet, view the YouTube video.
But sometimes, you will find the WIFI doesn’t connect automatically after you reboot your computer. You need to reconnect it and type the password each time manually or use the Ethernet network connection. This is very inconvenient. So solving WIFI won’t automatically connect to Windows error is necessary.
Solutions:
1: Set WIFI Connection Automatically
2: Set up the WIFI Network Connection Again
4: Create Wireless Network Manager Group Policy
5: Disable Microsoft WIFI Direct Virtual Adapter
6: Uninstall and Reinstall Wireless Drivers
Solution 1: Set WIFI Connection Automatically
Some users complained that“my WIFI doesn’t connect automatically every time I start my PC”, but they have no idea whether they have allowed Windows 10 to do so. Therefore, it is necessary for you to configure your WIFI and make it connect by itself.
To do that, just try to click the Network icon, choose the WIFI you would like to connect and then tick the box of Connect automatically.
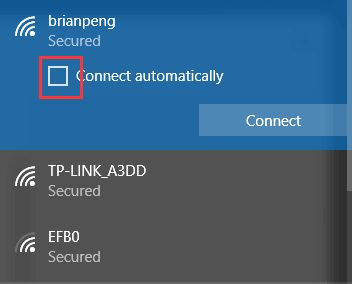
Under this circumstance, Windows 10 WIFI will be connected automatically next time you boot your PC.
Solution 2: Set the WIFI Network Connection Again
Reset the WIFI network is easy to fix Windows 10 WIFI manual connection error.
1. Click WIFI icon on the right bottom corner of the taskbar, and you then you will see many WIFI names list. Choose Network & Internet settings.
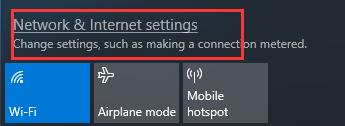
The settings contain many functions, such as Ethernet, WIFI, VPN, Airplane Mode, etc.
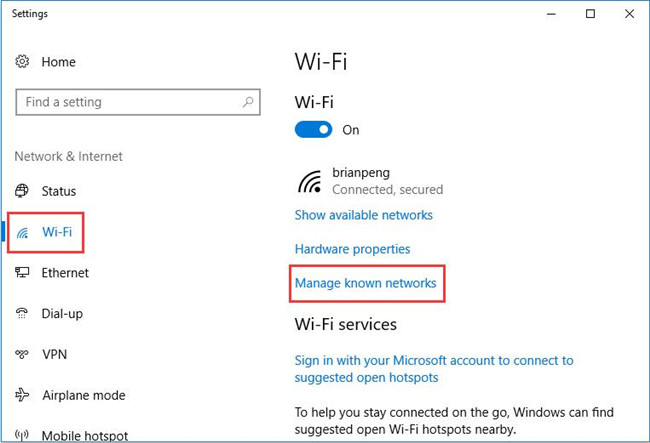
2. In the left side, choose Wi-Fi. From Wi-Fi settings, click Manage known networks to manage the WIFI which does not connect automatically.
3. Choose the wireless network won’t automatically connects to Windows 10, then click Forget button. After that, it will disappear in the list.
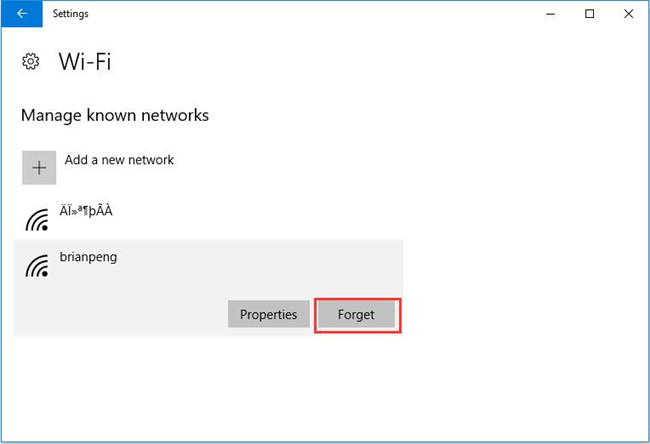
This action is deleting the wireless connection. In this way, Windows 10 will remove this WIFI.
4. Restart Computer. Restart computer will help take effective for this change.
5. Click the WIFI icon again, and then find the WIFI name, type the password again to connect WIFI to Windows 10. Remember to check Connect automatically function, this is very important.
Now the wireless disconnected automatically problem for Windows 10 will be solved. Of course, this solution can be applied to Windows 8.1, 8 and Windows 7.
Solution 3: Uncheck Power Management
Sometimes, the power management settings will be a reason to cause WIFI failed to connect automatically.
1. Enter device manager. You can type device manager in the search box to enter it, this is the fastest way.
2. Expand Network adapters, and find the wireless device. Right-click it to select Properties.
3. Find Power Management tab, and uncheck the option of Allow the computer to turn off this device to save power.
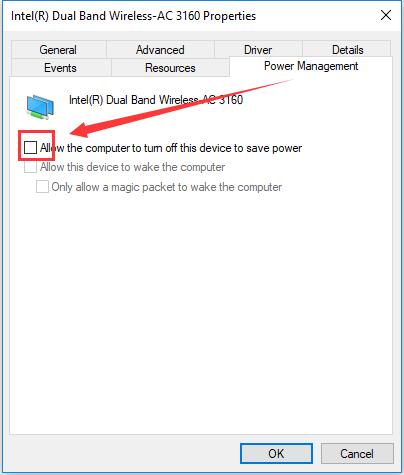
This solution will help to support power management for the wireless device, so Windows 10 will automatically detect it and connect the WIFI conveniently. It won’t disconnect again after restarting.
Related View: Fix Allow the computer to turn off this device to save power Grayed out
Solution 4: Create Wireless Network Manager Group Policy
You can also add a network policy for the not automatically connecting WIFI to see if it works, which has been proved powerful in the WIFI error.
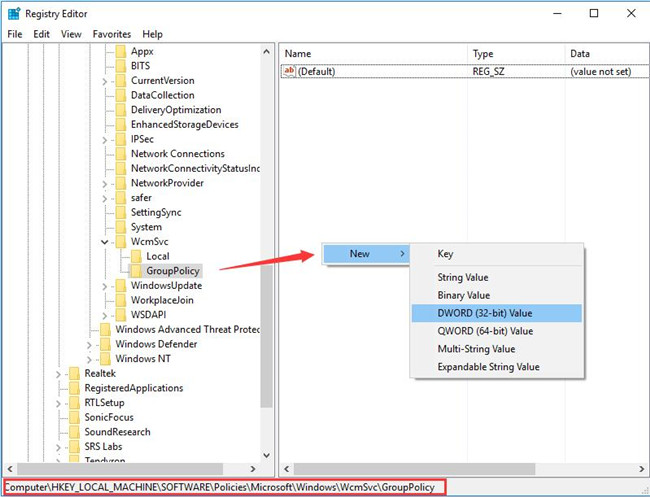
1. Click Win + R to open the run box, type regedit to run the registry. And there are 23 important shortcuts you should know.
2. Locate the path:
HKEY_LOCAL_MACHINE\Software\Policies\Microsoft\Windows\WcmSvc\
3. Right click the WcmSvc, and follow these clicks: WcmSvc > New > Key. Named the New Key #1 as Group Policy.
4. Select Group Policy folder, and right click the blank space in the right window. Follow these clicks: New > DWORD (32-bit) Value.
After you created the DWORD, rename it as fMinimizeConnections.
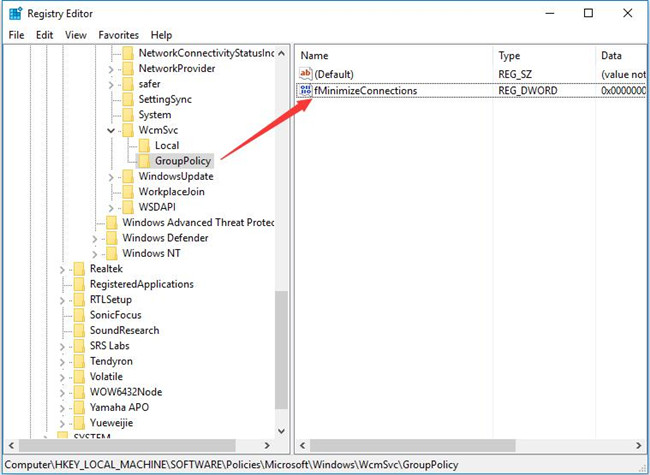
Now, you can reboot your computer to take effect about this automatic connecting policy. Now, the WIFI doesn’t connect automatically for Windows 10 will solve perfectly. This can also be applied to Windows 8.1, 8, 7.
Solution 5: Disable Microsoft WIFI Direct Virtual Adapter
This Microsoft WIFI Direct Virtual Adapter is designed for setting up portable hotspot on computers. It is believed that it will to some degree cause can’t connect to WIFI automatically error. Hence, you are supposed to stop it from running on Windows 10 to see if it works for not connecting to WIFI error.
1. Open Device Manager.
2. In the upper side of Device Manager, hit View > Show hidden devices.
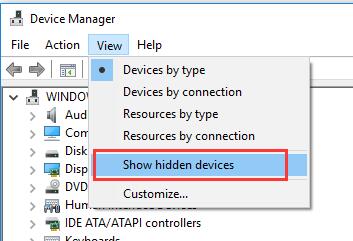
3. Then expand Network adapters and right click Microsoft WIFI Direct Virtual Adapter to Disable device.
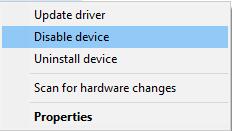
4. Restart Windows 10 to take effect.
You can try to connect to WIFI for more than once to check whether Windows 10 can connect to WIFI automatically.
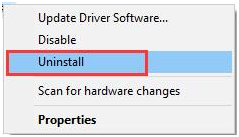
Solution 6: Uninstall and Reinstall Wireless Drivers
This is also an easy way. Because after you uninstall the Wireless driver, the WIFI connection disappears. And after reinstalling the wireless driver, you can reset the wireless connection again. If you hit upon Windows 10 can’t connect to WIFI, just manage to reinstall a new network driver.
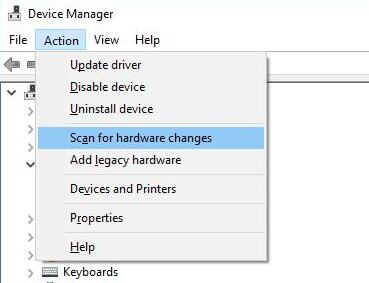
1. Open the device manager, find the wireless adapter, right-click it to choose Uninstall to uninstall the WIFI driver.
2. Click Change for hardware changes in the toolbar, the Windows 10 will scan your wireless adapter automatically and reinstall the driver for you.
After Device Manager installed the Wireless driver correctly for you, if you noticed no WIFI as well on Windows 10, perhaps you need to update the network adapter driver.
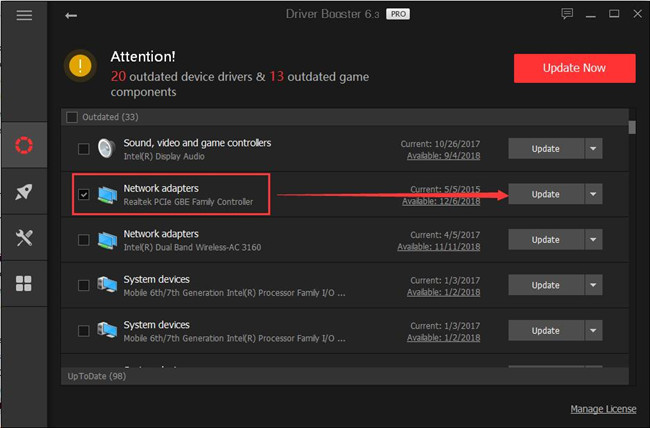
Solution 7: Update the WIFI Driver
Of course, with the network driver from Device Manager, it is available to get up-to-date driver manually from the manufacturer’s site, but to simplify the WIFI connection error, you try to use Driver Booster to help you.
Driver Booster is embedded with 3,000,000 or more drivers and it can fix network failure for you as well. If needed, you can roll back the WIFI driver to the previous version in the condition that it is incompatible with Windows 10.
1. Download, install and run Driver Booster on your PC.
2. Hit Scan to allow it to scan for the missing, outdated, and faulty driver.

3. Find out Network adapters and then decide to Update the WIFI driver.
After that, you can try to Reset the WIFI connection again. Find the WIFI name you want to connect, type the password and check Connect automatically.
So the above ways can fix the WIFI does not automatic connecting on Windows 10 issue. Wish it can help when occurring this problem.
More Articles:
Fix WiFi Connection Issues on Windows 10/11