Many of you tend to make use of System File Checker (SFC) to check and correct the corrupted files on Windows 10. While recently according to what you complained, you run into the SFC error saying that Windows resource protection could not perform the requested operation on Windows 10. The moment you enter the SFC command-line sfc/scannow in Command Prompt, this Windows resource protection issue comes up immediately.
In order to get rid of sfc/scannow not working on Windows 10 error, here come out the effective ways.
What to do with Windows Resource Protection Could Not Perform the Requested Operation Windows 10?
When you stumble upon Windows 10 resource protection could not perform the requested operation while performing SFC scan, it means that something went wrong with the SFC utility or the disk or even the system on your PC.
No matter what causes your Windows resource protection problem, you may as well manage to fix this sfc error by referring to the steps below.
Solution 1: Run CHKDSK Tool
To check the condition of the disk on your PC, it is necessary for you to take advantage of the tool-CHKDSK to see if the damaged disk can lead to sfc/scannow Windows resource protection could not perform the requested operation on Windows 10.
Now get CHKDSK tool started to deal with your Windows resource protection error.
1. Type in Command Prompt in the search box and then right click the search result to Run as administrator.
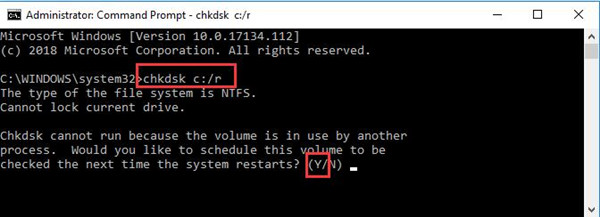
2. In Command Prompt, input chkdsk c:/r and then hit Enter to run CHKDSK. Then you would be prompted to choose if you wish to perform the chkdsk next time you start your PC, press Y to approve that.

Here you are to check local disk C:, you can replace it with any other disk you want to examine.
3. Restart your PC to let chkdsk work to check your disks.
Only after you used this chkdsk to perform a scan for the disk can you really get the idea what makes Windows resource protection could not perform Windows 10.
Then it is likely that you won’t encounter SFC fails, won’t complete error.
Solution 2: Enter Safe Mode to Solve Windows Resource Protection Windows 10
Even if you failed to make use of chkdsk to fix the SFC issue, do not be upset. Just get ready to navigate to the safe mode to make sure which part exactly result in sfc/scannow not working on Windows 10.
To move into safe mode with a minimal set of programs on Windows 10, follow the procedures below.
1. Type in msconfig in the search box and then press Enter to get into System Configuration.
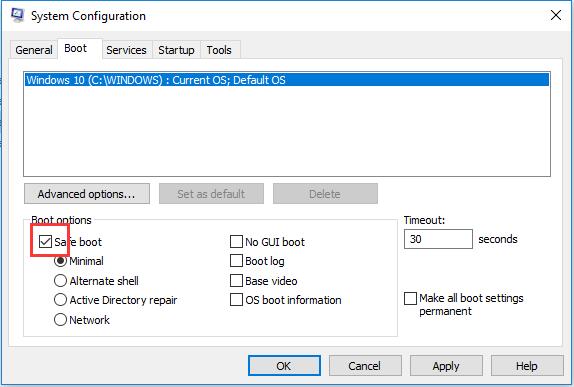
2. Then under Boot tab, check the box of the Safe boot and then click Apply and OK.

In this way, you can see the box of Minimal has been ticked as well.
3. Then hit Restart now to reboot your computer.
After you rebooted your PC, you can see the changes are applied and you have entered the safe mode on Windows 10.
Now in safe mode, you can try to run SFC again to see if the sfc/scannow not working is solved.
Solution 3: Change Winsxs Folder Description
It is said that the winsxs folder is used to save the system or the updates of your system file. Sometimes, when you perform SFC utility, it fails to do so as it is unable to approach this winsxs folder on Windows 10.
Under this circumstance, there is much need for you to modify the description of this folder so as to make SFC back to normal.
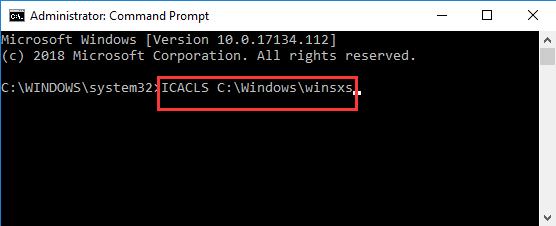
1. In Command Prompt with administrative privileges, enter ICACLS C:\Windows\winsxs and then press Enter to change the description of this folder.

2. Reboot your computer to take effect.
At this moment, you are able to access the winsxs folder and run SFC utility as usual on Windows 10.
There will be no more Windows resource protection could not perform the requested operation when performing sfc/scannow command.
These are the feasible and effective solutions towards sfc/scannow fails as Windows resource protection could not perform the requested operation on Windows 10. Or if they are useless to deal with your case, you have to restore Windows 10 to a point where the SFC error no longer exists.
More Articles:
Fixed: Unable to Connect to NVIDIA on Windows 10


