Contents:
- Quick Access Not Working Overview
- How to Fix Windows 10 Quick Access not working
- Plus: Add a Folder for Quick Access in Windows 10/11
Windows 10 Quick Access Not Working Overview:
For some users, Quick Access may cause the invasion of privacy that they don’t want to use it. As you know, Quick Access is a new feature in Windows 10/11 that exists in This PC, it can quickly navigate to the folders and files that you are frequently used or edited. Some users get used to the Quick Access because it is very convenient to locate files and can save much time for them.
But recently, it has been reported that Windows 10 Quick Access comes to various errors, including Quick access missing from the navigation pane, Quick Access crashes in File Explorer, Windows Quick Access isn’t opening or responding, etc.
Whatever, following next steps can help you disable Windows 10 Quick Access, fix Quick Access slow to open or not working on Windows 10 and add a folder to Quick Access after you solved this Quick Access menu error on Windows 10.
How to Fix Quick Access not Working on Windows 10/11
If you find Quick Access is not working, either open but not responding or not opening at all, firstly you are supposed to clean up all the caches in the two folders – CustomDestinations and AutomaticDestinations. And then take time to disable Quick Access and then re-enable it to see if this can help.
Solutions:
- 1: Clear Quick Access Caches
- 2: Disable Quick Access
- 3: Re-enable Quick Access and Clear File Explorer History
Solution 1: Clear Quick Access Caches
At the very beginning, once Quick Access is not working on Windows 10, there is much need for you to erase the caches of CustomDestinations and AutomaticDestinations folders.
Since these two folders are in charge of the Quick Access menu, when you clear off them, it is to refresh the Quick Access menu.
That will effectively deal with Quick Access, such as issues with Quick Access recent files doesn’t stick in Windows 10 or Windows 10 Quick Access keeps disappearing.
Step 1: Right-click Start icon and choose File Explorer to open the File Explorer.
Step 2: Paste the following folder paths to the address bar and hit Enter.
%AppData%\Microsoft\Windows\Recent\CustomDestinations
%AppData%\Microsoft\Windows\Recent\AutomaticDestinations
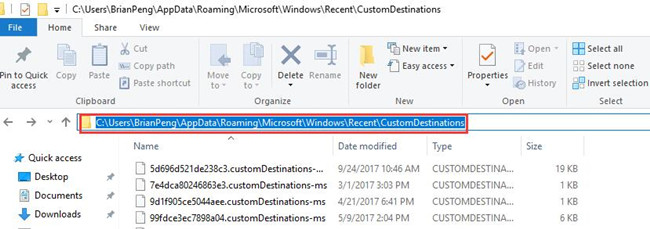
Step 3: After the folder is opened, choose all the contents and right-click to select Delete, click it to remove these contents all.
Step 4: Then restart your PC to check if your Quick Access problem has been fixed.
For some users, it is likely that deleting the caches of Quick Access folders have totally got rid of the Quick Access not working issue on Windows 10.
Solution 2: Disable Quick Access
If you just upgrade your PC from Windows 8 to Windows 10, you can find that Quick Access replaced the Favorites. You may not get used to the Quick Access and want to disable it. To disable the Quick Access, what you should do is to disable the frequently used folders and files.
Or to make things worse, sometimes you find Quick access on Windows 10 stops working and has no response at all. In all these cases, you need to disable the quick access and then clear the privacy options temporarily. After that, re-enable Quick Access for your use.
Step 1: Right-click Windows icon, and choose to open File Explorer, click View tab in Ribbon and choose Options.

Step 2: Under Options, click Change folder and search options to the next step.

Step 3: Locate Open File Explorer to, click This PC from the drop-down menu.
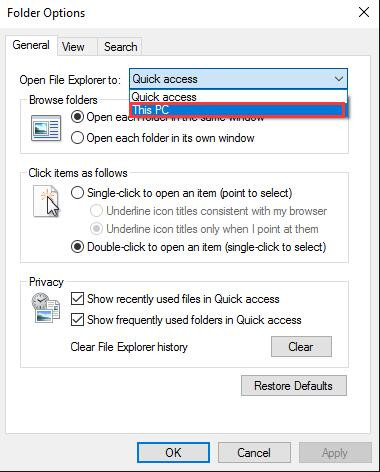
Now, you will have disabled Quick Access in Windows 10. You might as well enable it if you want to quickly access folders or files on Windows 10. That will also make Quick Access back to work.
Solution 3: Re-enable Quick Access and Clear File Explorer History
It is high time that you attempted to enable Windows Quick Access to see whether it will be opened and respond on Windows 10. Just follow the similar steps in Solution 2 to navigate to Folder Options and then enable Quick Access for Windows 10.
1. In Folder Options, firstly, choose to Open File Explorer to Quick access to enable it.
2. Then, navigate to Privacy settings, uncheck the following two options, Show recently used files in Quick access, Show frequently used folders in Quick access. Click Clear icon to remove the history data of File Explorer.
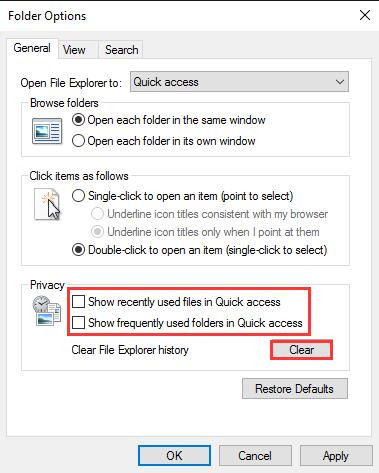
Without any cache corruption in File Explorer, Quick Access in it won’t stop working anymore. And if you cleaned up File Explorer history, it is also possible that File Explorer not responding can also be addressed as well.
How to Add a Folder to Quick Access in Windows 10/11
When you use the Quick Access frequently and want to add a new folder to Quick Access, there is an easy way to learn how to do it.
Choose a folder and right-click, find Pin to Quick access and click it, then you can find the folder is displayed in Quick Access.
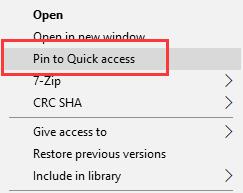
It is extremely foolproof, isn’t it? Now you will be capable of locating the frequently used folders and recent folders from Windows 10 Quick Access.
Conclusion: This post tells you some basic settings about Quick Access, whether you like the function or not, you can get what you want to do with the Quick Access. Have a look at the post, I promise it will not let you down.
More Articles:
How to Manage Files and Folders in File Explorer in Windows 10/11
How to Get Help With File Explorer on Windows 10/11
39 Shortcuts You Should Know For File Explorer on Windows 10/11




First solution works. thanks a lot.