Syncing content on all Apple products like iPhone, iPad, and MacBook is an attractive feature for Apple lovers. For instance, if you feel like syncing photos between iPhone and Mac, you can directly pair the iPhone with Mac to get the content synced easily.
In this post, you can learn to connect your iPhone or Mac using different methods, for instance, via wireless network and Bluetooth.
Why Do You Need to Connect your iPhone to Mac?
Unlike other devices, like Windows and Android, users can pair iPhone with MacBook to sync and share content like photos, music, documents, and other sources of content simply. With no need to copy and paste from one device to another, the connection between your iPhone and Mac makes it possible to move content between devices automatically.
For instance, users can transfer images between iPhone and Mac or sync messages from iPhone to Mac. You may find it is extremely convenient to share content between iPhone and Mac after synchronizing the iPhone to Mac.
How to Connect iPhone to MacBook?
No matter you are using Macbook air, Macbook pro, or any other Mac computer, there are some common ways offered to you to connect the iPhone with Macbook, for instance, by the USB cable, Bluetooth, and via the wireless network.
Or if you noticed that your iPhone can’t be recognized on Mac or iPad, you can also refer to the methods below to allow the iPhone to be detected and connected by the Mac. Especially, you can connect your iPhone to Macbook with and without cable.
Methods:
- 1: Connect iPhone to Mac using a USB cable
- 2: Pair iPhone with Mac via the Bluetooth
- 3: Connect iPhone to Mac Wirelessly
- 4: Synchronize the iPhone with Mac iTunes
- 5: Share Content on iPhone on Mac using iCloud
Method 1: Connect iPhone to Mac using a USB cable
Connecting a Smartphone to Mac using a USB cable can be a common way. While you need to know that in some iPhone models, the type of USB cable cannot afford users to connect the iPhone to MacBook directly using the USB cable. To be specific, iPhone XR, SE, and 11 above are equipped with a USB-C to lightning cable, which allows users to pair the iPhone with the Mac directly.
However, for iPhone x and below, the USB cable type is USB-A to lightning cable, so users with these iPhone models are unable to connect to the MacBook directly via the USB cable.
Therefore, if you have checked your iPhone version and ensured the equipped USB cable can plug the iPhone into the Mac directly, follow the steps below.
1. Open your Macbook.
2. Connect the iPhone to the Mac using the USB-C to lightning cable.
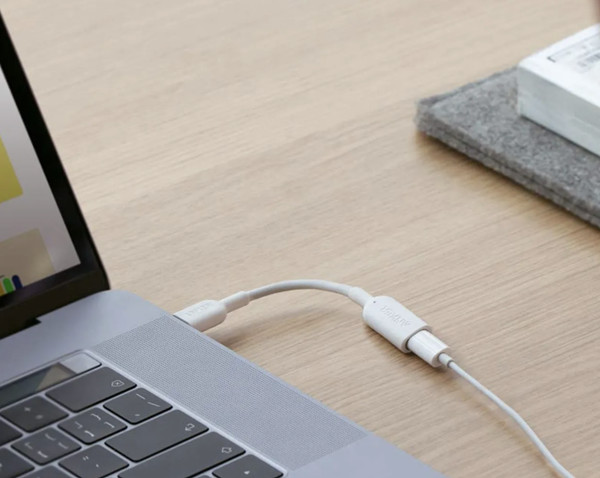
Here, for users using iPhone x and below, you can also purchase a USB-C lightning cable so that you can synchronize the Apple Smartphone with the MacBook. With the connected iPhone on MacBook with cable, you can transfer photos, documents, music, and other media content quickly between the iPhone and Mac.
Method 2: pair iPhone with Mac via the Bluetooth
Without the USB cable, you can also connect the iPhone to Mac via Bluetooth. After setting up the Bluetooth on both your iPhone and Mac, you can quickly pair them and then transfer data from one Apple device to another.
1. On your Macbook, go to System Preferences > Bluetooth.
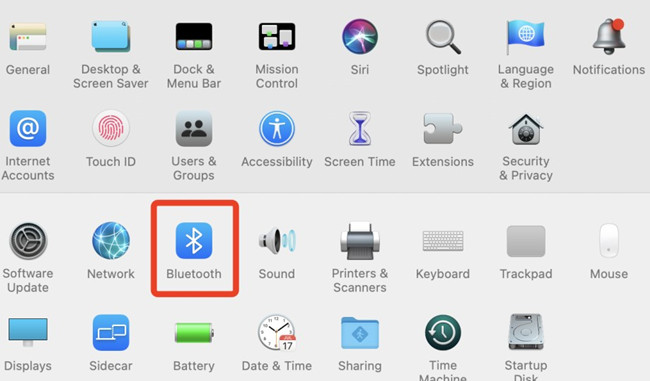
2. In the list of Bluetooth devices, locate iPhone and click Connect beside it.

Here, if you cannot see your iPhone listed in the Bluetooth menu, you may need to place it closer to the Mac computer.
3. Wait for “iPhone” to accept the connection and check the code on the iPhone.
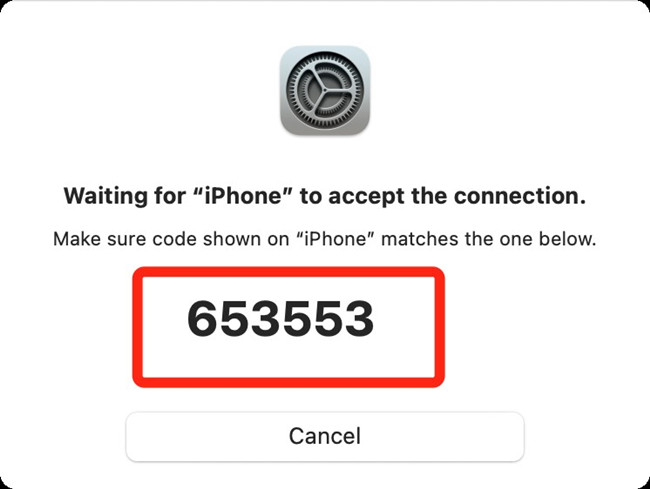
You can then see the iPhone is connected with your MacBook Air or pro. Start to share content on your iPhone with Mac or content on Mac with iPhone such as music, photos, and documents. Possibly, data on macOS Big Surcan be quickly transmitted to iPhone via the Bluetooth. If you want to disconnect the iPhone from Mac, disconnect it in Bluetooth settings.
Method 3: connect iPhone to Mac wirelessly
When your iPhone is connected to the same network as Macbook, you can connect iPhone XR or other models to the Mac computer without Bluetooth. While the USB-C cable is needed when you first set up the iPhone and MacBook before connecting them wirelessly.
1. Connect the iPhone and MacBook using the USB-c lightning cable.
2. In MacBook, locate Finder, and on the left sidebar, find out your iPhone.
Here, if you are unable to see your iPhone in the sidebar, you can find out Finder > Preferences to tick the box of CDs, DVDs, and iOS Devices to show them.
3. In the button bar, hit General.

4. Check the box of Show this device when on Wi-Fi.
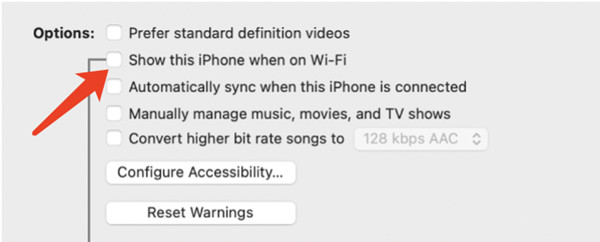
5. Turn on the syncing settings to connect the two devices.
6. Click Apply to save changes.
After that, you can see your iPhone appears and is connected to the Mac. And the syncing settings are also available for you to transfer data or information between the iPhone and MacBook wirelessly. If you wish to disconnect these two devices, right-click your iPhone in the Finder sidebar to Eject it. For some users, you can even use an iPhone hotspot on Mac if there is no wireless network.
Method 4: Synchronize the iPhone with Mac iTunes
iTunes is a program that allows users to add to, organize, and play digital media like music on the computer, just like Windows Media Player on Windows systems. Meanwhile, iTunes also allows users to sync content to a Smartphone or any portable device from both macOS and Windows devices.
In this case, since iPhone is also a portable device, you can also connect it to your Macbook through the iTunes software and then transfer media between them.
1. On your Mac computer, open the iTunes app and then connect your iPhone to the Macbook using a USB cable.
2. Then hit the iPhone from the top left corner of the iTunes software to connect it to the Mac computer.

3. At the left side of iTunes, locate Settings and then check the box of the type of content that you want to sync between the iPhone and Macbook.

4. Hit Apply to start the syncing.
As you can see, you can sync music, movies, TV shows, podcasts, books, audiobooks, and photos between iPhone and Mac through the iTunes program. You can further configure the syncing settings of different contents after selecting the content type under settings.
Solution 5: Share Content on iPhone on Mac using iCloud
iCloud can be a powerful feature for users of Apple products to synchronize various types of content among Apple devices like iPhone, iPad, and Mac. Hence, if you would like to pair your iPhone with MacBook, it is also a good option to share content between them by signing in to the iCloud account.
That is to say, so long as you have signed in to different Apple devices like iPhone and MacBook using the same Apple ID, different types of data in apps using iCloud to sync data can be synced at the same time.
1. On your Macbook, go to System Preferences > Apple ID.

2. Click iCloud, and then on the right pane, choose which App on this Mac using iCloud.
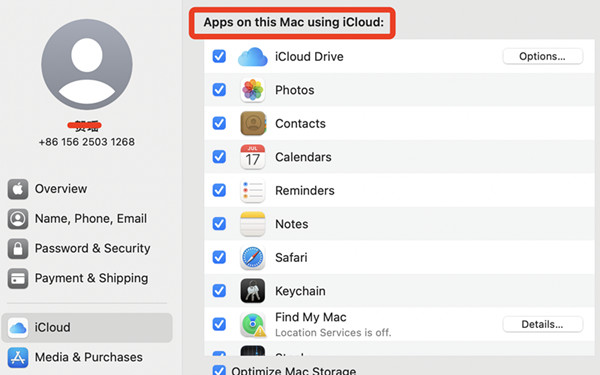
As you can see, on this MacBook, photos, contacts, calendars, reminders, notes, Safari, Keychain, and many other app data and information are automatically synced on iPhone and the Mac computer via iCloud. You can open the iPhone photos and MacBook photos to check photos in them, and you will find the photos are automatically synced since these two devices are signed in using the same Apple ID.
Summary:
In this post, you can learn to connect iPhone to MacBook with and without a USB cable, including pairing these two devices via Bluetooth, wireless network, iTunes, and iCloud.
After that, you can share or transfer photos, messages, contacts, music, movies, and many other types of content quickly and easily between your iPhone and Mac like MacBook Air and pro on macOS Big Sur.