Wondering how to record a video on Mac? Whether you want to capture on-screen activities on Mac to make a tutorial video or want to record a video of yourself on Mac with a webcam, we’ll show you how to get the job done with a few clicks.
In this post, we’ll go over the best ways to record yourself through a webcam & record your Mac screen in step-by-step detailed instructions. Stay with us to find out the suitable options for you to pick from.
How To Record a Video of Yourself On Mac (With Webcam)
Before getting started to take a video of yourself on Mac, make sure you have a webcam connected to your Mac.
All MacBooks and iMacs come with a built-in webcam, but users of Mac Minis and Mac Pros will need to purchase an external webcam. Installation is as simple as connecting your new webcam to an available USB port on your Mac.
Once everything is ready, you can begin the recording process. You can choose from the built-in recording tools on Mac and third-party screen recorders to record a video of yourself on Mac. Now let’s dive in!
#1: Record Yourself Video on Mac with QuickTime Player (Free)
In fact, Mac itself comes with a screen and webcam recorder, QuickTime Player. It is a free multimedia software compatible with all Mac computers that allow you to record your face, screen, and audio.
However, QuickTime Player cannot record system sound on your Mac, and will capture unwanted background noise while recording. The recordings are saved in .MOV format only so you have to convert the video file to save it in other formats.
Here’s how to record a video on Mac with a webcam using QuickTime Player:
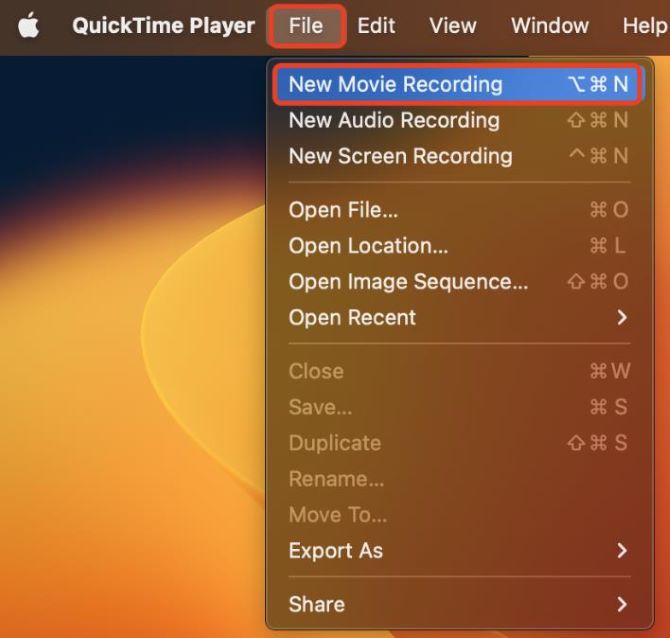
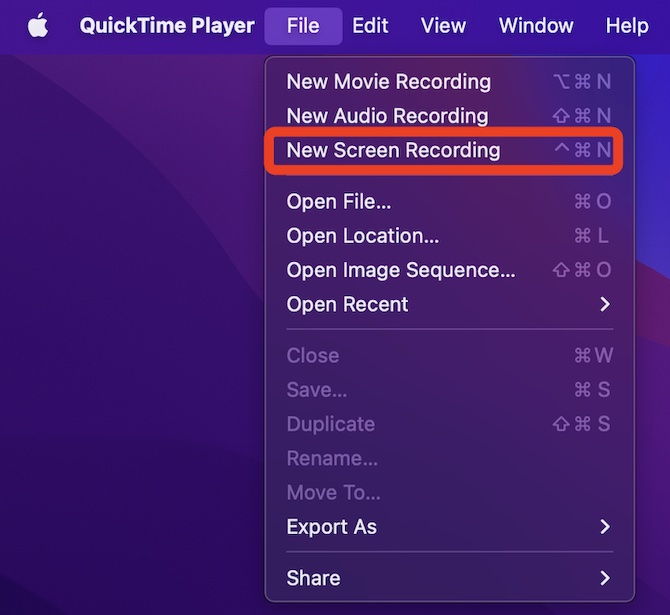
1. On your Mac, launch QuickTime Player from the Launchpad.
2. At the top of the screen, click File > New Movie Recording. A window will open with a preview of your webcam. A control bar will appear on your screen.
3. Set up your webcam and audio. On the control bar, click the drop-down arrow on the right of the red button.
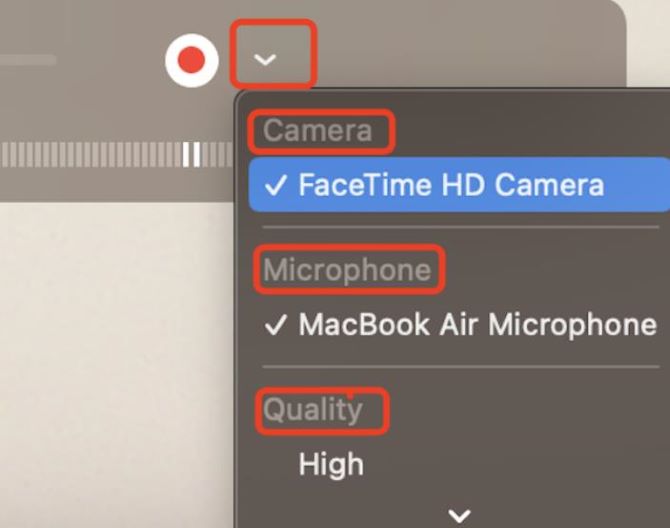
- Choose your source camera to record a video of yourself.
- Select the built-in microphone to record yourself with audio.
- Select the video quality (high or maximum).
4. Set up the recording volume. Dragging the speaker slider on the control bar to adjust the volume.

5. Start recording a video on Mac with yourself. On the control bar, click the red Record button.

6. Stop recording. Click the square Stop button when you are finished. The recorded video will then pop up and you can click on it to play.
#2: Record Yourself Video on Mac with Movavi Screen Recorder (Best Way)
The best way to record a video on Mac is to use a professional and easy-to-use third-party screen recorder such as Movavi Screen Recorder. You can record high-quality videos without any limitations in this way.
Movavi Screen Recorder for Mac is an expert and intuitive screen and video recorder as well as video editor. You can not only record your webcam video with audio but also edit out the video before uploading and sharing.
This excellent recording tool for Mac is more than a simple screen recorder, but gives you the advanced recording features you need to truly customize your videos and satisfy your recording needs.
Benefits of Movavi Mac Screen Recorder
- Record the webcam and screen simultaneously or separately
- Record the entire or partial of your Mac screen flexibly
- Capture videos with the Mac built-in or external camera and microphone
- Record streaming TV, webinars, online calls, gameplays without time limit
- Support schedule recording, video editing, taking notes while recording
Here’s how to take a video on Mac with yourself with Movavi Screen Recorder:
1. Download and install Movavi Screen Recorder for Mac, then run it.
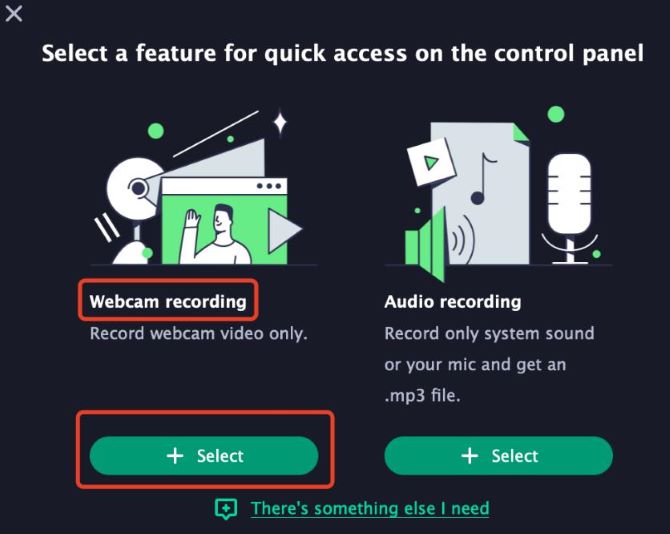
2. On the control panel, click the Plus button to open the customization window.
3. Click Select below Webcam Recording to add it to the control panel.
4. Adjust the webcam settings. Click the webcam button on the control panel, this will open a new window with a preview of your webcam.
5. Then click the Settings icon on the right to enter Web Camera settings.
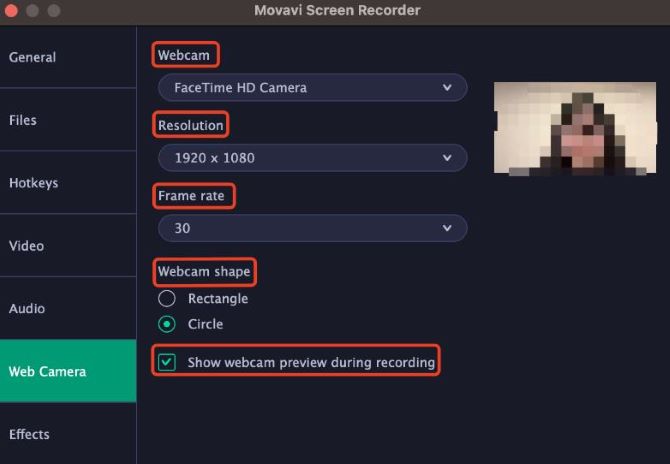
- Choose the Webcam device that you want to use and check its preview on the right.
- Choose the Resolution that you would like to use.
- Set up the Frame rate to provide the higher-quality for your recording.
6. Once you’re all set, Click OK.
7. Adjust the audio settings. Click the speaker icon to record the system audio on Mac. Click the microphone icon to enable recording from your built-in microphone or an external microphone.

8. Start recording a video on Mac with a webcam. Click the red Record button to start recording. You will be given a 3-second countdown before the recording begins.

9. Stop recording. To finish recording yourself, click the square Stop button. To temporarily stop recording, click the pause button on its left.
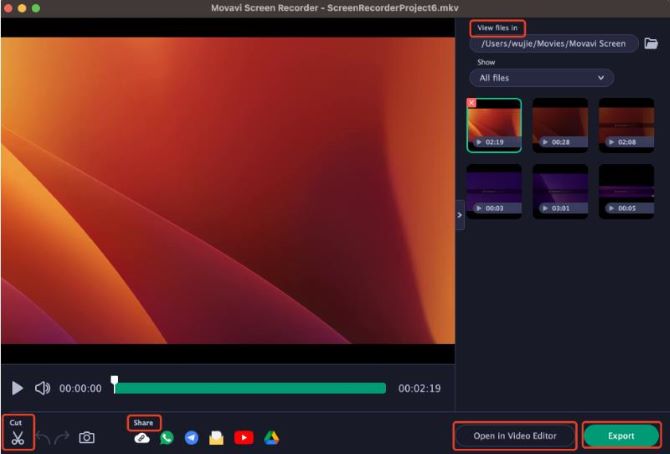
10. Preview and edit the recordings. A new window will open when you are finished, your video is now ready and saved in .MKV format. You can then play it, change the format, cut out unwanted parts, and share it with friends from this open window.
#3: Take a Video of Yourself on Mac via Photo Booth (Add Effects)
Photo Booth is another built-in recording tool you can use to record videos on your Mac. Photo Booth enables you to use your webcam to shoot pictures and films, and add various effects to your video recording.
However, Photo Booth won’t be of great help in a professional production considering its limited recording functions, even if it’s funny and humorous.
How to record a video on Mac with Photo Booth
1. On your Mac, open Photo Booth from the Launchpad.
2. Select video recording mode. Click on the camera icon at the bottom left corner. This will have a preview of your webcam.
3. Add effects to the recordings. Click Effects at the bottom right and pick a preferred effect to make your video funny and vivid.

4. Start recording a video on Mac. Press the Record button in the center of the screen.

5. Stop recording. When you are finished, press the Stop button. The thumbnail images of the recorded videos will appear in the bottom right corner. Click on it to check out your recordings.
#4: Take a Video of Yourself on Mac via iMovie (+Edit)
iMovie is another great built-in screen recorder that can help you take videos on Mac with a webcam.
iMovie is designed specifically to record videos and turn them into a movie. It includes a range of video effects and tools like color correction and image stabilization. There are various settings available to fulfill your recording needs.
However, iMovie has its limitations. The interface is relatively complex considering its various features, and the basic video will take up a large storage space. Besides, it is difficult to import MP4 files for editing.
How to record a video on Mac with iMovie
1. Launch iMovie on your Mac from Launchpad.
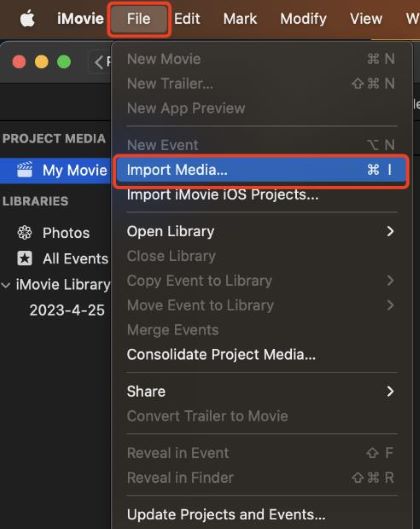
2. From the top menu bar, click File > Import Media. This will open a new window.
3. Set up the webcam. To record with your Mac’s webcam, on the left-hand sidebar, click FaceTime HD camera. You’ll see a preview of your webcam.
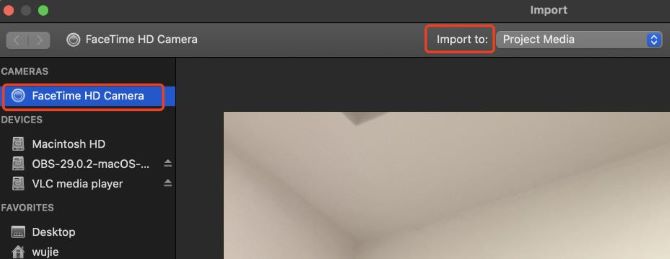
Tips: You can also click Import at the top and choose where to save the recording.
4. Start recording. Click on the red Record button to start recording a video on Mac of yourself.

5. Stop recording on Mac. Press the Record button again, then click Close at the button right corner to close the recording window.

How To Screen Record a Streaming Video On Mac
You can record a video of your Mac’s screen using either the built-in screen recording tools or a professional third-party screen recorder.
We’ll walk you through the two different ways and show you how to record a video on Mac in just a few simple steps. Read on to find which method works best for you.
#1: Record a Streaming Video on Mac Without limitations
If you want to screen record a video on Mac with advanced recording features like schedule recording, video editing, and taking notes while recording, you should try a professional third-party screen recorder.
Movavi Screen Recorder is such an excellent screen recorder that we’ve mentioned above to help you record a video of yourself. Other than that, you can also record your screen video on Mac effortlessly with this powerful screen recorder.
Steps to screen record a streaming video with Movavi Screen Recorder
1. Run Movavi Screen Recorder for Mac.
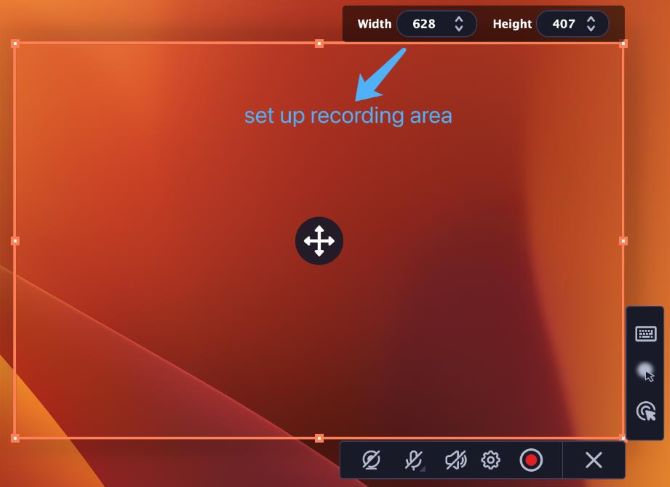
2. On the Control Panel, click the Camera icon to select the recording area.
3. The area selection tool will pop up. Click and drag to select the part you want to record. If you want to record the entire screen, simply click on any part of your screen.
4. Set up the record settings. The system sound, microphone, and webcam settings are turned off by default. Click on the speaker icon to screen record with audio.

Tips: Click the settings button on the control panel and enable the noise reduction feature to remove unwanted noise.
5. Click the red start recording button.

6. While recording, on the control panel, you can click the clock icon to set a timer for the recording, and click the pencil icon to take notes and mark important parts.
7. Stop recording. When you’re finished, click the square stop button on the recording panel.
8. Preview and edit the recording. Your video is ready and saved in .MKV format, you can preview it, edit it, and export it to a different format from the pop-up window.
#2: Record a Streaming Video on Mac Free
QuickTime Player is an easy-to-use built-in recording tool for Mac users to take basic video captures.
Without having to download or install any software, it’s a convenient and time-saving way to record lectures directly on your Mac.
Steps to screen record a video with QuickTime Player
1. Open QuickTime Player from the Launchpad.
2. From the top menu bar, click File > New Screen Recording.
3. Select the recording area. On the toolbar, click the record entire screen icon to capture the entire screen, or click the record selected area icon and drag over the area where you want to capture only a portion of your screen.

4. Adjust the audio and video settings. On the toolbar, click Options.
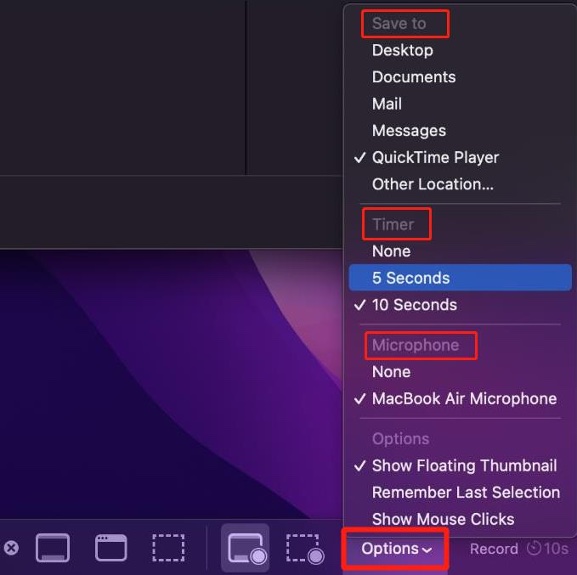
- Choose the built-in microphone to screen record with audio.
- Set a 5 or 10 seconds timer to have a delay for recording.
- Choose where to save the recordings.
5. Start screen recording a video on Mac. On the control bar, click on Record to start recording.

6. Stop recording. Click on the stop icon at the top right corner. The recorded video will pop up and you can click on it to view and play.

FAQs About Record Video On Mac
A: Yes. You can record yourself with your Mac’s internal camera or an external camera. If you want to change to a different camera, just navigate to the camera settings and choose whichever camera you want to activate.
A: The best way to record a video on Mac is to use a professional third-party screen recorder. By doing this, you should have greater control over various record settings, and increase the quality of your recorded video to 4k / HD.
A: A free way to record video on Mac with audio is by using the built-in QuickTime Player. But you have to install an external plugin to record the system audio. You can also use a third-party screen recorder to record a video on Mac with audio easily.
A: There is no time limit on recording a video on a Mac. The maximum video length is only limited by the storage space on your device.
A: This issue might be caused by various reasons. In general, common reasons include permission for screen recording, insufficient space, copyright issues, software updates, defective cameras, etc.