When you’ve finished your recording on Streamlabs, the next question you may have might be: Where do my Streamlabs recordings go? How to find Streamlabs recordings?
If you are facing the same problem, check out this post.
Streamlabs is a popular broadcasting software that many content creators use to stream and record videos. With it, you can stream on Twitch, YouTube, and other platforms, and capture your computer screen with internal and external audio.
However, after recording videos with Streamlabs, some people said they can’t find the Streamlabs recording location. To solve this problem, this tutorial will show you in detail where to find Streamlabs recordings and how to change the recording location.
Let’s find out quickly!
Where Does Streamlabs Save Recordings
After finishing the recording with Streamlabs, you need to know where are Streamlabs recordings saved, so you can find recorded videos and manage them in whatever way you like.
By default, if you have not specified a location for your Streamlabs recordings, here’s where your recordings are saved on Windows and Mac:
- Windows: The default recording location is C:\Users\YourUserName\Videos.
- Mac: The default recording location is /Users/YourUserName/Movies.
How to Find Streamlabs Recordings
If you can’t find recorded videos on Streamlabs, simply follow the step-by-step guide below, and you’ll be able to access your Streamlabs recordings in no time.
1. Launch Streamlabs on your computer and click on Settings in the bottom left corner.

2. Click on Output on the left-hand menu.
3. Scroll down to the Recording Path section.
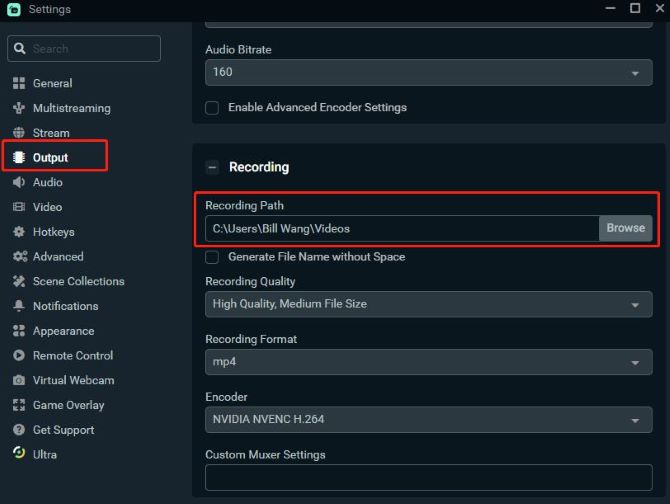
4. Click on Browse to open the folder where your Streamlabs recordings are saved.

You can also right-click the text in the Recording Path box, and select Copy.
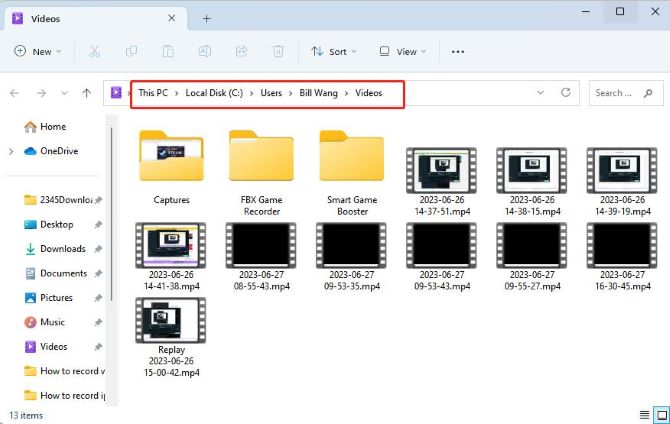
After that, open File Explorer, paste the recording path into the search box, and search for the recordings.

5. Now you can find all your recordings from Streamlabs.
Note:
The specific recording location may vary depending on your configuration and settings.
How to Change the Streamlabs Recording Location
The Streamlabs recording path can be customized based on your preferences. If you want to save your recorded videos to a specific folder, you can simply change the Streamlabs Recording location.
The following steps will show you how to change the OBS recording location.
1. In Streamlabs, click on Settings at the bottom left corner.
2. Click the Output tab on the left side.
3. Scroll down to access the Recording Path option.
4. Click on Browse and choose a new location for Streamlabs to store your recordings. After that, click Select Folder to confirm the change.
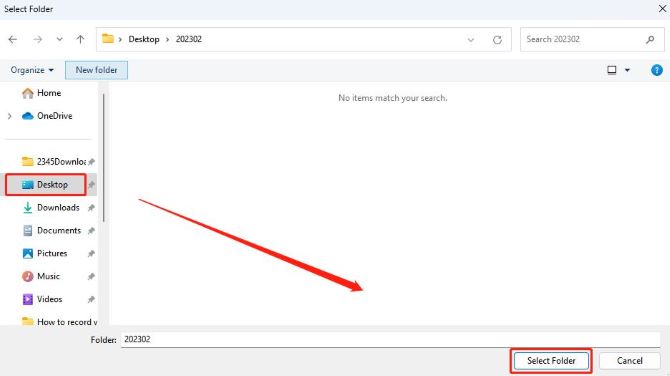
You can also manually type in the recording location that you want to save the recorded videos in the Recording Path box.
5. That’s done. Once you have made the changes, you should always know where to find the Streamlabs recordings from the path that you set for yourself.
Note: Streamlabs recordings can take up a significant amount of disk space, especially if your videos are very long, so it is very necessary to choose a location with plenty of available space.
FAQs about Streamlabs Recordings
A: Yes. If you select the “Automatically start replay buffer when streaming” option in the Streamlabs setting, it will automatically capture and record up to the last two minutes of your live stream.
A: If Streamlabs does not save recordings, consider the following factors: incorrect recording settings; insufficient disk space; file naming conflicts; software conflicts; incorrect permissions; problems with Streamlabs itself.
A: Yes, Streamlabs can save live streams as recordings. Streamlabs offers the capability to record your live streams while you’re broadcasting. Simply add the live streaming resources you want to record, and hit the record button to start recording.
A: Streamlabs allows you to save recorded videos in different formats. To save it in MP4, click Settings at the bottom left corner, then go to Output > Recording > Recording Format, and select MP4 as the recording format.
A: Yes, you can record videos on Streamlabs without going live. To do so, select the content you want to record from Sources and click the REC button in the lower right corner. This will start a recording without going live.

