
Want to record the screen activities on your Mac? Whether you want to film a tutorial, share what you are looking at with your friends, or simply want to save a video of what’s happening on your screen, we’ve got you covered.
In this tutorial, we’ll walk you through the step-by-step processes to screen record your Mac in the 4 best ways. Fortunately, these options apply to MacBook Air, MacBook Pro, iMac, iMac Pro, Mac Pro, Mac mini, or any other Mac computer.
Can You Screen Record On Mac?
Yes. You can screen recording on a Mac computer for sure.
In fact, Mac come with a built-in screen recorder. Good though it is, you may still face problems if you find the default tools limit the recording features and record unwanted background noise.
In this case, you can turn to a professional third-party Mac screen recorder for advanced screen recording features, including recording webcam, editing video, annotating video, etc.
Let’s get started.
Way 1: Screen Record On Mac With Built-in QuickTime Player
Macs (running macOS Mojave or newer) all come with a built-in screen capture app called QuickTime Player. It is the most hassle-free way to screen record on a Mac.
Since QuickTime Player is pre-installed, to use it, you don’t need to download extra software on your Mac and can simply launch it by using hotkeys to process the recording tasks.
However, it’s a pity that QuickTime Player is not available to capture system sound, and has only one format (.mov) to export your recordings. There are no cool features to make the recordings engaging as well.
If you’re looking to create stunning videos with advanced features, see Way 2 directly.
Here’s how to use QuickTime Player to record your Mac screen:
1. Open QuickTime Player. From the launchpad, search for QuickTime Player, and click on it to run.
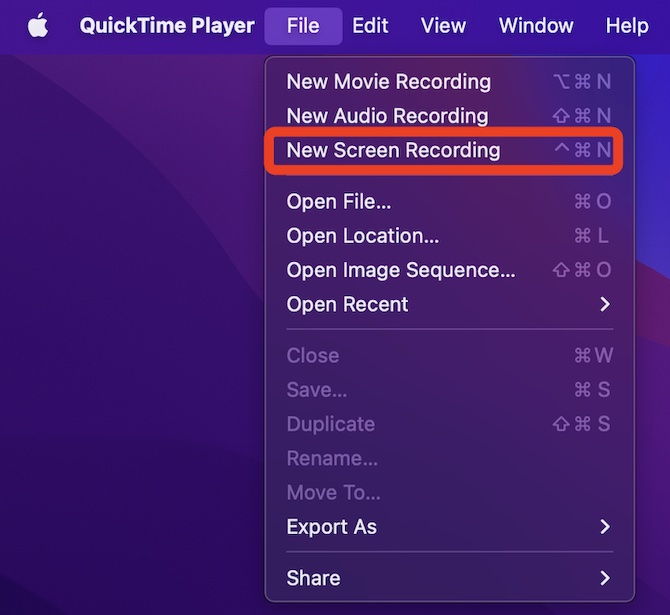
2. From the top bar on your screen, click File > New Screen Recording. A toolbar will pop up and your mouse arrow is replaced with a picture of a camera.
3. Select your entire screen or a selected portion. Choose from icons on the toolbar to Record Entire Screen or Record Selected Portion using the draggable window.

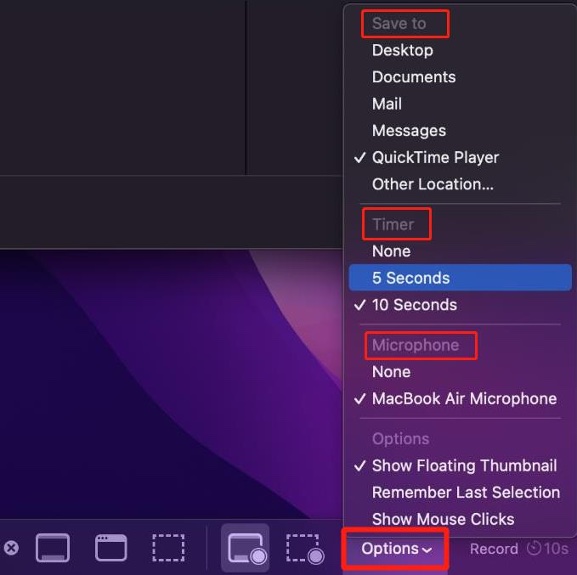
4. Adjust your recording settings. From the toolbar, click on Options. Choose the built-in microphone to record with audio, and select a location to save the recorded video. If you want to have a delay for recording, select a 5 or 10 seconds timer.
5. Start recording. Press the Record button to begin your screen recording on Mac.

6. Stop recording. Press the stop button at the top right corner to stop your recording.

Once your recording is complete, it will pop up automatically. Click on it to view and play. After that, you can upload it to other platforms or share it with friends.
Way 2: Screen Record On Mac With A Screen Recorder (Recommended)
Although you can record your Mac screen using Mac’s built-in screen recording tools, you might need an easier way for screen recordings or advanced features such as schedule recording, webcam, show keystrokes and mouse, video editing, etc.
If so, Movavi Screen Recorder for Mac is the best Mac screen recorder recommended for you.
It is compatible with Mac OS X 10.10 or higher, as well as with any MacBook model, including Air and Pro. You can record anything you want – live webinars, hangouts, tutorials, online calls, and even movies.
Movavi Screen Recorder has a concise and intuitive interface, so that you won’t spend a lot of time learning how to use it. You can save recorded videos to different output formats and cut out unwanted fragments with the built-in edit tool.
Benefits of using Movavi Screen Recorder
- Capture your Mac screen flexibly with no time limit
- Screen record on Mac in full HD / 4K with a recording scheduler
- Record both internal and external audio with noise reduction
- Capture both webcam and Mac screen output simultaneously
- Offer editing tools to trim, cut and join recorded video clips
Follow the steps below to learn how to screen record on your Mac in minutes.
How to screen record on Mac via Movavi screen recorder
1. Download and install Movavi Screen Recorder for Mac, then run it.
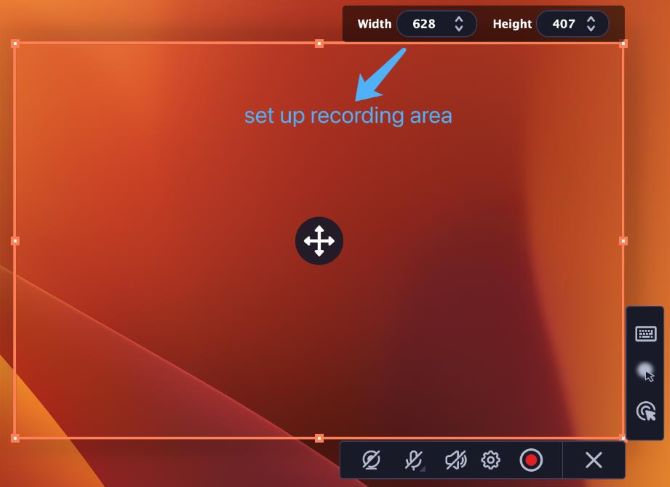
2. Set up the recording area. Click the camera button on the control panel or press F10. The area selection tool will start. Select the part of the screen that you want to record.
- To record a window, hover your mouse pointer over it and click once a frame appears around it.
- To record the full screen, press Space or click on any part of your screen (make sure no windows are selected).
3. Set up the sound and camera. By default, the system sound, microphone, and webcam settings are off. To enable them, click on the corresponding icons. If you have more than one microphone connected, select the one you need.

Tips:
To remove extraneous sounds, click the settings button and enable the noise reduction feature. It’s handy if you’re recording audio in a noisy place.
4. Start recording on Mac. When you’re ready to begin, click the red start recording button. You will be given a 3 seconds countdown before the recording begins.

5. While recording, you can enjoy these advanced features.
- Set a Timer. Click the clock icon > Set time duration > Choose what happens after capture. The recording will stop automatically once the time is up. You don’t have to wait around for the video to end.
- Take notes and mark important parts. Click the pencil icon > select the tool, line color, and width and draw or add shapes using your mouse cursor.
6. Stop recording on Mac. When you’re ready to finish your recording, click the square stop button on the recording panel.
7. When you finish recording, the capture editing window will open. Your video is ready and saved in MKV format, you can then:
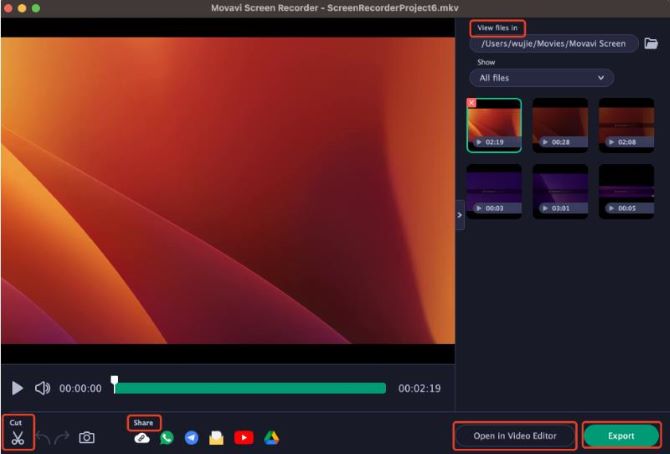
- Cut recordings: trim videos from the beginning or the end, and cut out fragments.
- Navigate files: view and edit recorded files from any folder.
- Change recording format: save the video in a different video format.
- Share recordings: upload your video online or send it to your friends.
Movavi Screen Recorder is a highly recommended Mac screen recorder, especially when you need to capture the system sound, and webcam and enjoy advanced recording features. It is a powerful recording tool that meets all your recording needs.
Way 3: Capture Screen On A Mac Via OBS Studio
OBS Studio is a free and open-source app that you can use to screen record on a MacBook, iMac, or any other Mac device.
Thanks to its versatility, OBS Studio is enjoyed by a lot of gamers, streamers, and content creators. It offers a range of features that advanced users can take advantage of while recording to make unique and custom videos.
However, the interface of OBS Studio can be quite confusing and overwhelming for beginners. It would be comparatively complicated to operate with many professional functions hard to understand in a short while.
Now follow the steps below to screen record on Mac with OBS Studio:
1. Download and install OBS Studio for macOS. Next, go to Finder > Applications and find the OBS app. Click it to launch.
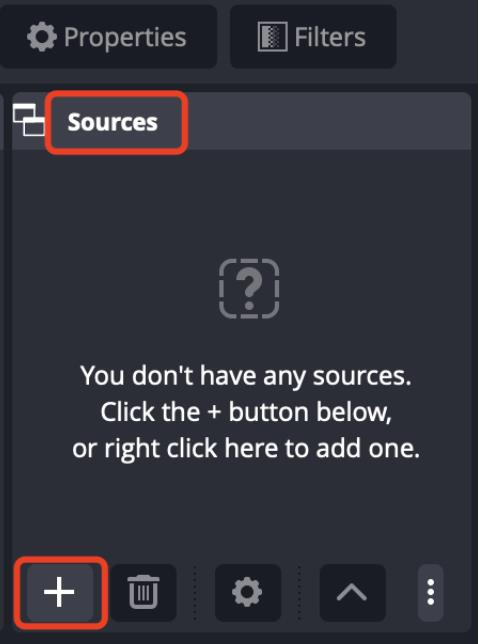
2. Click “+” under Sources. It’s near the bottom-left corner of OBS. A list of sources will appear.
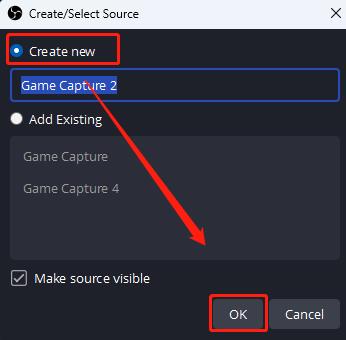
3. Click macOS Screen Capture. This opens the Create New window. Click OK.
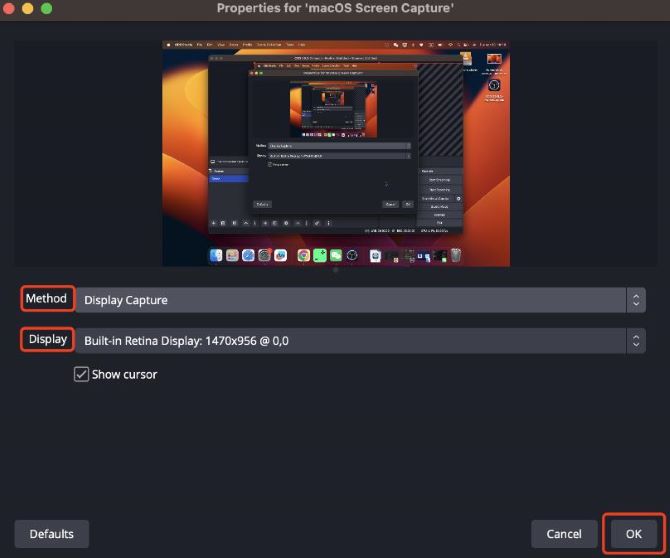
4. Select the screen you want to record from the Display drop-down menu. Toggle on Show cursor to catch the mouse display. Then click OK.
5. Adjust the volume as needed. You’ll see two sliders in the Mixer tab at the bottom of OBS.
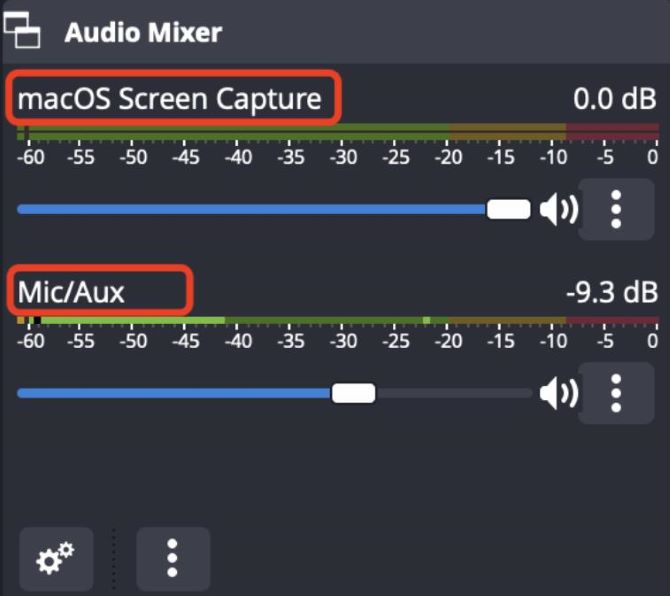
- Adjust Desktop audio: This controls the sounds coming from your computer during the recording.
- Adjust Mic/Aux: This controls the microphone or external input. If you’re using a mic to speak over your recording, make sure this slider is up.
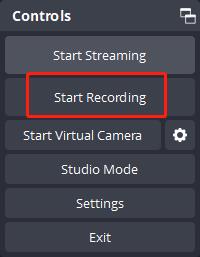
6. Click Start Recording. It’s near the bottom-right corner under Controls. The recording on Mac will begin immediately.
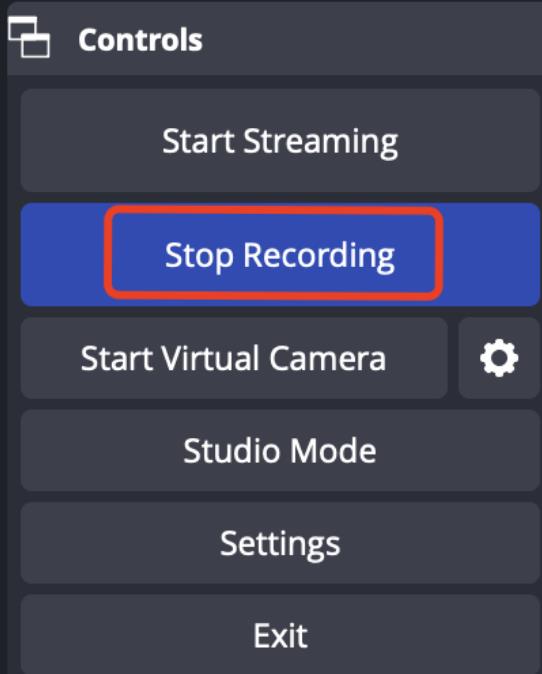
7. Click Stop Recording when you’re finished. It is level to Start Recording under Controls.
Way 4: Screen Recording On A Mac Via VLC Media Player
VLC Media Player is widely known as an open-source and cross-platform multimedia player. It is also a free but powerful screen recording software that can be used to capture videos on Mac.
However, as a media player, VLC has various limits on screen recording as follows:
- It doesn’t support recording part of your screen.
- It lacks trimming, cutting, and basic editing tools.
- It doesn’t allow you to record computer screen with webcam.
But still, VLC Media Player is capable of doing some basic screen recording on Mac. Let’s go through the full recording process in detail so that you don’t have to go anywhere else.
1. Download and install VLC Media Player for macOS, then run it.
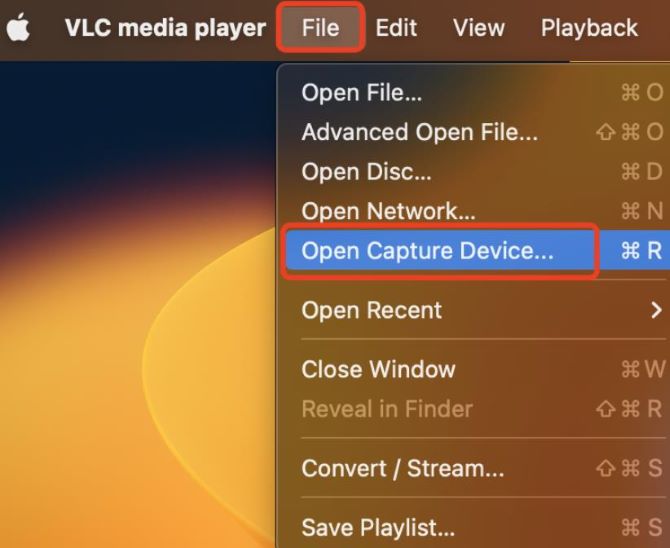
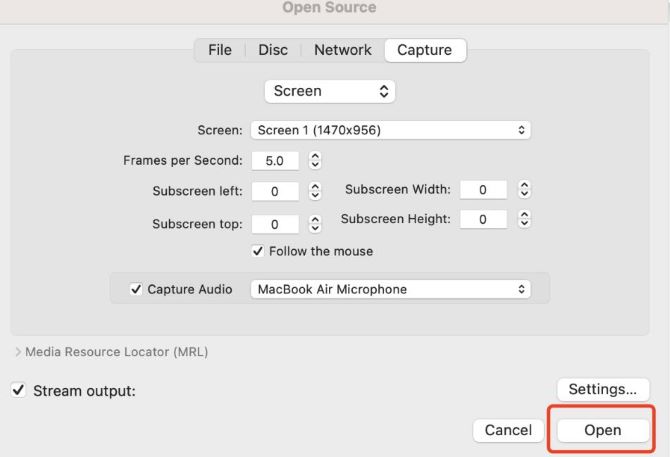
2. Navigate to File at the top of the screen, and select Open Capture Device.
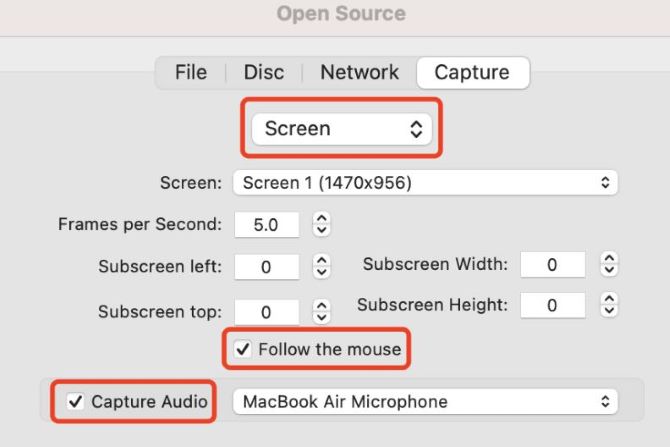
3. A new Open Source window will appear up. From the dropdown menu of Input Devices, select Screen. Toggle on Follow the mouse to catch your mouse display. Select Capture audio, and choose the microphone to record on Mac with audio.
4. Adjust more settings. Select Stream output, and click on Settings on the left. In the new window, select where to save the video file from Browse. Set audio and video settings including bitrate, channels, and so on. Then click OK.

5. Click on Open on the bottom-right and minimize the VLC recording window. It will start screen recording on your Mac instantly.
6. Click on the square stop button on the left of the control bar, and the recording on Mac will stop.

Tips: You can also click on Playback > Record and Playback > Stop to start and end recording on Mac on top of the screen.
Whether you want to capture your screen with Mac’s built-in recording tool or want to enjoy advanced recording features with the help of an easy-to-use screen recorder, this guide will get you covered.
FAQs About Screen Record On Mac
A: It could be because of your audio recording settings. If you use the built-in QuickTime Player, the audio source is off by default. Ensure that you navigate to the toolbar, click Options, and select the desired Microphone to record incoming sound.
A: If you are using QuickTime to record your Mac screens, you can continue recording until your drive runs out of memory. If you are screen recording on Mac with a third-party screen recorder, there is no time limit for your recording.
A: If you need just the basics to occasionally record your Mac screen, QuickTime Player is a handy tool to use. If you are looking to screen record on Mac in a quick, simple, and easy-access way, a professional third-party screen recorder is the best choice.
A: To schedule a screen recording on Mac, you need to use a third-party screen recorder like Movavi Screen Recorder. On the control panel, click the settings button > open Preferences > Switch to the Scheduler tab > Select Schedule recording > fill in the details > click Create.
A: If you are using the QuickTime Player to record on Mac, the default storage location to save your screen recordings is on your desktop. However, you can change your storage location by clicking the Options button on the toolbar.
More Articles: