Whether you are using a mobile phone or computer or iPad, it is extremely necessary for you to free up Mac disk storage. Specifically, this article will be helpful if you are using a MacBook and want to clean up Mac disk space.
For an expensive MacBook with no default disk division, users may find it complicated to spare disk space on a MacBook. Some users may just want to know what occupies much disk space on MacBook Air or iMac, and which files can be deleted and which files can’t be removed from macOS.
Contents:
- How to Check Storage on Mac
- How to See What’s Taking Up Space on Mac?
- Effective Ways to Clean Disk Space on Mac
How to Check Storage on Mac?
Before cleaning up the disk storage, you may want to see how much storage you have on Mac. Like what you can do on Windows, you can enter Storage on Mac using different ways. Below are steps of the most common way to get into Mac Storage.
In the Menu at the top of the Mac desktop, hit the Apple icon > About this Mac > Storage. Then you will have entered the disk Storage on MacBook.
As can be seen below, the Macintosh HD has taken up 63.92 GB of disk space, and there is also 181.09GB available.
On the right side, the Macintosh HD is displayed with a total storage of about 245.11 GB.
While on the left side, it displays Flash Storage and its data. For instance, the disk below has total disk storage of 251 GB.
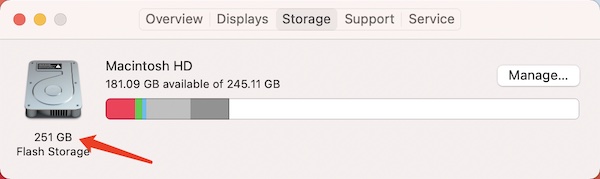
Now, many of you may be wondering how much the storage of this disk is. The answer is: Macintosh HD represents the real capacity.
Further: Why is Macintosh HD Storage Different from Flash Storage?
Some users may find that the real capacity of Flash Storage is different from the displayed capacity of Macintosh HD, and the difference between the volumes of Flash Storage and Macintosh HD capacity ranges from several KB to several GB.
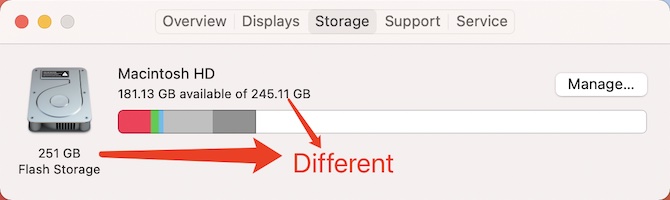
For instance, for this Mac, the total capacity of Macintosh HD is less than Mac Flash Storage of about 5.89 GB.
Hence, what is my real Mac disk storage? Is it flash storage size or Mac hard drive size? Why is there a volume difference between them? Can I clean up Mac space manually?
Flash Storage displays the data of the inbuilt disk program, Disk Utility on Mac. There may be differences in the disk space as displayed in Disk Utility, especially the difference between SSD and flash storage data.
The main reasons include EFI partitions, recovery partitions, loss-balancing blocks, write buffer areas, metadata, standby blocks, growing bad blocks, and additional space occupied by factory bad blocks.
In Disk Utility, these differences will be displayed a general data. Users can check the data via the shortcut Command + 2 or click Show All Devices in Disk Utility.
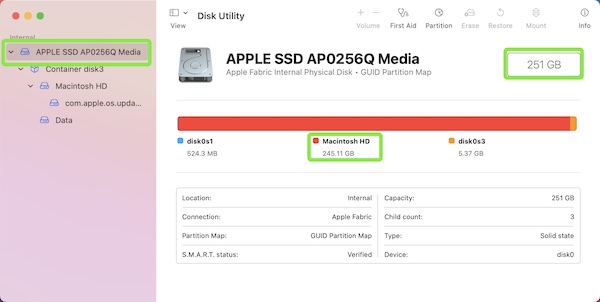
Here, you can see that the total flash storage is 251GB, the Macintosh HD storage is 245.11GB, and two disks named disk0s1 and disk0s3.
If you want to ascertain what disk0s1 and disk0s3 are, you can check them in Terminal:
Open Terminal and then enter the following command. And then hit Return.
Diskutil list
Now, you can view what files or apps take up your Mac disk space.
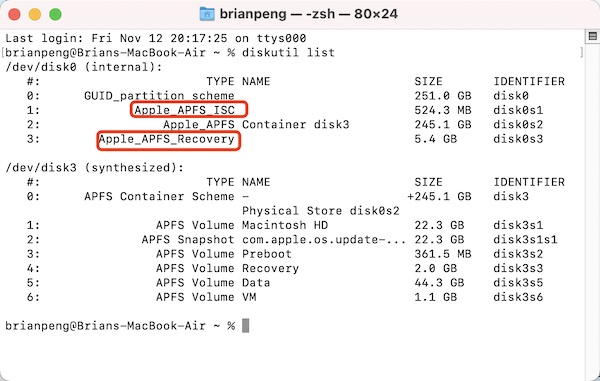
In fact, disk0s1 represents Apple_APFS_ISC, which is about System Container. And the storage of disk0s1 is 524.3 MB.
While disk0s3 represents Apple_APFS_Recovery, which is dedicated to providing 1TR and stored on the recovery volume. The storage of disk0s3 is 5.4 GB.
Here, it is worth noting that if you have not created a recovery partition, you will not observe its presence.
To sum up, the real storage of Mac is the hard disk size. Therefore, the total capacity of this MacBook Air is. 245.11 GB.
How to See What’s Taking Up Space on Mac?
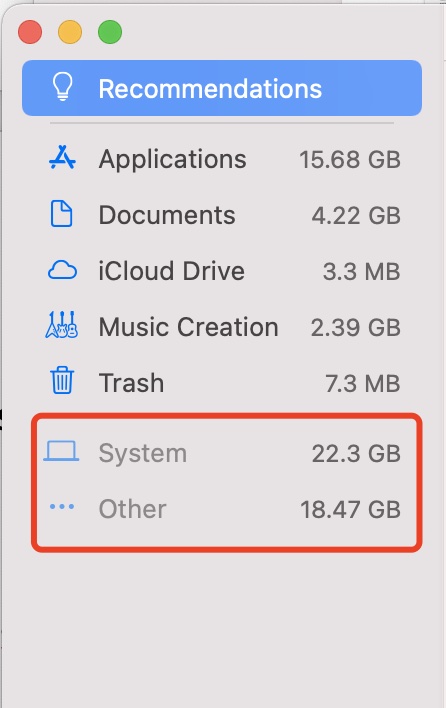
On Mac, different colors are often used to mark different spaces for different purposes. The disk below displays five different file types, which are apps, documents, music creation, system, and Other. There may be different disk usages that are marked with other colors depending on your disk space divisions.
For instance, you can see Trash here if there are some files in Trash. As you can see here, there is an “Other”. It will be explained in later parts.
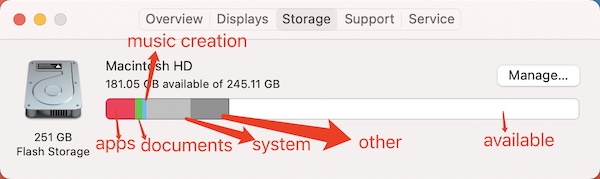
In the above screenshot, the white space displays the available disk space on your Mac. The more space is in white, the healthier your Mac is. If you barely see the space in white, it implies that you need to clean up the disk space.
When you click the Manage button on the left of Macintosh HD, you can enter Mac Storage Manager.
Left Side of Mac Storage Manager
On the left pane of Mac Storage Manager, you can find details of different types of files like how much disk space each type of file takes up.
Normally, different users use different types of files, so the file types displayed on the left side of Mac Storage Manager differ from a Macbook to another.
Here, files types in the upper part display as available options, whereas file types in the lower part are unavailable in grey, including Users, System, and Other.
These file types that occupy the Mac disk space and can be managed directly are:
Applications: it includes all inbuilt and third-party programs on MacBook.
Documents: it includes a wide range of files. After you click this option, you can see all kinds of files like videos, audio, pictures, images, documents, folders, and program packages.
iCloud Drive: it is mainly used to synchronize, store, and back up system files and essential files.
Mail: you can check the attachments of all e-mails and delete junk e-mails here.
Messages: it includes all chatting records including pictures via messaging on iPhone, iPad, iPod, and Mac.
Music Creation: music from GarageBand and the app itself.
Music: Cache and downloaded music from Apple Music.
Trash: Files in Trash.
Photos: images and pictures.
Podcasts: content in Apple Podcasts.
…..etc.
In your MacBook Air or Pro or iMac, you can find other file types except for the above types and they include specific files related to or from the files.
In the upper part in white, there are file types of System and Other. Besides, if you have created multiple users, “Other” will also appear in the unavailable options. These grey options are created as unavailable because Mac tries to ensure safe disk clean without deleting essential files.
System:
It is composed of several parts like system inbuilt programs, cache, and configuration files, and configuration files of downloaded apps.
(1) System inbuilt programs: Mail, Dictionary, Preview, and cache, journal, and configuration files of system programs.
(2) Other program files: in disk storage, the section of “Applications” only calculates the total app size (except system inbuilt programs). While the configuration file, data, and cache are categorized into “System”. That is why the “System” disk storage part takes up so much space.
In program files, some are cache and log files. Cache files are used to speed up the programs, while log files are mainly used to record operations and crashes when programs are running. These two types of files are junks. And you can clean up them without affecting Mac’s performance and operations.
Some files that occupy much disk space are configuration and data files of different apps. These files are normally located in the Database folder. If there is no special cleaning plan, these files will be stored in your Mac disk until it is full. For this part, these files are culprits of high disk usage by “System”.
Other:
What on earth is it? Sometimes, you find that the “Other” section takes up a lot of space, but there’s no way to enter this option to examine what files it contains. Apple has not given a specific explanation for Other, neither.
Which files will be categorized and displayed in Other? Software cache or least-used software? It’s not just that.
In fact, the categorization of files in disks has nothing to do with the type of file, but with the location of the file. As macOS will not scan the system in-depth every time, when the size of the system folder changes, it will be displayed in Other.
“Other” comes from system folders, which are generated for the running of the system. No matter the system itself or third-party software, some cache and temporary files will be generated when running. Over time, Other disk will take up more space.
However, as the “Other” disk contains system and third-party applications, not all files in this section can be deleted. That’s why Apple displays the system and Other as unclickable.
Right Side of Mac Storage Manager
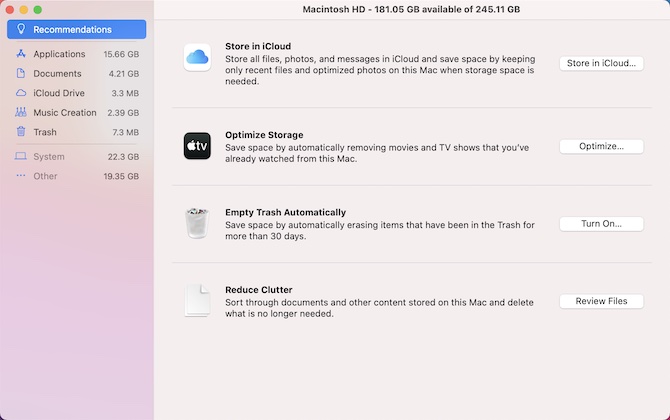
On the top right, you’ll see that it still indicates the available disk space on this Mac.
On the right side, MacOs provides four methods (Store in iCloud, Optimize Storage, Empty Trash Automatically, Reduce Clutter) to help you clean and Optimize disk space.
Steps about four methods will be mentioned in the following parts.
How to Clear Disk Space on Mac?
Having learned about the disk usage on the Mac above, you can now completely clean useless files, installation packages, images, audio and video, various caches, and Other on Mac.
- Clean Mac disk Space Automatically
- Empty Trash to Free up Disk Space
- Clean Up the Large Files and Application Packages in Downloads
- Uninstall Apps That Have Not Been Used For A Long Time
- Delete Duplicate Files and Photos
- Manage Storage With the 4 Mac Built-in Tools
- Delete Junk Mails and Unnecessary Mail Attachments
- Delete Unused Language Files
- Delete Different Types of Caches on Mac
- Delete IOS Backups
- Delete Local Backup of Time Machine
Clean Mac Disk Space Automatically
Considering the complexity of manually cleaning up Mac disk storage, it is recommended that you use a third-party tool to automatically clean the disk and delete junk files on the Mac to spare more space. That will efficiently clear up your Mac disk storage.
Mac Booster is a professional protection and cleaning tool for MacBook. It can help you scan the Mac to find junk files, cache files, cookies, virus files, and then automatically clean them up. In addition, this tool can also be used to speed up the MacBook.
It can also help you find all kinds of big files, duplicate files, old photos on your Mac, and you can remove them as needed using this tool.
You can try it to free up more disk space on Mac.
1. Download, install and run Mac Booster on Mac.
2. Click Scan. Mac Booster will start scanning the system.
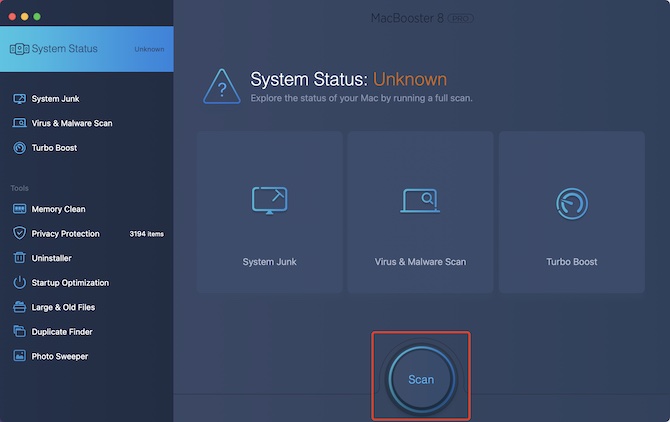
It will take several seconds. Learn more from here to see which items Mac Booster will scan on your Mac.
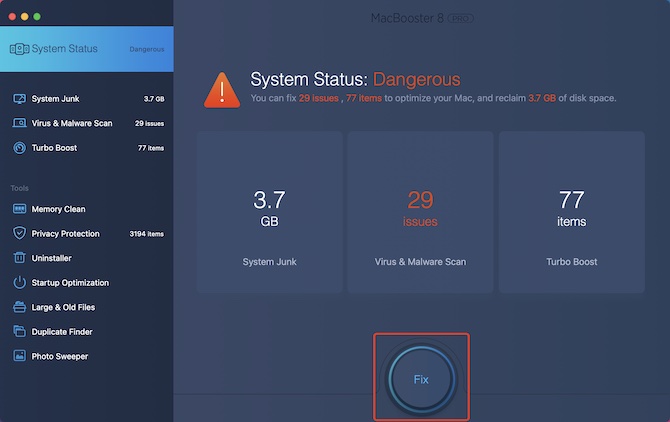
As you can see, Mac Booster has scanned your MacBook and found that there are system trash files of 3.7GB, 29 virus issues, and 77 items that slow down the Mac.
3. Click Fix.
Now you will not receive a warning that the Mac disk is full. You can also open the Mac Storage panel again to see which types of disk space have been reduced.
Further: Which Items Mac Booster Will Scan for (On) your Mac?
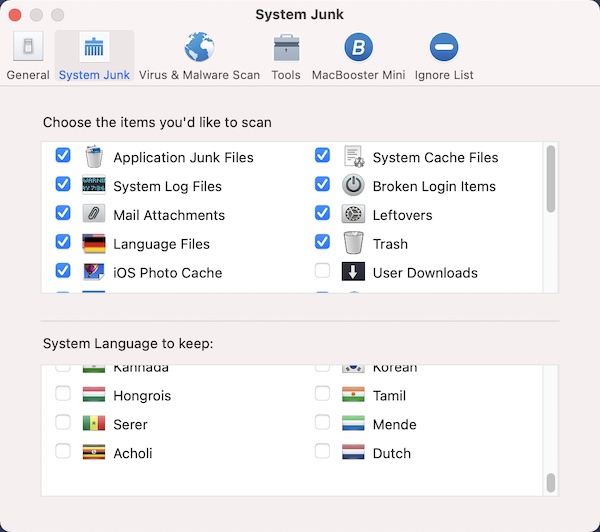
How many junk files can Mac Booster find? How much disk space does it clear up? When it performs a scan, it lists a total of 20 possible trash items. After the scan, it lists these items for you so that you can clean or manage them when needed.
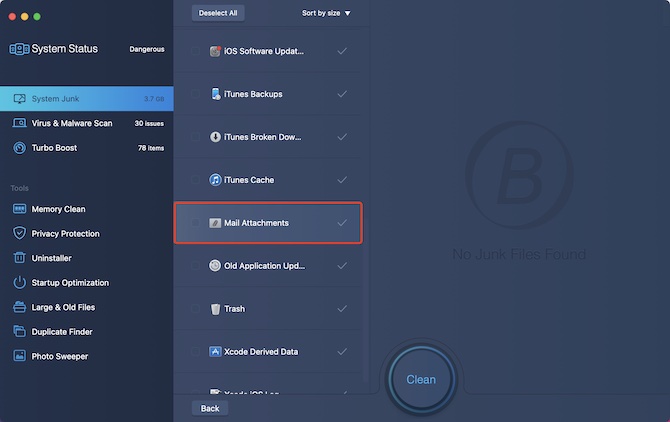
These items are Application Junk Files, System Cache Files, System Log Files, Broken Login Items, Mail Attachments, Leftovers, Language Files, Trash, iOS Photo Cache, Xcode Derived Data, Mac Software Installer, iTunes Backups, iOS Applications, iOS Software Updates, iTunes Broken Downloads, iTunes Cache, Old Application Updates, Xcode iOS Log and MacOS Localization.
You can also use other tools to clean up your disk. However, all of these tools, including Mac Booster, sometimes fail to satisfy your demands in cleaning up disk space.
If you find that Other or any other type of files still takes up much space after the automatic cleaning, you need to manually check and clear the other space.
Empty Trash to Free Up Disk Space
Trash on the Mac is the same as the Recycle Bin on Windows. When you move installation packages or files from your Mac into the trash, you don’t actually delete them as they’ve just moved to the trash. Trash also takes up disk space unless you empty it to completely remove files in it.
There are many ways to empty your Trash. For instance, you can find Trash in the lower right corner of the Dock, and then right click to “Empty Trash”.

In the pop-up, select Empty Trash. You need to know that it will permanently remove files in Trash. Therefore, if you’re not sure which files to be deleted, you can open Trash and select which files to be removed.

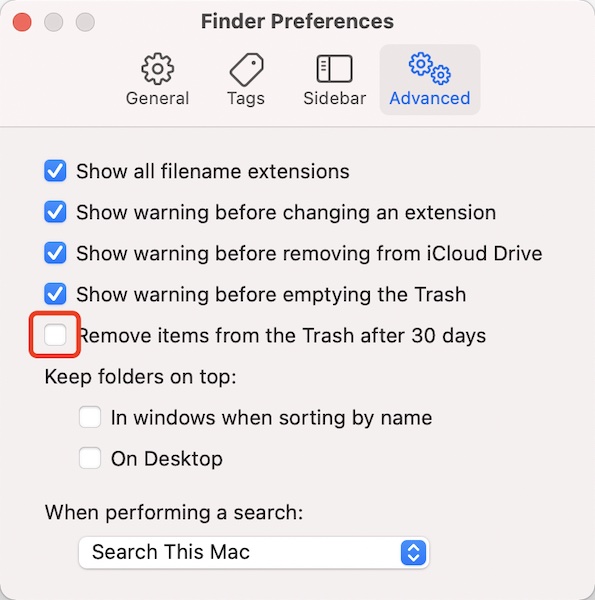
There is another method for you to automatically clean Trash.
1. Hit System Preferences > Advanced.
2. Check the box of Remove items from the Trash after 30 days.
Clean up the Large Files and Application Packages in Downloads
Undoubtedly, this method must come first. In addition to the disk space taken up by system files, backups, and programs, numerous packages and files downloaded from the browser may quickly take up the disk space. You can spare more space if you can clear up them.
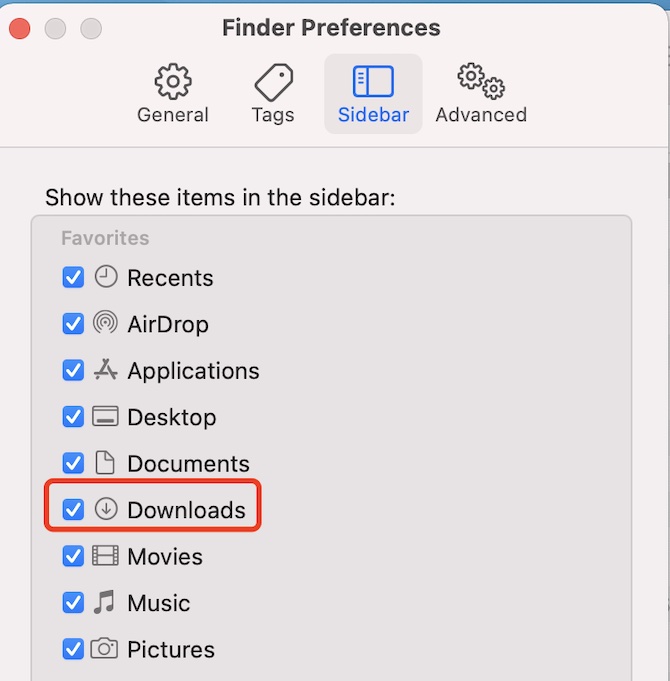
1. Open Finder.
2. On the left side, click Downloads.
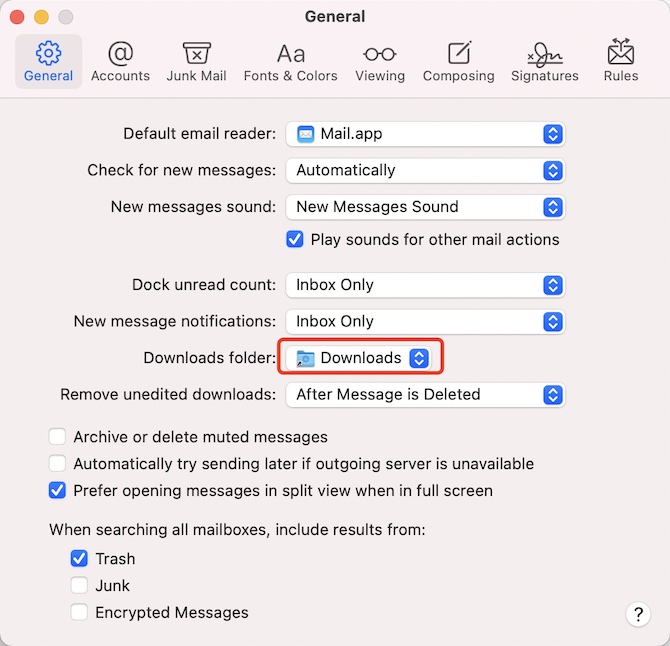
If you cannot find Downloads on the left, just open System Preferences and then select Downloads under the Sidebar check box.
In Downloads, Mac files can be displayed in line with their Size, Kind, and Date Added.
Below are two basic principles for you to deal with these “Downloads” files.
List these files with “Size” to filter out large files and installation packages and then Delete them;
List these files with “Date Added” to filter out unnecessary and old files and then Delete them;
If you do not want to delete some files, you can pack these files using some packing tools like 7zip to save disk space, or you can also output these files to external disks.
Uninstall Apps That Have Not Been Used For A Long Time
On a Mac, Apps usually take up much disk space, and every time you open, update, or automatically back up an app, App and Other sections will grow larger. Thus, properly dealing with app files is necessary.
If some apps haven’t been used for a long time and they’re taking up a lot of space, you can consider uninstalling them. If you have no idea how to clean up Mac disk storage, you can refer to the complete guide: how to uninstall programs completely on Mac.
Besides, you can consider uninstalling some large applications and downloading some smaller alternatives to replace them.
If the automatic backup is enabled for some programs but the old backup files are not replaced by the automatic backup, new backup files will likely occupy more disk space as time goes by. If so, you can consider disabling the automatic backup option.
Similarly, if automatic maintenance is enabled on your Mac, the program cache will be accumulated to take up a lot of disk space. Hence, apart from cleaning up the program cache, you can also turn off the automatic maintenance of programs to run the maintenance manual.
Delete Duplicate Files and Photos
There are many duplicate files, photos, and images on a Mac. More often than not, copies of files and photos will come from your accidental copying and backups between different devices. As time goes by, these files take up more and more disk space. Therefore, it is necessary to move files and photo copies.
Use Mac Booster Duplicate Finder
You can use Mac Booster to find duplicate files, installation packages, photos, and other files on your Mac and then delete them.
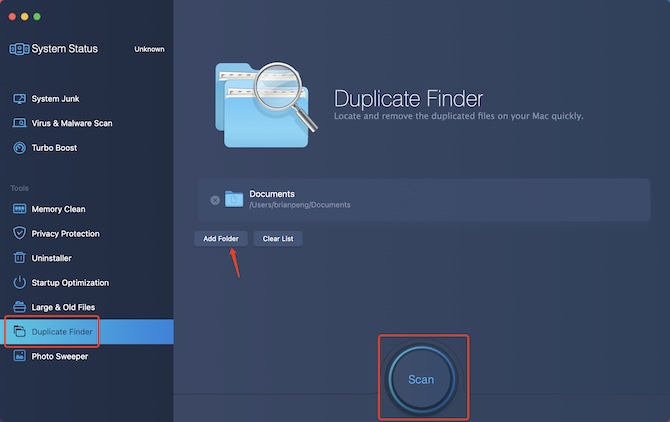
1. Open Mac Booster and click Duplicate Finder on the left to enter Duplicate Finder.
2. Click Scan. The Mac Booster will scan all the same files on your MacBook like documents, pictures, photos, music, videos, installation packages, and more. Wait a moment and you can see the same files on the Mac.
3. Check the box of Smart Check and then hit Remove.
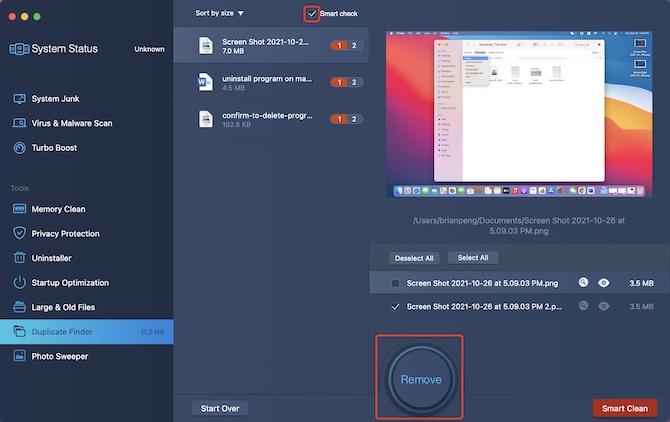
The Smart Check will save a document on your computer and delete other text attachments, so there is no need for you to worry that Mac Booster will delete the essential files.
Use Mac Finder Smart Folder to Search Duplicate Documents and Photos
Besides, you can also manually find duplicate files using the New Smart Folder that is inbuilt within the Mac Finder. This method seems to be more complicated in that it requires you to set different search criteria and manually identify duplicate images and documents before deleting them.
1. In Dock, open Finder.
2. At the top of the Finder menu, click File > New Smart Folder to open it.
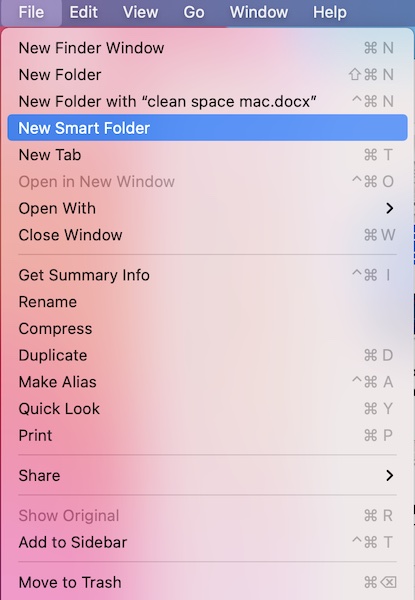
3. Hit the + button on the right side of Save, and then you can search for files.
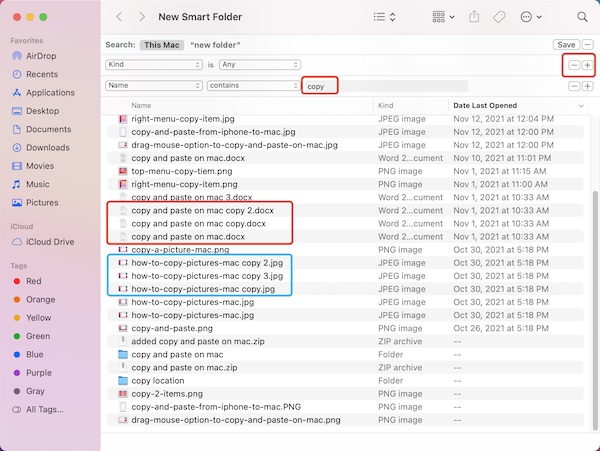
The screenshot below shows how to search for duplicate files of any type (documents, images, photos, programs), and so on.
4. Select the document or photo and then drag it into Trash or right-click on Move to Trash.
5. Open Trash and empty the file you just moved into the Trash.
Further: knacks about searching in New Smart Folder
a) Use the keyword “copy” when searching for a name. What lies in that when a file is copied on Mac, it always ends with “copy” after the name. You can see the tutorial: how Mac duplicate files are named.
b) Besides the keyword “copy”, you can also try number keywords like 1, 2, 3. That is because some copied files end with numbers 1, 2, 3, and so on.
c) In the search results, make View as List. You can then find the duplicate files more efficiently.
Manage Storage With the 4 Mac Built-in Tools
In the Mac Storage Manager panel, there are four methods and tools for you to manage disk files.
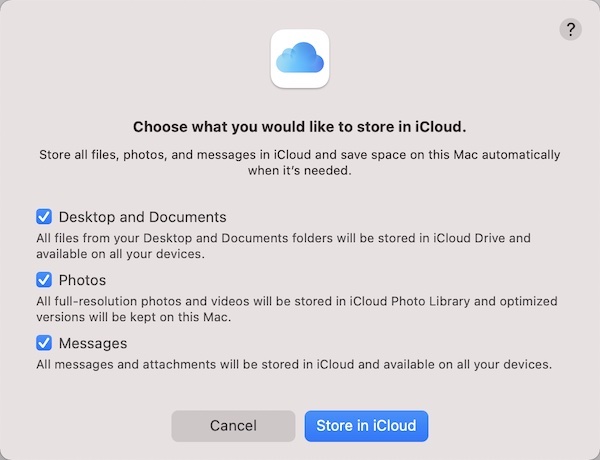
Store files, photos, and messages in iCloud
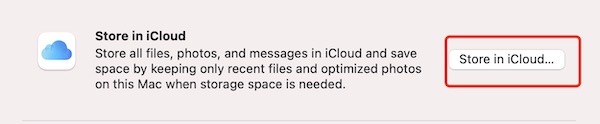
You can choose to save essential files, pictures, messages, and many other types of files to iCloud and delete local backups.
When necessary, you can download or edit the files from iCloud. Another advantage of this option is that you can access and edit these files on iPhone and iPad.
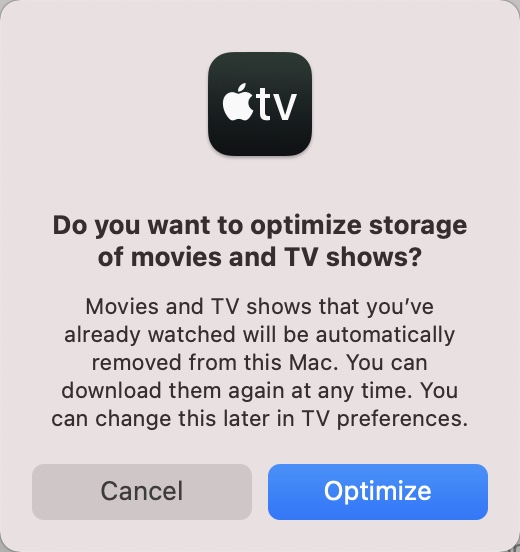
Optimize Movies and TV Shows to Free up Mac Storage

This method is also foolproof. It is to delete TV programs and movies on Apple TV to increase disk storage.
On the right side, hit Optimize, select Optimize in the pop-up dialogue. MacBook may also automatically move the TV programs and movies to save disk space.
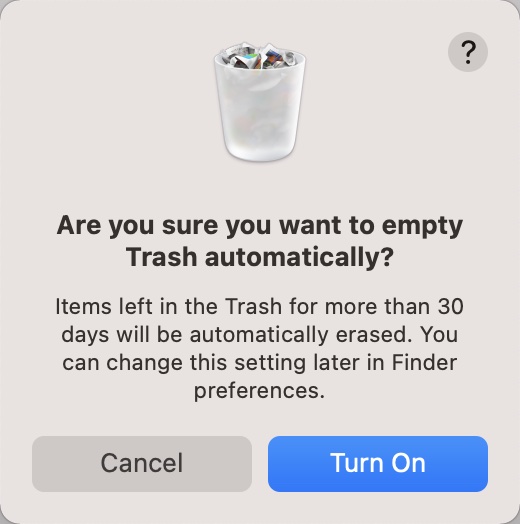
Empty Trash Automatically

Besides the manual method to manage files in Trash, the disk management interface also demonstrates this function. This function will automatically track files that exist for more than 30 years in Trash and remove them.
On the right side, click Turn On and then select Turn On in the pop-up dialogue.
Reduce Clutter on Mac
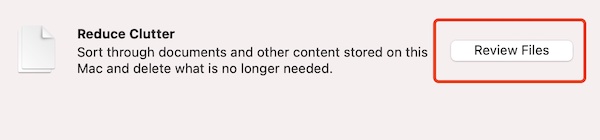
This option is advisable for users who have manually managed and cleaned up the disk. It allows users to view files that might slow down your Mac, including large files, downloads, downloaded but unsupported applications, unneeded application data containers, and generic file browsers.
1. Click Review Files, and then enter the Documents Manager panel.
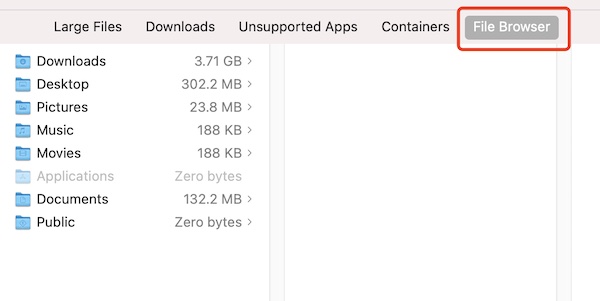
2. On the right side, you can observe five options: Large Files, Downloads, Unsupported Apps, Containers, and File Browser.
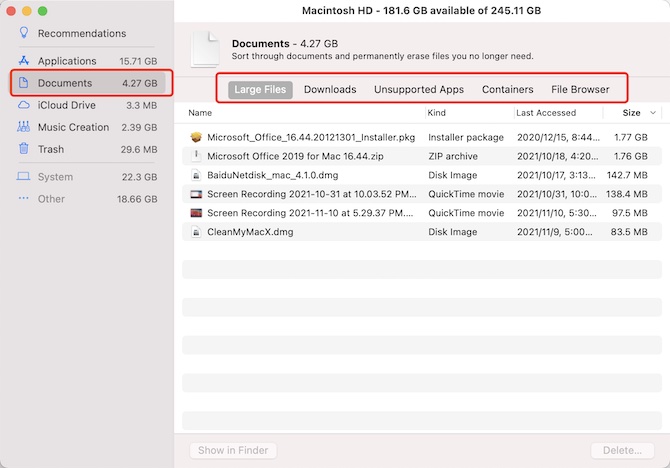
Large Files:
All the large files are listed on the computer, such as packages, movies, documents, etc. You can manually delete them if needed.
Select one or more files, and right-click Delete or directly click the Delete button in the lower right corner. Later, click Delete again to permanently delete the file.
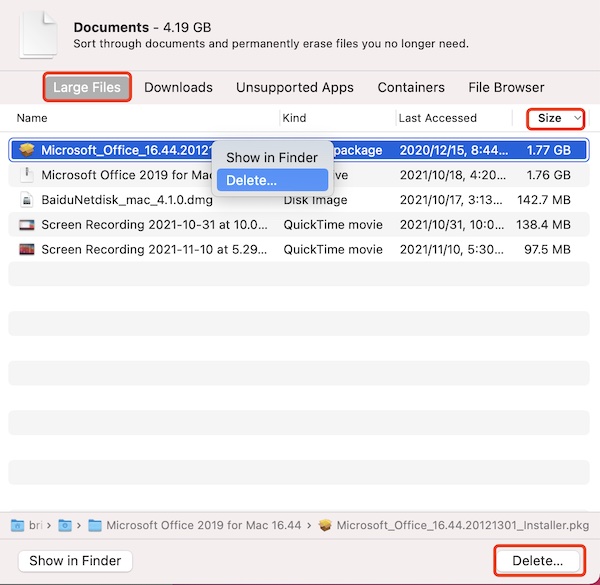
It is worth noting that files that are deleted in this way will not be a move to Trash. To avoid unnecessary file loss, you need to back up files in advance. At this point, compressing large files to free up disk space can be a good choice.
Downloads:
It lists all the files and folders from your browser, applications, mail, and social applications. By default, folders are displayed at the top and individual files are displayed below in order of size from the largest to smallest.
You can delete large installation packages, folders, and unnecessary files.
Unsupported Apps: delete them directly. You can download alternative applications instead.
File Browser: this is an effective tool. It can clearly display which files or folders take up large disk space. You can click the folders to check the files in them.
Delete Junk Mails and Unnecessary Mail Attachments
As a daily office communication tool, email is often used. Mac Mail apps contain a lot of email subscriptions, junk emails, and large attachments.
Over time, these emails can take up much disk space. And if you enabled the iCloud syncing setting, it may compress your iCloud storage. To release Mac’s available space, you need to clean up the Mail app.
Automatically:
Mac Booster can help you scan large mail attachments and Junk mails, ads mails, etc.
You can choose to delete some of the files or delete all.
Manually:
You can also manually clear up emails and attachments.
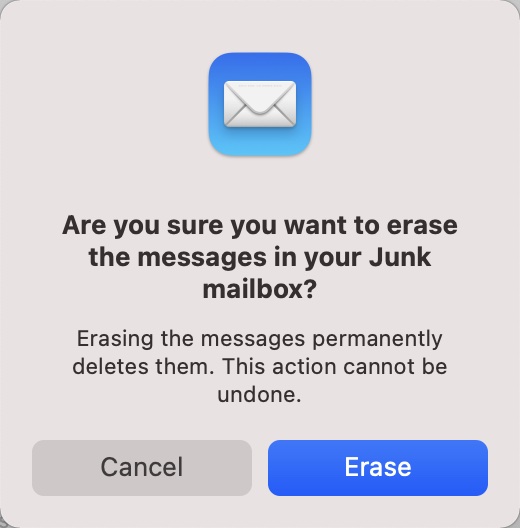
1. Open the Mail app, and at the top menu, select MailBox > Erase Junk Mail.
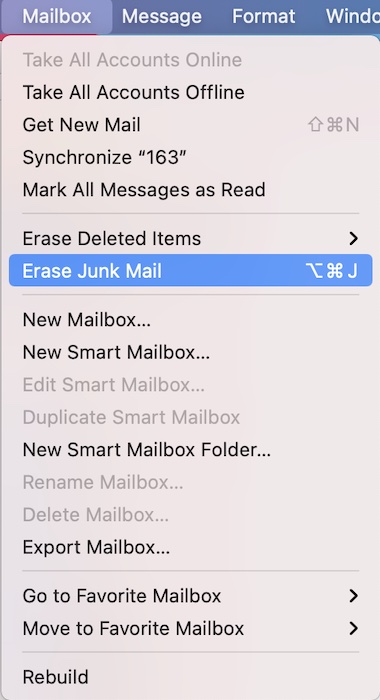
2. In the pop-up “Are you sure you want to erase the messages in your junk mailbox”, hit Erase.
In addition to the menu bar at the top, if you have multiple email accounts such as Gmail, Hotmail, etc., you can also delete Junk Mails, empty Mail Trash, and delete advertisement mails on the left side of each email.
Delete Mail Attachments
In fact, all email attachments will be stored under the “Downloads” folder by default. So, when you clear files from “Downloads”, your email attachments may have been deleted as well.
Delete Unused Language Files
Whether you use Windows or Mac, you probably only use several languages, so deleting language files that are not needed is also a way to clean up disk space.
There are usually two ways to remove unwanted language packages from your program. Firstly, you can use Mac Booster to automatically remove unwanted language packages.
The advantage of this method is that when you have limited knowledge about program files, this tool will help you quickly and efficiently find the unwanted language packages and automatically delete them.

Of course, you can also manually delete the language files, but that may be more complicated. Here, take searching for the language files of Time Machine and deleting unnecessary language files as an example.
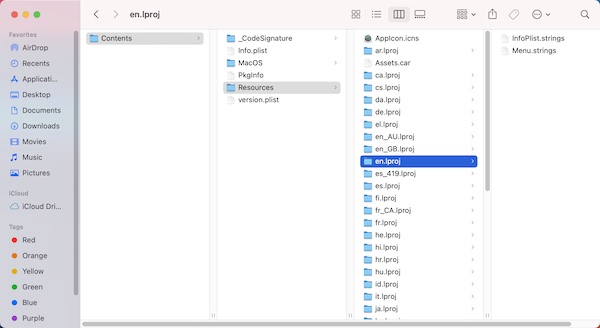
1. On the left side of Finder, open the Application folder.
2. Select Time Machine, and right click to select Show Package Contents.
3. Under Contents, select Resources and open it. At this moment, you will find many .lproj files, which are language files.
4. Select unwanted language files and drag them to Trash. And then delete them in Trash.
In fact, language packages usually won’t take up much space. Therefore, manual removal is not recommended unless you have installed a large number of programs.
Delete Different Types of Caches on Mac
When you use Windows or Mac, cached files will be generated. For example, if you open Safari, it will generate browser cache files. When you run a game, game cache files will be generated.
As cache files are used to download data locally to speed up internet access, the longer and more frequently you use your computer, the more cache files will be accumulated. Hence, it’s important to clean your MacBook’s cache regularly.
As mentioned above, Mac Booster can scan the system cache, Application cache, iOS cache, iTunes cache, and so on.
In addition, you can also find various types of caches on Mac manually and then delete the caches.
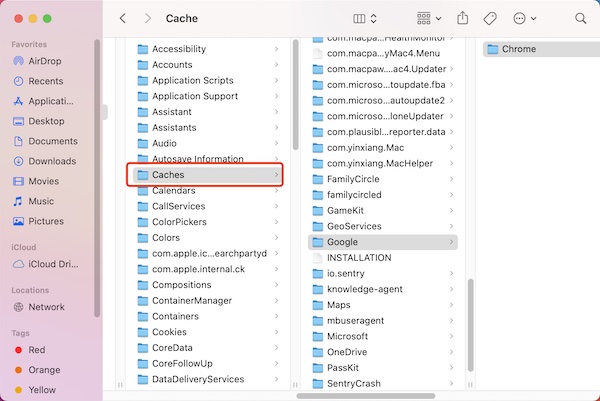
1. At the top menu on Mac, hit Go > Go to Folder.
2. Enter the following path, and then hit Go.
~/Library/Caches/
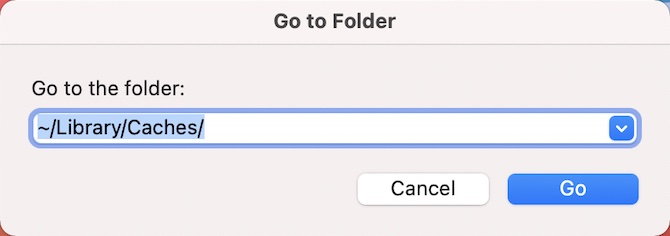
In the Caches folder, you can see all the cache files.
3. Select all the caches like Google Chrome cache and then delete them.
It is worth noting that the deleted cache files will be re-generated when you re-use the program.
Delete IOS Backups
If you’ve backed up your iPhone files via iTunes on your Mac, consider cleaning up your IOS backups and selectively deleting unwanted files when you need to free up MacBook disk space.
There are different methods to delete iOS backup files on MacBook. In fact, Mac Booster will automatically scan all backup files in iTunes by default, and you can delete items via this tool if needed.
Of course, you can also manually delete the IOS backup files. On your MacBook, find the directory ~/Library/Application Support/MobileSync/Backup, and then select files or folders to delete them.
Delete local backup of Time Machine
Some users will use the Mac inbuilt Time Machine to back up the system to an external disk, but it will also generate backup files locally. The Mac tends to clean up the old Time Machine backup files regularly, so you can ignore the backup files if there is sufficient disk storage. While if you do wish to delete the backup file, it is also possible.
Two options are available for you. Since this is a Time Machine tool, you can delete the Snapshot directly from Time Machine backups. Or you can delete it from Finder.
Summary:
Without distinguishing between drive letters, it is challenging to know the situation of Mac disk usage, organize MacBook files, and clean up the disk space.
As mentioned above, it is recommended to use the automatic tool to help you better observe the condition of the disk and clean Mac space. You can also manually delete files and folders on the Mac without affecting the system to spare more disk capacity.
More Articles: