Wondering how to capture audio while screen recording on Mac? You are in the right place. This post aims to guide you on how to screen record Mac with internal audio and microphone in 4 easy ways.
With the solutions we provide, you can record screens with audio on Mac for streaming videos, presentations, lectures, classes, and more. After that, recording a meeting or webinar on your Mac with audio is just as effortless.
Although it’s easy to record screens on Mac and capture external audio from your Mac’s microphone, it’s actually a little hard to record the internal audio while recording the screen on Mac.
Luckily, there are still ways out. Keep reading to discover working ways to record your screen and internal audio on Mac with ease!
Option 1: Screen Record on Mac with Audio via QuickTime Player (With Plugin)
The most hassle-free way to screen record Mac with sound is by using the built-in recording feature: QuickTime Player. You don’t need to install extra software and can simply launch it by using hotkeys to start the recording tasks.
However, Quick Time Player does not have the ability to record the internal audio of your Mac during the screen recording.
For example, it won’t record the sound coming from programs like games or music interfaces. This is a serious problem for most people trying to record their screens since it is impossible to make engaging content without any audio.
To capture the sound from a video, game, or application on your Mac while screen recording, you need to use QuickTime Player plus a plugin.
How to screen record with audio via QuickTime Player
1. Download and install Loopback on your Mac.
Tips: If you are using macOS Big Sur (11.1) and earlier, Soundflower is another great choice. Here is a tutorial about how to check and update your macOS version.
2. Set up the Loopback plugin before recording.
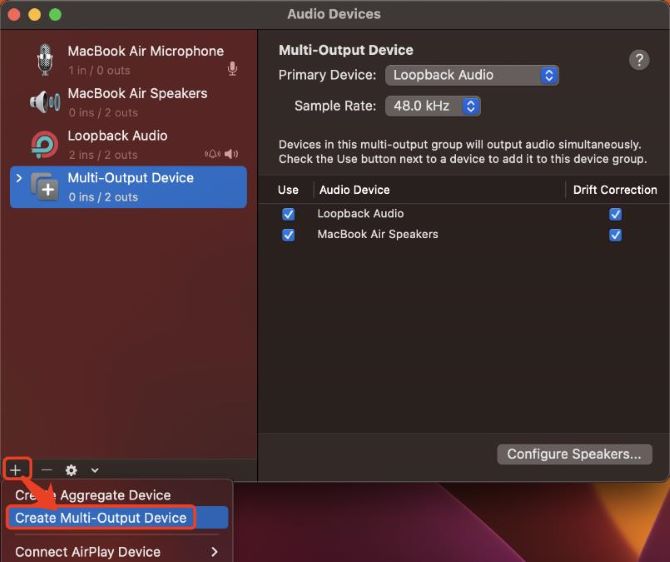
- Open Audio MIDI Setup. You can find it from the Launchpad.
- Click the “+” at the bottom left corner, select Create Multi-Output Device, then choose Mac’s built-in output and Loopback Audio at the same time.
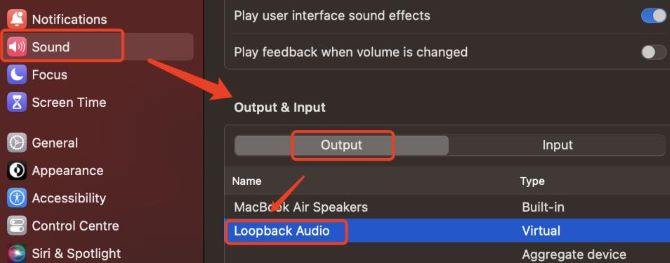
- Go to System Settings > Sound > Output & Input. Under the Output tab, choose Loopback Audio.
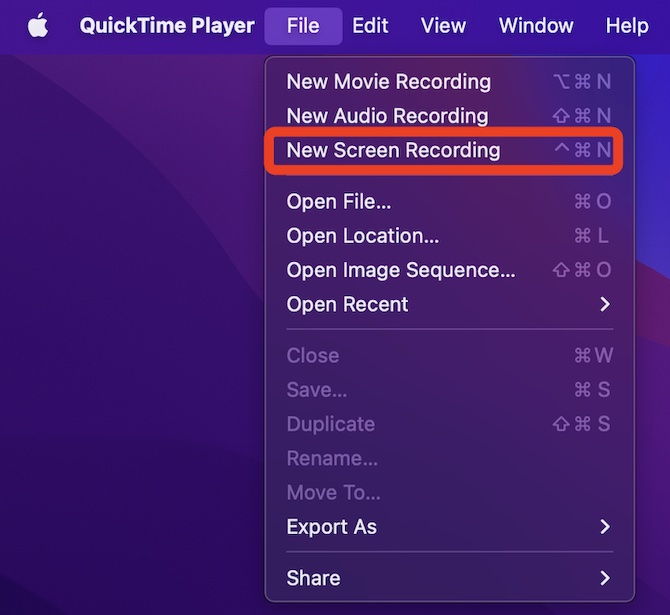
3. Launch QuickTime Player from the Launchpad.
4. On the top menu bar, click File > New Screen Recording. A toolbar will appear on your screen, and your mouse arrow is replaced with a picture of a camera.
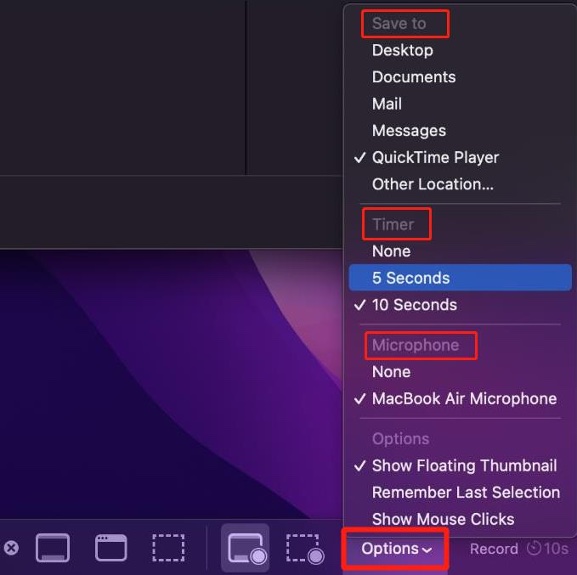
5. Adjust your record settings. From the toolbar, click on Options. Select the Loopback Audio as the microphone to record internal audio, and select a location to save the recording.
6. Select the recording region and start recording.
- Record entire screen: click anywhere on the screen and the recording will begin.
- Record a selected screen: click record selected portion, drag over the section you want.

7. Click Record button to start recording.

8. Stop recording on Mac with audio. Click on the stop icon at the top right corner. The recorded video will pop up on your screen, click on it to view and play.

Option 2: Screen Record on Mac with Audio via A Screen Recorder (Recommended)
For those who want to easily record screen on Mac with both internal and external audio, an expert and intuitive screen recorder will be a top priority. You can capture screens with audio in a professional way and without any limitations in this way.
Movavi Screen Recorder for Mac is such a perfect tool that can perfectly suit your needs. It gives full support for capturing microphone audio as well as system sound. It is also equipped with noise reduction features, ensuring better audio quality outputs to you.
You can freely select a recording area with Movavi Screen Recorder, and record online meetings, streaming videos, gameplays in 4k with no lag. Moreover, it has a video editor that can help you cut, trim and add special effects to your recordings.
Key features of Movavi Screen Recorder
- Screen record on Mac in full 4k / HD with no time limit
- Capture both internal and external audio with noise reduction
- Capture webinars, online calls, streaming videos, gameplays freely
- Show keystrokes and mouse and create screenshots while recording
- Support audio-only recording on Mac separate from the screen recording
Follow the steps below to process Mac screen recording with sound:
How to record screen with audio via Movavi Screen Recorder
1. Download and install Movavi Screen Recorder for Mac, then run it.
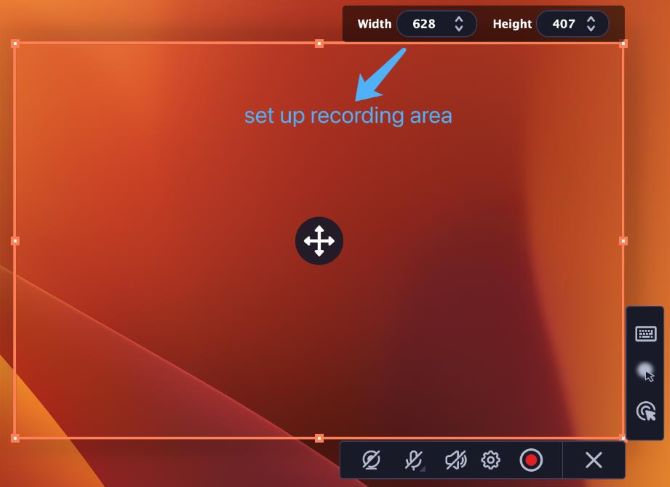
2. Set up the capture area. On the control panel, click the camera icon.
3. The area selection tool will pop up. Click and drag on the screen to select the part you want to record.
- To record a window, hover your mouse pointer over it and click once a frame appears around it.
- To record the full screen, click on any part of your screen (make sure no windows are selected).
5. Set up the audio settings. The system sound, microphone, and webcam settings are turned off by default. Click on the microphone and speaker icons to record internal and external audio while recording.

Tips: if you’re recording in a noisy place, click the settings button on the control panel and enable the noise reduction feature.
6. Start screen recording on Mac with audio. Click the red start recording button.

7. Stop recording. Click the square stop button on the control panel when you’re ready to finish your recording.
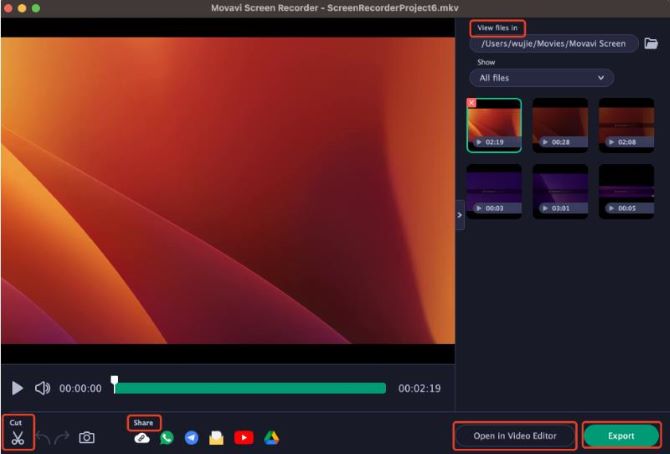
Preview and edit the recording. The capture editing window will open when you finish recording. Your video is ready and saved in MKV format, you can then preview it, edit it, or export it to a different format.
Option 3: Record Screen with Audio on Mac Using OBS Studio (Free)
Another easy way to screen record on Mac with sound is by using OBS Studio. It is a free and open-source app that comes with a nice recording function. It has an intuitive audio mixer with multiple options to capture audio from both internal and external.
However, the interface of OBS Studio can be quite confusing and overwhelming for beginners. It would be comparatively complicated to use with many professional features that are difficult to understand in a short time.
How to screen record with audio using OBS Studio
1. Download and install OBS Studio on your Mac, then launch it.
2. Adjust audio settings. Click Settings under Controls in the top left corner. This will open a new settings window. Click on Audio, and select your Desktop Audio and Mic Audio devices. Click OK.
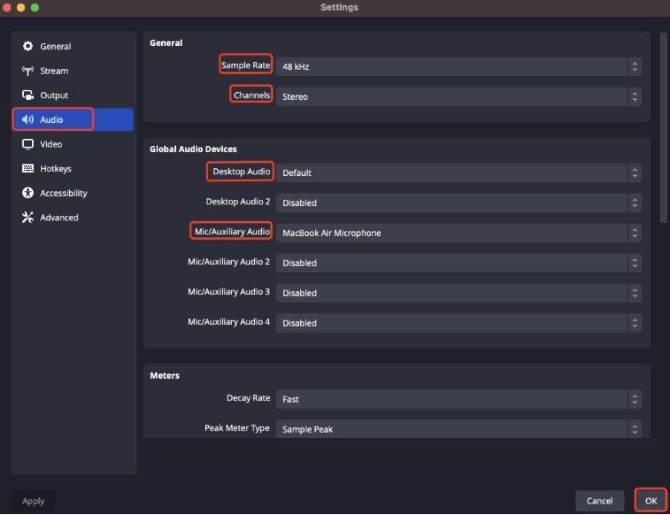
Tips: You can also set up the audio sample rate and channels from here.
3. Set up the recording screen.
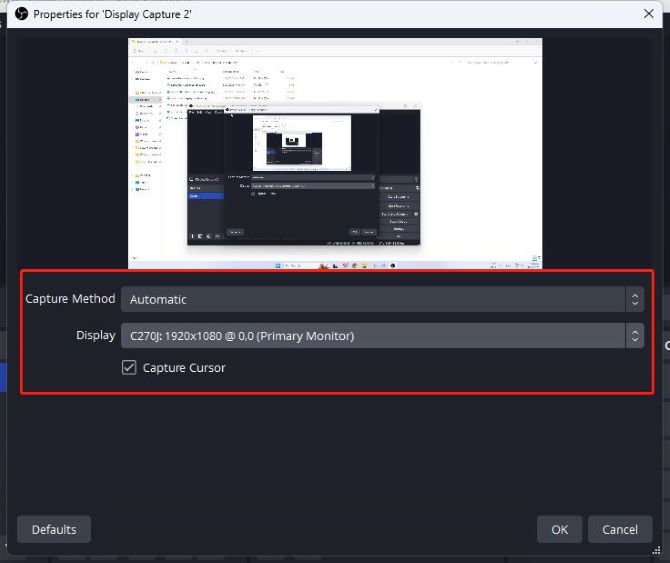
- Click “+” under Sources. A list of sources will appear. Click macOS Screen Capture, this opens the Create New window. Click OK.

- Select Display Capture from the Method drop-down menu. Toggle on Show cursor to catch the mouse display, then click OK.
4. Adjust the sound volume. Under the Audio Mixer tab, you’ll see the audio sliders.
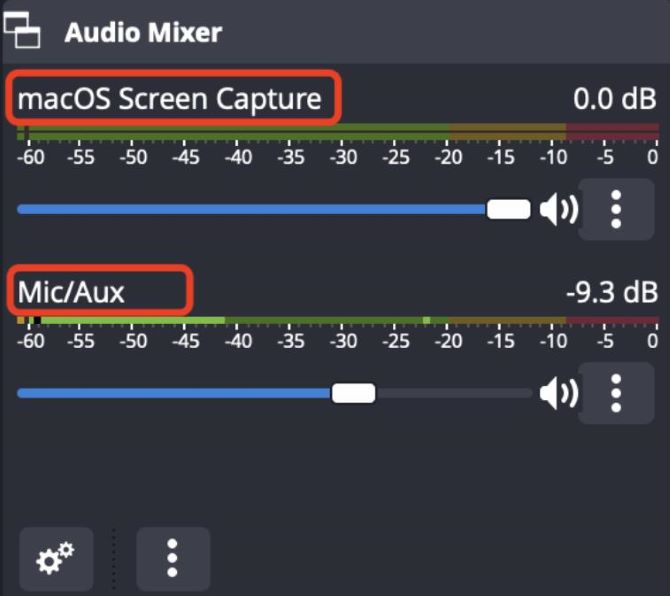
- To record the internal sounds coming from your computer during the recording, make sure the Desktop audio slider is up.
- To record the microphone speaking over your recording, move the Mac/Aux slider to the right.
Tips: Also make sure the macOS Screen Capture slider is up.
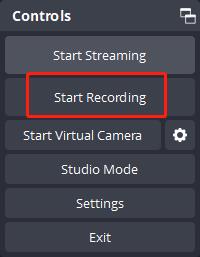
5. Start recording. Click Start Recording near the bottom-right corner under Controls.
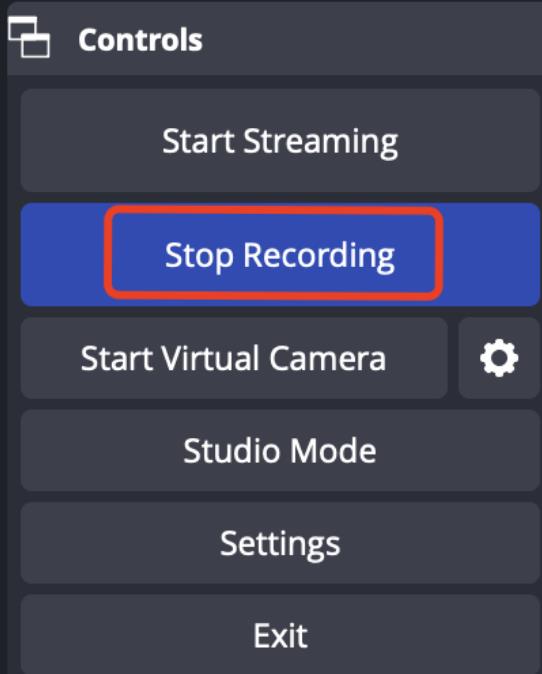
6. Stop recording on Mac with audio. Similarly, click Stop Recording under Controls.
Option 4: Record Screen with Audio on Mac Online (No download)
If you want to record a short clip with audio on Mac and are not very demanding on the recording’s video and audio quality, screen recording online will be an ideal choice.
You don’t need to install anything on your Mac, simply open the website of an online screen recorder, set the capture preferences, and start recording.
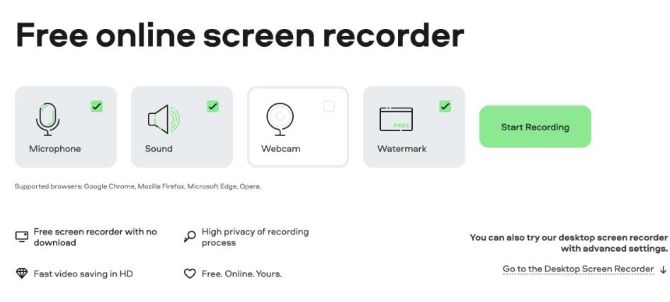
Screen Capture is an easy-to-use online screen recorder that allows you to capture the microphone and system sound at the same time.
Note: A watermark will appear on your recordings if you’re using this online screen recorder for free, to remove this, you have to pay for the premium version.
How to screen record with audio online
1. Open Screen Capture online screen recorder in your browser.
2. Configure the record settings. Select Microphone and Sound to activate the system sound and microphone capture while screen recording on Mac.
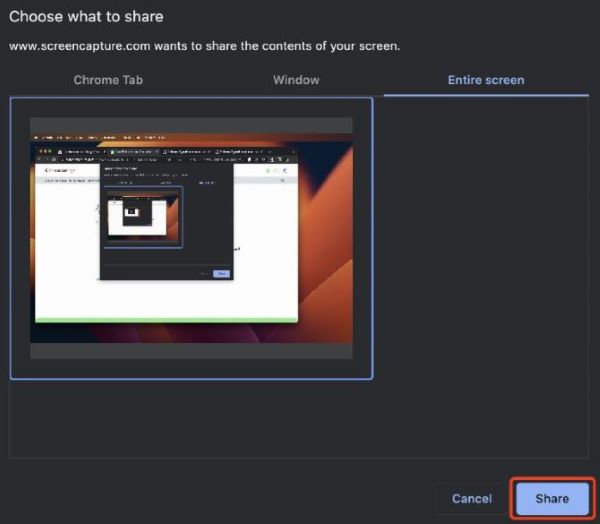
3. Start recording. Click the Start Recording button. It will let you choose which window you want to start recording. Select the screen you want to record, then click Share.
4. Stop and save when you’re finished. Click Stop Recording when you’re done. Hit Download to save the file to your computer.

FAQs About How To Record Screen On Mac With Audio
A: Yes, you can use the built-in QuickTime Player to record your screen on Mac with audio. But if you want to record internal audio as well, you need to install a plugin for QuickTime like Loopback or Soundflower. A third-party screen recorder will make it easier to record internal audio while screen recording on Mac.
A: It could be because of your audio recording settings. Typically, the audio source is turned off by default. Ensure that you enabled your microphone to record incoming sound. If there’s no internal sound when you screen record on Mac, it may be because you’re using a tool that only records microphone audio.
A: Since you have to install an extension to record screen with internal audio on Mac by using the default tool, the best way to record on Mac with audio is to use an all-in-one audio and screen recorder like Movavi Screen Recorder.
A: There is no time limit to recording your screen on a Mac with audio. Maximum video lengths are only restricted by your device’s storage space.
A: Make sure that your microphone is turned on and that it is set as the default input device. Check the sound levels in your System Preferences and make sure that the recording level is not set to zero. Make sure that you are using a recording tool that captures both the system sound and microphone audio.