Many people are complaining that their Realtek audio is skipping or buzzing on Windows 10 or Windows 11, which makes them annoying. When playing the game, the game audio play fine. But when watching the Netflix with the browser or watching video with media player like VLC Media Player, the sound get slow and buzzing.
In some computer, the ndis.sys and other processes cause extreme DPC latency, which causes system delays of about one second, and the next second, they will experience the audio stutters disruptively and video is frozen.
Even when they have tried many ways to solve the Realtek audio stuttering issue, the problem still persists. And to resolve audio issues when the sound is not working, click here.
How to Fix Realtek Audio Stuttering on Windows 10/11
On this occasion, here we offer several helpful ways for you. Whatever your Realtek audio issue is, stuttering or distortion, you can choose one way.
Solutions:
- 1: Uninstall and Reinstall Realtek Audio Driver
- 2: Disable Audio Enhancements
- 3: Change a Low Quality Audio Default Format
- 4: Uninstall the Conflict Network Driver
- 5: Disable all input and output devices
- 6: Troubleshooting the Realtek Audio
- 7: Reset the CPU Power Plan
- 8: Disable onboard Realtek Audio In BIOS
Solution 1: Uninstall and Reinstall Realtek Audio Driver
Audio driver issue may the attribution to the lagging, especially when you have upgraded your PC to Windows 10, therefore, you can update Realtek audio driver in device manager. So you can try to use the built-in driver tool to get the latest Realtek audio driver.
1: Open Device Manager.
2: Navigate to the right Realtek audio driver under the Sound, video and game controllers.
3: Right-click the Realtek audio driver to Uninstall it.
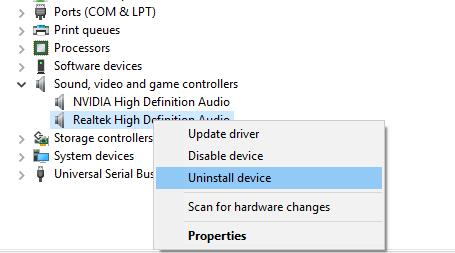
If you are prompted to delete the software from the device, you should also check it.
Step 4: Restart your PC.
When you login in again, you can check your Realtek audio is still lagging or in distortion by listening to a song.
You can go to Realtek official site to download the driver and install it manually, and here is the tutorial.
However, if you are not possessed of so much computer skills or knowledge, you can try to automatically update the Realtek audio driver with Driver Booster.
Driver Booster is a professional and safe driver tool for updating a variety of drivers to Windows 10, it makes it possible to download the latest drivers in three clicks in several minutes. Thus, you can benefit a lot once you have mastered the ways of using it.
You can at first download, install and run Driver Booster on your PC.
1. Click Scan. Driver Booster will search for your computer for the outdated or missing drivers, so if the Realtek audio distortion is caused by the outdated audio driver, you can easily solve the Realtek audio problem.

2. Click Update. Find the Sound, video and game controllers to update them.
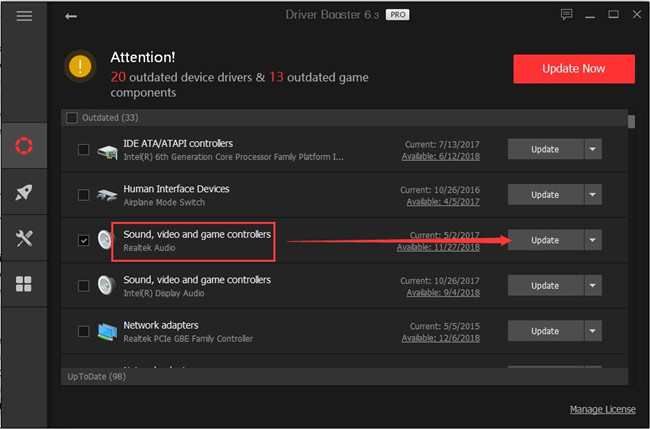
After click the button, it will download and update the audio driver one by one.
3. Restart Computer.
You will find you can finish the whole process in a wink. Then the stuttering sound may disappear after the driver reinstalled.
Related: Fix PC No Sound Issue on Windows 11/10
Solution 2: Disable Audio Enhancements
If you are using the audio enhancements to get prefect audio experience, you can disable them to identify if this effects audio stuttering or distortion.
1. In the low right corner, right-click the sound icon and choose Playback devices.
2. Right-click the default playback device and choose Properties from context menu.

3. In enhancements, check Disable all sound effects, then click OK.
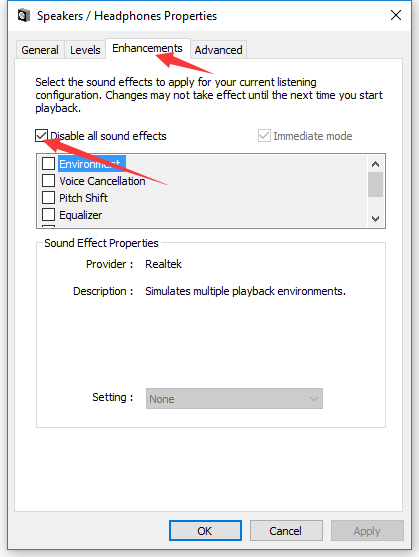
Open an online video or start a game to test if the computer sound stutters.
Solution 3: Change a Low Quality Audio Default Format
The high audio format quality may lead to the audio unnormal noise, so reset it to a low quality to test.
1. In playback devices, right-click the default devices and choose Properties.
2. Locate to Advanced tab, and choose the default format as 16 bit, 48000 Hz (Studio quality).
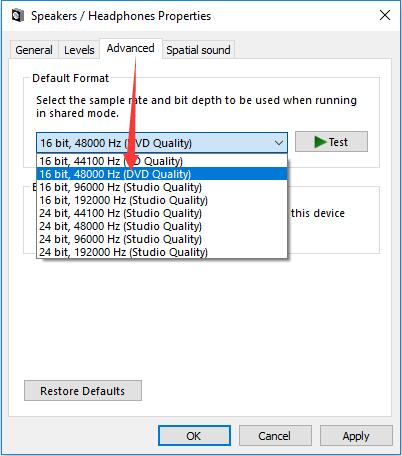
After that, the buzzing sound disappeared.
Fixed: HDMI Sound Not Working on Windows 11/10
Solution 4: Uninstall the Conflict Network Driver
Someone reported that the Realtek PCIe Family Ethernet controller and the wireless adapter will interrupt the audio adapter, so uninstall its driver can fix sound glitch error.
1. Open device manager.
2. Expand Network Adapters and find the network adapter such as the Realtek PCIe Family Ethernet controller.
3. Right-click it to choose Uninstall.
4. In confirm window, check Delete the driver software for this device.
5. Use the same way to uninstall the WIFI driver.
So you can go to the official site to download the right Ethernet driver and Wi-Fi driver and reinstall it manually.
This way can fix it fully or at least reduced the buzzing noise.
Solution 5: Disable all input and output devices
Sometimes, if you are using many input and output audio devices in your computer, these devices may cause clashes. And you cannot judge which one is the real error caused the audio buzzing problem. So try to disable all of them.
1. Open device manager.
2. Expand Input and output devices.
3. Select the device and right-click it to choose Disable. Disable all the devices.
4. Expand Sound, video and game controllers.
5. Select the device and right-click to choose Disable device. Disable all the devices.
6. Restart Computer.
7. Go to device manager, expand Sound, video and game controllers, find Realtek HD Audio and Enable it.
Related: How to Send Audio to Multiple Audio Devices
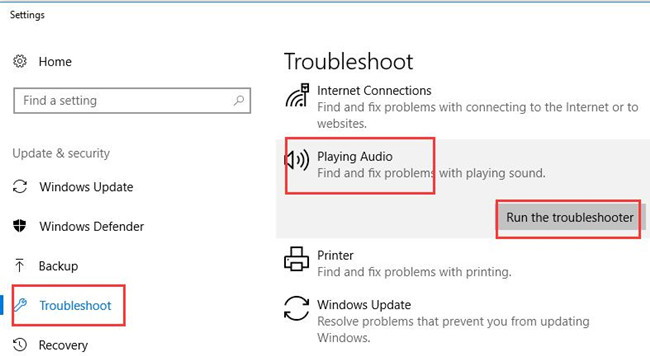
Solution 6: Troubleshooting the Realtek Audio
As a Windows 10 user, if you are experiencing any problem with programs, you can at the very beginning try to run the troubleshooter to solve the problems for you. Here if it occurs to you that your Realtek audio is cracking or staggering, you are suggested to use the tool at first.
1: Navigate to the Troubleshooting window from the search box.
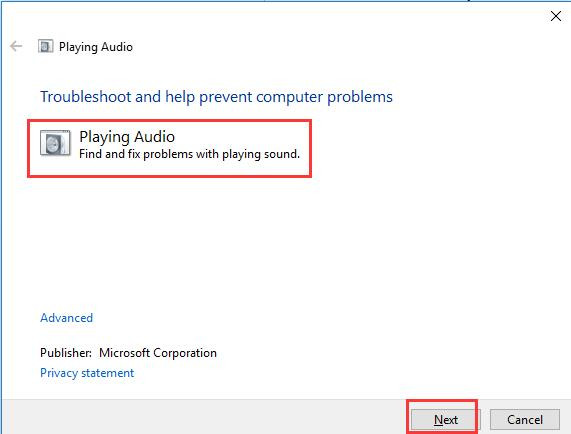
2: Find out Playing audio and click it to Run the troubleshooter.
3: Click Next to detect the audio problem. You should also check the option Apply repairs automatically.
4: Detect the problems.
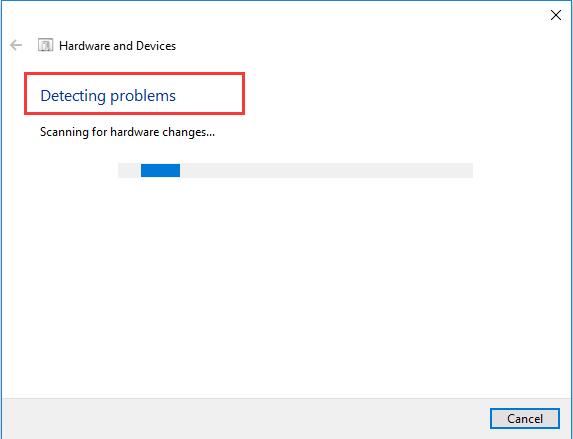
Then what you need to do is follow the instruction popped up on the screen. You will make the Realtek audio work normally from staggering or stuttering.
Now you will not receive the skipping or stuttering sound from the Realtek audio on Windows 10.
Solution 7: Reset the CPU Power Plan
If you are getting a choppy audio or broken sound, you can try to reset the processor power management plan to solve the problem.
1. Click Start > Settings > System > Power & sleep > Additional power settings.
2. Choose the power plan you are using, then click change plan settings > change advanced power settings to open the advanced power options.
3. Expand Processor power management, and you will see there are 3 items. You should to keep the minimum processor state and maximum processor state at 100%.
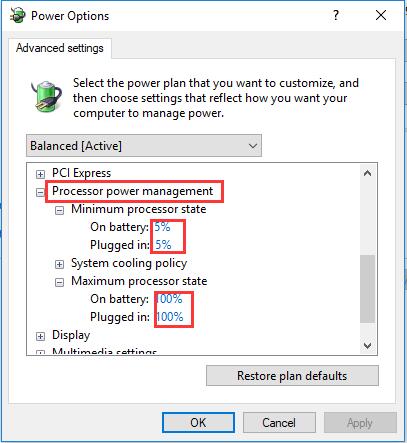
Minimum process state:
On Battery: 100%
Plugged in: 100%
Maximum processor state:
On battery: 100%
Plugged in: 100%
Now you had already disabled the CPU throttling.
Tips: If you cannot adjust the minimum processor state and maximum processor state, you can create a new power plan and reset it by yourself.
Solution 8: Disable onboard Realtek Audio In BIOS
The audio stuttering most happened when you are using the Realtek HD audio. If all the solution cannot make the sound changes smoothly, you can try to disable the onboard Realtek and to use an external sound device such as Sound Blaster Audigy FX.
1. To disable the Realtek audio, you need to reboot your computer and press F1, F2, F10 or Del to enter the BIOS and then find the Realtek Audio.
2. After that, install the external sound device and update the audio driver for this device.
3. Go to the playback device to set the external device as the default playback speaker.
You will find the external audio sound is better than the onboard sound.
On the basis of the methods above, you can seek out a useful way to solve the Realtek audio buzzing or skipping issues, and your sound will not stutter any more.
More Articles:
FIxed: No Audio Output Device is Installed
1 Comment
Leave a Response


Solution 4 worked for me. I had a “Realtek 8723DE Wireless LAN 802.11n PCI-E NIC” enabled (but I’m running wired so it was not needed). I disabled in Network Settings and my Windows 11 stuttering is gone!! To note, this was a Dell Vostro 5880 purchased Nov 2020 which had Win10, which I upgraded to Win11, which is when my audio stuttering became apparent.
Thank you!