Windows 10 screen saver is what most users want so as to protect your PC using passwords or to decorate the computer with moving images or patterns.
Contents:
- Overview
- What is a Screensaver?
- Does Windows 10 Have a Screensaver?
- How Do I Turn on My Screensaver on Windows 10?
- How to Change Screen Saver for Windows 10?
- How to Install Screensaver Windows 10?
- How to Make My Screensaver Last Longer on Windows 10?
- How to Create Screen Saver Shortcut in Windows 10?
Overview
But actually, many of you have no idea how to customize screensaver in Windows 10, for instance, how to turn on the screen saver on Windows 10, how to make your screensaver last longer, how to change screensaver, for example, how to make an animated screensaver on Windows 10.
That is why this tutorial comes up to show you how to find and set Windows 10 screen saver.
It is no doubt that you will gain access to the custom screensaver on Windows 10 after diving into this setting, just like learning how to customize the lock screen.
What is a Screensaver?
As a computer program, the screen saver functions to blank the space or fill it with animated images or patterns while your PC is idle in a certain time. Previously, a screen saver is mainly designed for the purpose of preventing your computer from phosphor burn-in on CRT and plasma computer monitors.
But now the purpose of Windows 10 screensaver has been changed anyway, if you are away from your computer for a while without closing it, the screensaver would usually be activated with a password on it so that other people cannot launch the PC unless they have the password.
And another modern use of Windows 10 screen saver is that it can be a decoration on your PC as you are entitled to change the screen saver picture into animated one depending on your likes.
That is your screensaver on Windows 10, if you would like, you can get started to learn more about it, including how to start the screen saver and then how to change Windows 10 screensaver.
Does Windows 10 Have a Screensaver?
It is said that you can find the screensaver from Personalization in previous Windows systems.
While on Windows 10, there goes with the screen saver settings, too. If you feel like to use a screen saver, just try to enable the screensaver on Windows 10. And then you are able to set screen saver pictures as you wish.
How Do I Turn on My Screensaver on Windows 10?
As for how to start screensaver on Windows 10, it is rather foolproof due to it being the computer program.
You can find Windows 10 screen saver from Personalization as well. Or if you can’t open personalization, it is feasible to search Screensaver directly in the search box and then change the settings of the screensaver.
1. Go to Start > Settings > Personalization.
2. Under Lock screen, scroll down to find out Screen saver settings.
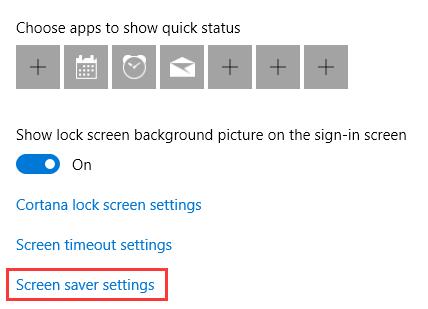
3. Then set Screensaver as 3D Text or Blank or Bubbles or Mystify or Photos or Ribbons and then hit Apply and OK to save changes.
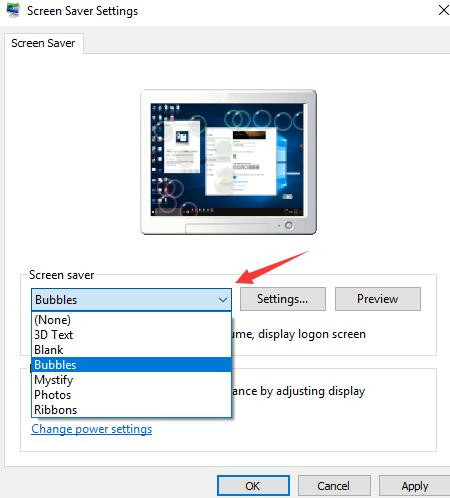
4. Once you select one kind of the screensavers, whatever it is, go to Settings to customize the screen saver settings.
Here take 3D Text as an example, if you choose it, and then click Settings beside the Screen saver drop-down menu, and you will navigate to 3D-Text settings, such as Text, Resolution, Size, Motion, etc.
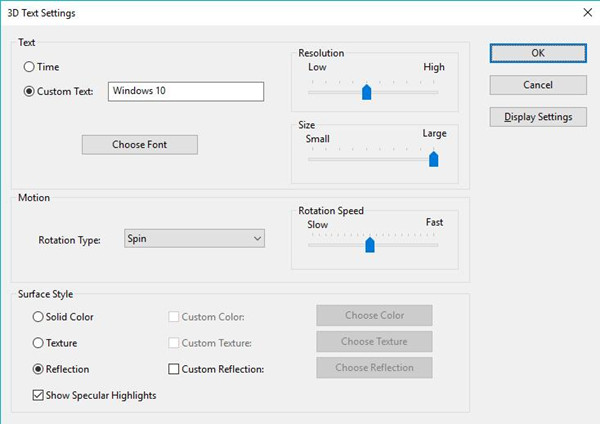
By the same token, if you hope to make the screen saver Photos or Bubbles, it is open to you to set custom screensaver pictures on Windows 10.
5. You can also decide how many minutes your PC need to Wait before your screen saver turns on.
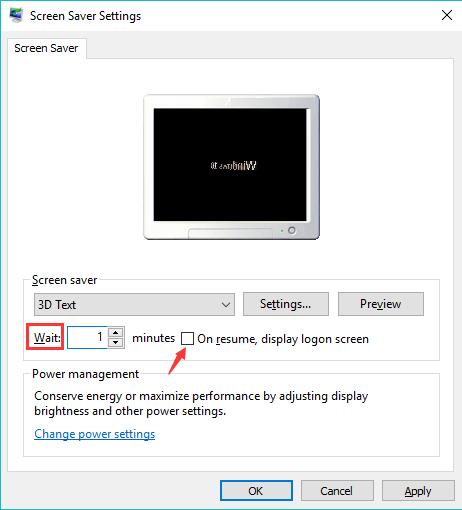
Or here it is available to enable Windows 10 screensaver On resume, display logon screen.
After you enabled screensaver in Windows 10, as long as you hope to turn off your screensaver on Windows 10, you can just configure the screen saver settings as None.
Upon turning on Windows 10 screensaver, it is high time that you got started customizing the settings of it, whether you are to get more screensavers on Windows 10 or to change it for your PC.
How to Change Screen Saver for Windows 10?
As what you do to change login screen background, it is reasonable that after using a custom screen saver on Windows 10 for a long time, you wish to change it to another one, like screensaver photos or Ribbons or 3D Text.
To do that, you can head to the Screen Saver settings to change your lock screen to others.
For some people who would like to change into the animated screensaver on Windows 10, you can choose to use the 3D Text screen saver to see if it satisfies your needs.
How to Install Screensaver Windows 10?
In the process when you change the Windows 10 screensaver pictures, you can find there are not so many animated screensavers available. Hence, to download and install the screensaver you need is rather necessary.
According to your reports, it is expected to get 4K screensaver on Windows 10, which is the HD wallpaper for computers and also the screen saver with flying Windows 10.
To install Windows 10 screensavers, you need to go online and search it in the browser, like Google Chrome and Firefox. And then download them from the Windows wallpaper gallery.
How to Make My Screensaver Last Longer on Windows 10?
In accordance with some users, you may need to change the lock screen timeout on Windows 10. In other words, you would like the screen saver on your PC lasts longer than it is used to be.
Under this circumstance, it is likely that the screen saver on Windows 10 can work for a longer time while the PC is idle.
To change the screensaver settings to make your screen saver picture keeps longer, there is much need to change Windows 10 lock screen timeout in Power options. But before you get down to it, you are supposed to adjust the registry for screensaver timeout on Windows 10.
1. Open Registry Editor by press Windows + R to activate the Run box and then input regedit in the box.
2. In Registry Editor, navigate to this path.
HKEYLOCAL_MACHINE\SYSTEM\CurrentControlSet\Control\Power\PowerSettings\7516b95f-f776-4464-8c53-06167f40cc99\8EC4B3A5-6868-48c2-BE75-4F3044BE88A7
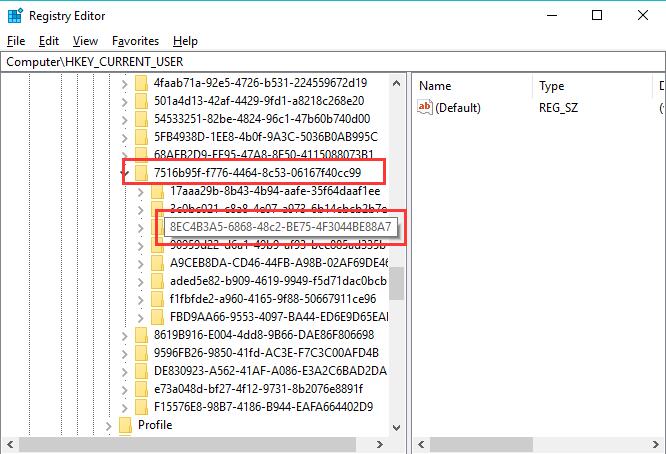
3. Under the value 8EC4B3A5-6868-48c2-BE75-4F3044BE88A7, on the right pane, locate Attributes and the double click it to Edit it.
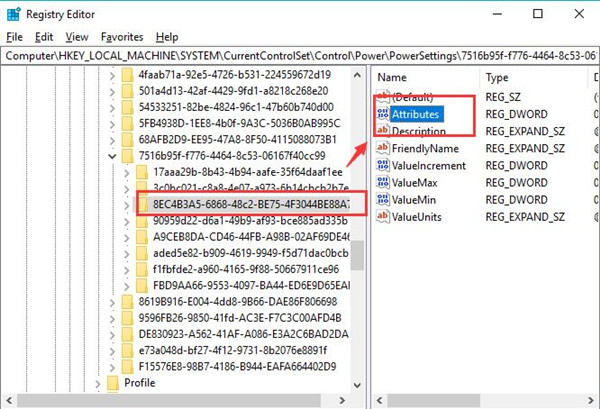
4. Then change the Value data of Attributes from 1 to 2.
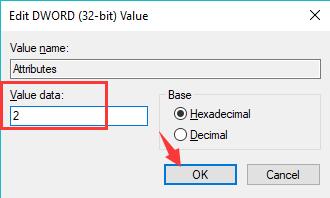
In this way, screen saver timeout would have been changed in Registry on Windows 10. You should go on to Power settings to customize screen saver timeout in order to make it last longer.
5. Search Power in the search bar and then hit Enter to move into Power & sleep settings.
6. Then under Power & sleep, scroll down to locate Additional power settings.
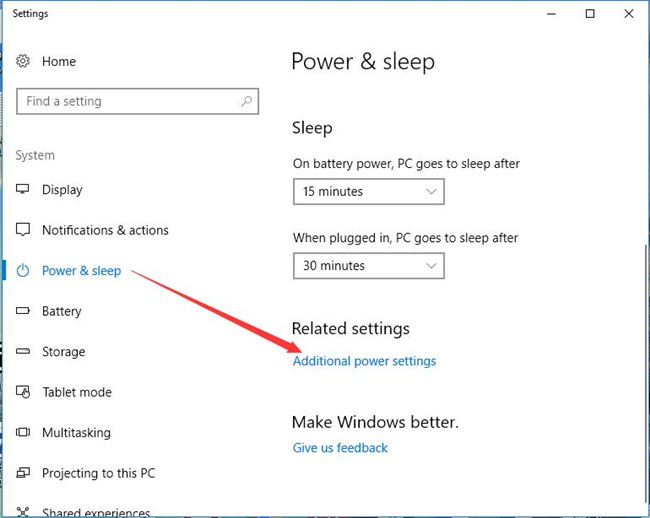
7. Then choose to Change plan settings.
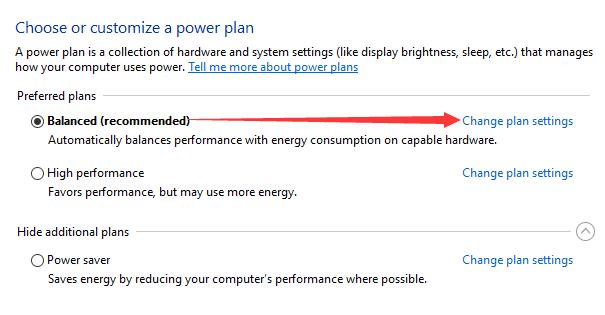
8. In Edit plan settings, hit Change advanced power settings.
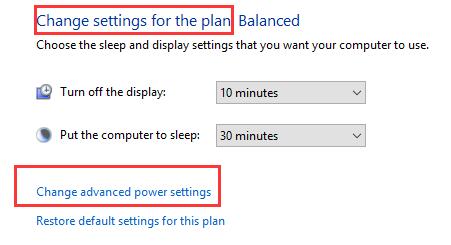
9. Under Advanced Power settings window, find out Display and then expand it to pinpoint Console lock display off timeout.
10. And then you are free to set the screen saver timeout as you like.
From then on, Windows 10 screen saver will keep for a long time when it is not in use. That all you can do is adjust the length of the time your screensaver plays before you begin to do other operations.
How to Create Screen Saver Shortcut in Windows 10?
For the purpose of making screensaver settings available to you, you can determine to create a shortcut for it on Windows 10.
In this case, you can find where your screensaver is and change the settings for it easily.
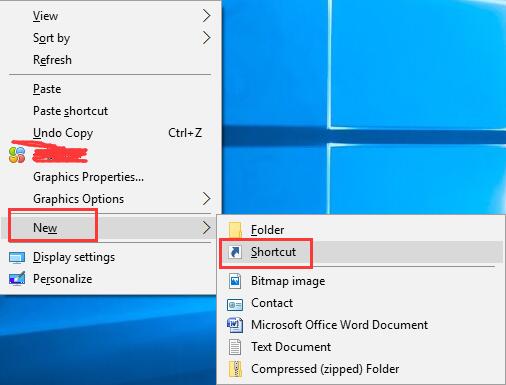
1. Right click to create a New > Shortcut.
2. Then type the location of the item: control desk.cpl,,@screensaver.
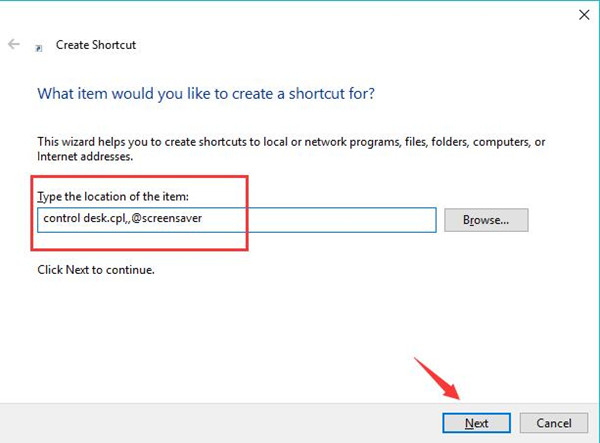
3. After that, in the following window, Type a name for this shortcut.
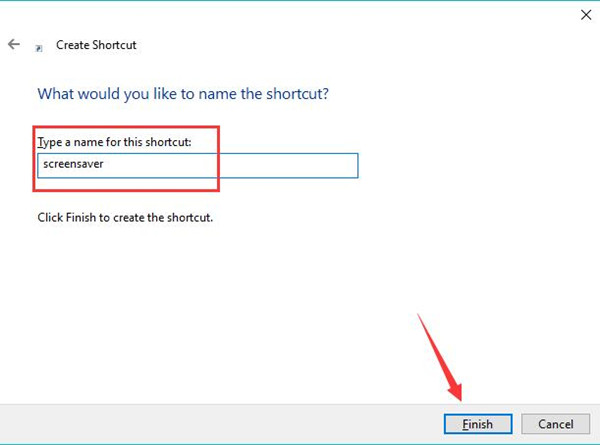
Here make the name of the new shortcut as screensaver simply.
4. Hit Finish to accomplish the whole process.
In doing so, you can see the screen saver shortcut on your Desktop and it is available for you to turn on the screensaver settings on Windows 10 directly.
In a word, in terms of customizing screensaver settings for Windows 10, no matter you are to enable screen savers or to change screensaver pictures or create a shortcut for Windows 10 screensaver, this post will answer your call.
More Articles:
How to Fix Windows 10 Login Screen Missing


