Contents:
Why Does Activate Windows Appear on Windows 10?
How to Remove Activate Windows 10 Watermark?
Suddenly, a message “Activate Windows, Go to Settings to activate Windows 10” pops up on Windows 10 Desktop and doesn’t go away even if you rebooted the PC for many times. And when you go to Settings, you find there a license key for your Windows 10 edition, like Windows Home, Pro.
Why Does Activate Windows Appear on Windows 10?
This Activate Windows activation error occurs to you mainly due to the expired, or invalid or wrong Windows 10 license key. If the system failed to find the right product key or Windows 10 deactivated itself, you will be prompted to activate Windows 10 again.
For most users, perhaps your license key has expired after months, or the key is actually invalid and doesn’t come from Microsoft at all. Or it is also likely that you have been using Windows 10 Home key on Windows 10 Pro. All these factors can contribute to Go to Settings to activate Windows error.
How to Remove Activate Windows 10 Watermark Permanently?
As this Activate Windows warning is principally caused by the license key, it is understandable that you use the valid and right product key to reactivate Windows 10. But here for users who have no license, you can also try to get rid of this watermark without the product key but with commands in Command Prompt or registry value changes.
Methods:
1: Remove Activate Windows 10 Watermark Using License Key
2: Get rid of Activate Windows Watermark with Notepad
3: Remove Activate Windows 10 Watermark Permanently in Registry Editor
4: Remove Activation Watermark on Windows 10 Pro with Windows 10 Home key
Method 1: Remove Activate Windows 10 Watermark Using License Key
Of course, the most efficient way to make Activate Windows disappear is to use the valid Windows 10 product key. The right key is the best removal for this activation issue.
So if you have money and hope to fix this error quickly, go ahead to Microsoft site to buy a key for Windows 10 Home, Pro or Education edition. Then enter the license key into the system to activate Windows 10.
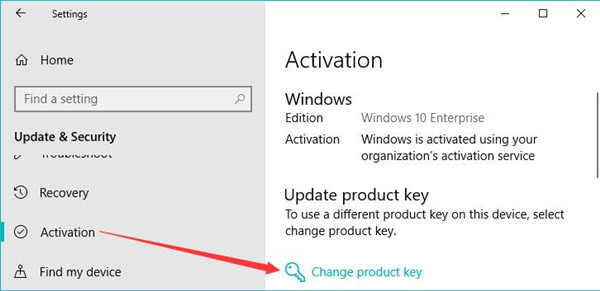
1. Go to Start > Settings > Update & Security.
2. Under Activation, hit Change product key.
3. Then Enter a product key and click Next.
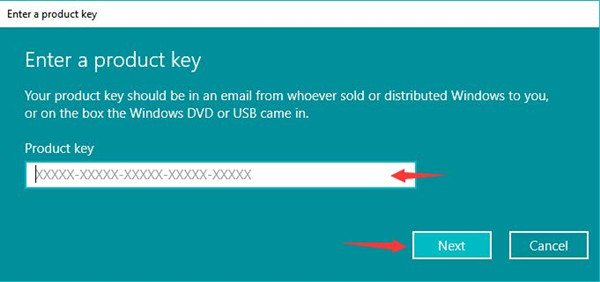
You can see Windows 10 has been successfully activated and Activate Windows watermark has been removed permanently. But many of you show no interest in purchasing a key, in this case, you can go further to delete Activate Windows 10 message without busing the license.
Related: How Do You Update Windows 10 Version
Method 2: Get rid of Activate Windows Watermark with Notepad
Without the product key, you can use notepad to remove activate Windows 10 watermark once for all.
1. Search in Notepad in the search box and then hit Enter keyboard key to open a Notepad.
2. Then copy and paste the following contents in the Notepad.
@echo off
taskkill /F /IM explorer.exe
explorer.exe
exit

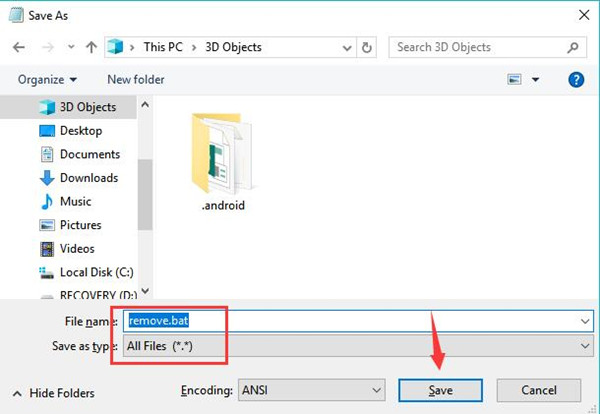
3. Then choose to Save the untitled Notepad.
4. Find a location to save the notepad and then name it remove.bat with the type of All files. Then hit Save to save the notepad.
5. Right click the remove.bat to Run as administrator.
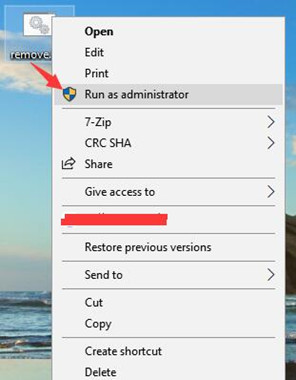
A Command Prompt window will show up and turn off on its own immediately.
Try to reboot Windows 10 and then log on again. You will see Activate Windows, go to Settings to activate Windows 10 vanished.
Method 3: Remove Activate Windows 10 Watermark Permanently in Registry Editor
If you feel like getting rid of Windows 10 activation on the Desktop, you can attempt to change the Desktop version to keep Activate Windows watermark away. To accomplish this goal, just adjust the value in Registry Editor.
1. Press Windows + R to elevate the Run box and then enter regedit in the box.
2. In Registry Editor, navigate to HKEY_CURRENT_USER\Control Panel\Desktop.
3. Under Desktop, on the right pane, locate and right click PaintDesktopVer to Modify it.

4. Change PaintDesktopVer value data from 1 to 0.
5. Close Registry Editor and restart Windows 10.
When signing in again, you will notice that Windows 10 needs activation message is nowhere to be seen.
Solution 4: Remove Activation Watermark on Windows 10 Pro with Windows 10 Home key
Especially, provided that you have updated from Windows 10 home to Windows 10 Pro, but you have no key for Windows 10 Pro but that of Windows 10 Home, this Activate Windows 10 watermark is possible to come up. To remove this activation watermark, you are supposed to clean install Windows 10 Home from computer BIOS and bootable USB flash drive. Prior to that, remember to back up all your data.
And after that, you will notice Windows 10 Pro go to Settings to activate Windows 10 perished from the Desktop. In a nutshell, with this post, you can learn to get rid of Windows 10 Activate Windows desktop watermark permanently with the solutions above.