It is reported that some users often run into an error that There was a problem starting C:\Windows\System32\LogiLDA.dll, the specified module could not be found. More often than not, after you upgraded to Windows 10, the time you launched your PC, LogiLDA.dll missing issue will come up.
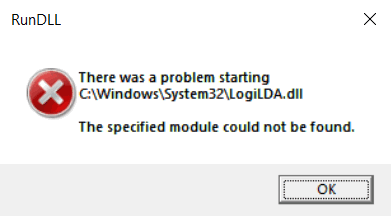
What is LogiLDA.dll? Why is LogiLDA.dll Missing from Windows 10?
DLL refers to the Dynamic Link Library file. And LogiLDA.dll file is a component of Logitech Download Assistant, one of the Logitech mouse applications. It is said that this LogiLDA.dll file includes essential resources and data for the Logitech software. Moreover, this DLL file can be found in C:\Windows\System32.
According to the usage of the LogiLDA.dll file, it is safe to say that this file missing mainly due to the problematic Logitech Download Assistant and Logitech mouse driver. Possibly, if the Logitech software and driver run into errors, the LogiLDA.dll file couldn’t be found on Windows 10, 8, 7.
How to Fix LogiLDA.dll Missing on Windows 10, 8, 7?
If you would like to fix LogiLDA.dll file not found error, you would better make sure Logitech Download Assistant and driver work well on your PC. In this way, Windows LogiLDA.dll will not be missing, causing troubles to Logitech devices.
Solutions:
- 1: Disable Logitech Download Assistant at Startup
- 2: Disable or Delete LogiLDA Key in Registry Editor
- 3: Uninstall Logitech SetPoint Software
- 4: Update Logitech Mouse Driver
- 5: Uninstall and Reinstall Logitech Mouse Driver
Solution 1: Disable Logitech Download Assistant at Startup
In case LogiLDA.dll could not be found due to the problematic Logitech software, you may as well directly disable the application from the startup in Task Manager. In doing so, it is likely that Logitech Download Assistant won’t check for updates as long as you boot up your PC, causing errors to files, programs, etc.
1. Open Task Manager.
2. Then under the Startup tab, scroll down to find out Logitech Download Assistant and right click it to Disable it.
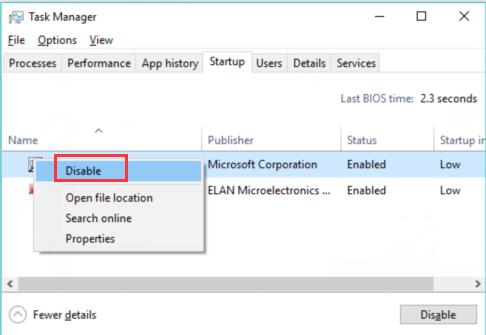
3. Reboot your computer to take effect.
Check if LogiLDA.dll file missing persists on your PC. For some of you, you can choose to re-enable the software if needed.
Related: How to Download Logitech Gaming Software
Solution 2: Disable or Delete LogiLDA Key in Registry Editor
If solution 1 does not help and the error message about the LogiLDA.dll file keeps showing up, perhaps you need to delete the related key in the registry editor to remove the problem. Prior to that, it is advised that you try to back up all the registry keys.
1. Press Windows + R key to elevate the Run box and then enter regedit in the box. At last, hit Enter key to get into Registry Editor.
2. In Registry Editor, go as the following path:
HKEY_LOCAL_MACHINE\Software\Microsoft\Windows\CurrentVersion\Run
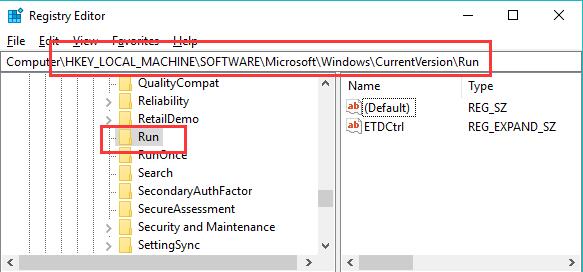
3. Then locate Logitech Download Assistant key and right click it to Delete it.
4. Restart the Windows system.
Once your PC starts again, you can see There was a problem starting C:\Windows\System32\LogiLDA.dll, the specified module could not be found won’t appear on your PC.
Solution 3: Uninstall Logitech SetPoint Software
It is said that Logitech SetPoint software is used to customize mouse buttons, keyboard Fn keys, and hot keys. For this part, there is a high probability that LogiLDA.dll disappeared from Windows 10 can also be caused by the erroneous Logitech SetPoint Software, so you would better get rid of it to make the LogiLDA.dll file goes back to work.
1. Go to Control Panel.
2. Find out Programs > Uninstall a program. You can locate these items more quickly if you choose to View by Categories.
3. In Programs and Features, find out Logitech SetPoint Software and right click it to Uninstall it.
4. Reboot to take effect.
From the reports of many users, removing this application will be of great help to fix LogiLDA.dll not found on Windows 10 error.
Solution 4: Update Logitech Mouse Driver
Since this DLL file is closely associated with Logitech mouse, it is also feasible and reasonable to ensure the mouse driver is working properly on your PC. In most cases, updating the mouse driver will solve many issues with the mouse.
Here, you might as well take advantage of Driver Booster, the top one driver software for Windows 10, 8, 7, etc. This tool will download and install the latest mouse driver quickly and automatically.
1. Download, install and run Driver Booster.
2. Click the Scan button. That will get Driver Booster to start scanning your PC for outdated, missing, and corrupted drivers.

3. Locate Mice and other pointing devices and Update Logitech mouse driver by Driver Booster.
After Driver Booster installed the mouse driver, it is predicted that LogiLDA.dll mice error will have also been resolved.
Solution 5: Uninstall and Reinstall Logitech Mouse Driver
Or you can try to reinstall a new mouse driver. It is likely that Logitech mouse driver is just corrupted on your PC, thus not working on Windows 10, 8, 7. Under this circumstance, there is no need to update the driver because you can just manage to remove the problematic driver and then install a new one.
1. Open Device Manager.
2. Expand Mice and other pointing devices, and right click Logitech mouse driver to Uninstall device.
3. Then confirm to uninstall Logitech mouse driver.
4. Restart your PC to let the Windows system reinstall a Logitech Mouse driver for your PC.
Provided you re-launched your PC, a new Logitech mouse driver will be installed immediately. And LogiLDA.dll missing issue will disappear from Windows 10. But if the error remains, you would better try to download LogiLDA.dll file online.
In short, the solutions above are reported useful in solving LogiLDA.dll not found issue. Especially, for users who stumble upon this error after Windows 10 1903 update, it is worth a shot to update Logitech drivers so as to make the LogiLDA.dll file be found.
More Articles:
How to Fix Logitech Unifying Receiver Not Recognized in Windows 10


