If your PC is slow for unknown reasons, you go to the Task Manager to have a check, but to find a process called Service Host: Local System (Network Restricted) is using much of your CPU on Windows 10/11.
This service host local system is actually an issue of service host Superfetch on Windows 10/11. It is just disguised under the name of the local system.
That is where this post will start to teach you to resolve the service host local system high disk error.
How to Fix Service Host Local System (Network Restricted) High CPU on Windows 10?
Regarding the causes of this high CPU or disk problem by service host Superfetch, you need to take measures to adjust settings of this service. For instance, you can attempt to restart the Superfetch, or end it if you like.
Here it is also possible that this service host local system high disk pops up due to the memory leak on Windows 10. Therefore, you would better manage to fix the memory leaks for your PC as well.
Solutions:
1: Disable Superfetch Service on Windows 10/11
2: Fix Memory Leak in Non-paged Pool on Windows 10/11
3: Disable Svchost Process in Task Manager
Solution 1: Disable Superfetch Service on Windows 10/11
Since one of the main culprits of this CPU error is service host Superfetch, there is much need for you to reboot this service in the hope of dealing with the issue facing you.
You might as well try to stop the Superfetch service for Windows 10/11.
1. Press Windows + R combination key to elevate the Run box and then type in services.msc in the box. Finally, hit OK to go further.
2. In the Services window, scroll down to locate the Superfetch service and then right click it to open its Properties.
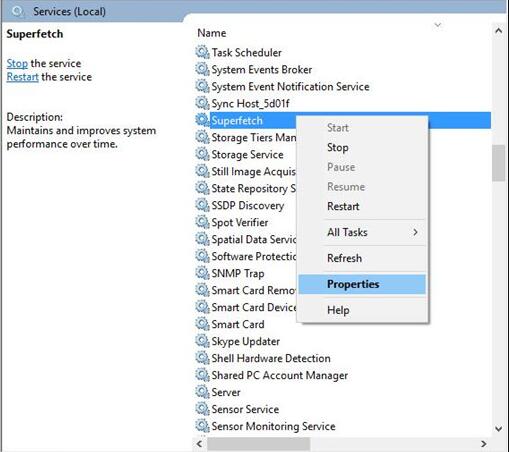
3. In Superfetch Properties, under Startup type, choose to set it as Disabled and then hit Stop under Service status.
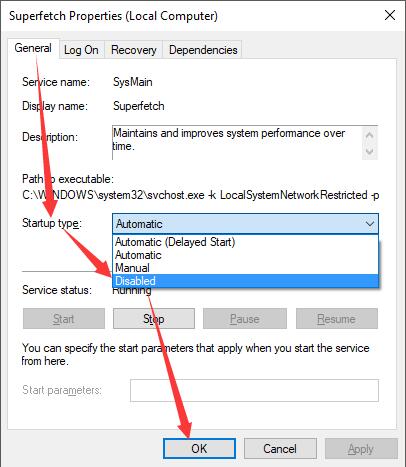
Then click Apply and OK to take effect.
Upon closing Service window, it is likely that the service host Superfetch won’t eat up high CPU or disk on Windows 10. You are supposed to open Task Manager to see if the high CPU by service host local system still leads to high CPU or disk usage.
Solution 2: Fix Memory Leak in Non-paged Pool on Windows 10/11
Another way open to you is to tackle the high CPU or disk by way of remove memory leak from Windows 10/11.
You can navigate to Registry Editor to make that happen. It is possible the service host local system Windows 10 audio can be fixed successfully.
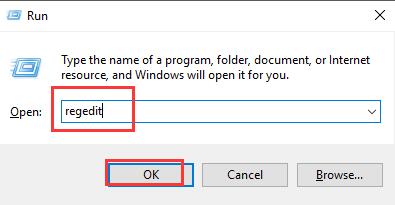
1. In the Run box, enter regedit and then stroke OK to move on.
2. In the Registry Editor, navigate to HKEY_LOCAL_MACHINE > SYSTEM > ControlSet001 > Services >Ndu.
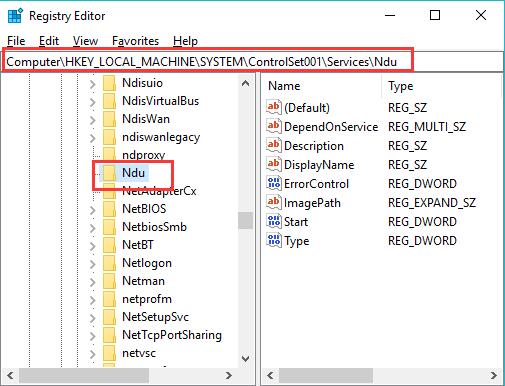
3. Then under Ndu, on the right pane, locate Start and then right click it to Modify its Value data.
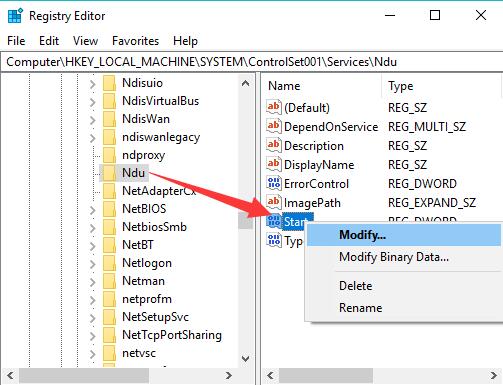
4. Then decide to change the Value data to 4. Then hit OK to save changes.
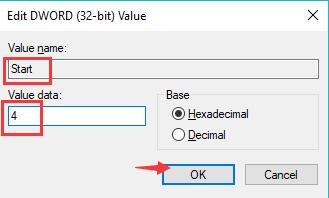
It is to disable the Ndu, thus removing memory leak in non-paged pool on Windows 10.
Now you can notice that the service host local system high CPU or high disk disappeared as the memory leak has been solved.
Solution 3: Disable Svchost Process in Task Manager
It is also said that in task manager the SVChost process may also pretend to be the service using high CPU.
Under this circumstance, you are able to end the SVChost process as well if you would like to solve this high disk by service host Superfetch Windows 10.
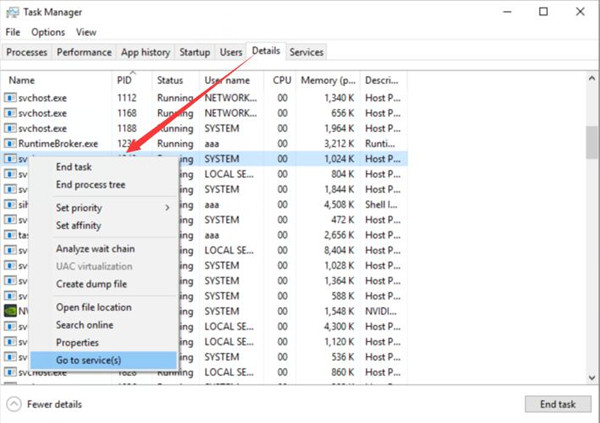
1. Right click Start and then select Task Manager from the list.
2. In Task Manager, under Processes, find out SVChost process and right click to End task.
Then restart your PC to take effect.
In this sense, no more service host local system high CPU usage will come up on Windows 10.
In a nutshell, in order to solve high CPU or high disk by service host Superfetch, you can struggle to disable Superfetch service or end SVChost process on Windows 10.
Or if the service host: local system (no network) Windows 10 persists, you can manage to run SFC to scan for the file corruption on your PC, just type sfc/scannow in the Command Prompt and it will help you correct the file errors.
More Articles:
Fix Google Chrome High CPU Usage Issue