Contents:
No WIFI Connection When on Battery Power Overview
Why Does My WIFI Drop on Battery Power?
How to Fix WIFI Connectivity Issue on Battery Power Windows 10?
No WIFI Connection When on Battery Power Overview:
WIFI dropping constantly has long been argued. No matter you are having trouble with WIFI hotspot or wireless adapter, there are always some issues as to WIFI connectivity issues or performance issues on battery Windows 10.
Here comes your problem. When you plug your laptop to an AC adapter for charging, the wireless network runs fine, whereas the time you unplugged the PC, laptop WIFI drops when on battery power. It is quite confusing why your PC would lose WIFI when it is using the battery to work, isn’t it?
Here this post would focus on teaching you how to do to make your WIFI perform smoothly either it is plugged into an AC adapter or on battery power.
Why Does My WIFI Drop on Battery Power?
In fact, the reason why you have no WIFI connection or WIFI is in poor performance lies in your power settings and power saving options. To get to the bottom of it, it denotes that you have set your power settings to reduce the power supply for the wireless network adapter and that you even allow your PC to turn off the device to save power. In this way, you are experiencing now the WIFI connectivity issues due to the network adapter power management on Windows 10, 8, 7.
How to Fix Windows 10 WIFI Drops on Battery Power?
In accordance with what causes severely reduced WIFI on battery on Windows 10, there is much need to change the power management settings and power saving options for the WIFI adapter and the power. What’s more, keeping the WIFI driver updated can also be a useful method.
Solutions:
1: Change Power Saving Mode Performance
2: Disallow Windows 10 to Turn off the Device to Save power
3: Use High-Performance Power Plan
4: Update Wireless Adapter Driver
Solution 1: Change Power Saving Mode Performance
One reason why your WIFI has a poor performance on Windows 10 lies in that you have used the WIFI hotspot with wireless Adapters or the routers that grant little support for the 802.11 power save protocol on Windows 10. You need to configure the power saving mode performance to make it work as maximum performance even if your laptop is using the battery.
Under this circumstance, you would better manage to make changes to the power saving plan, which in another sense is to turn off the 802.11 power save protocol.
1. Stroke Start > Settings > System.
2. Under Power and Sleep, click Additional power settings.
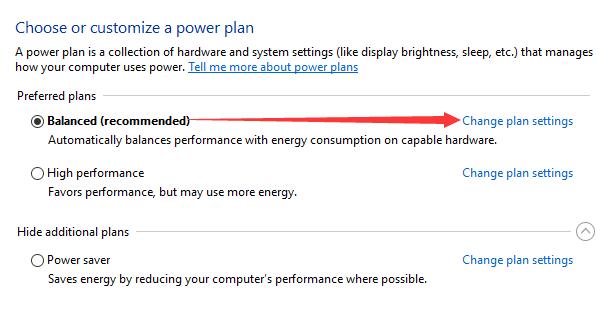
3. Choose Change plan settings. Here you choose the one according to your power plan. If your power plan is Balanced, click the one Change plan settings beside it. This holds true for Power Saver.
4. Locate Change advanced power settings.
5. In the Advanced settings window, scroll down to find out Wireless adapter settings.
6. Then expand the Power save mode and choose On battery to set it as Maximum performance. And then set Maximum performance when Plugged in as well.
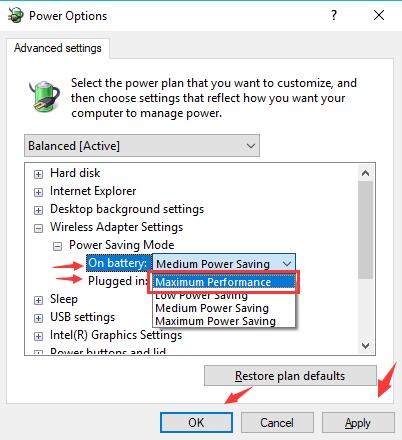
7. Here if you choose to set the performance as Medium power saving, you will turn on 802.11 power save mode.
8. Hit Apply and OK to save changes.
Once you have set the wireless adapter as maximum performance when you plug a mobile PC into a power source or on battery power on Windows 10, you have also turned off the 802.11 power save mode. And in this way, wireless AP would not buffer the packets that network adapter receives which can also fix the WIFI slow connection or a poor performance issue on Windows 10.
Related: How to Change Advanced Power Plan on Windows 10
Solution 2: Disallow Windows 10 to Turn off the Device to Save power
If you have made your laptop turn off the device to save power, it is likely that WIFI disconnects when on battery power as it tries to save power when using the laptop battery.
1. Go to Device Manager.
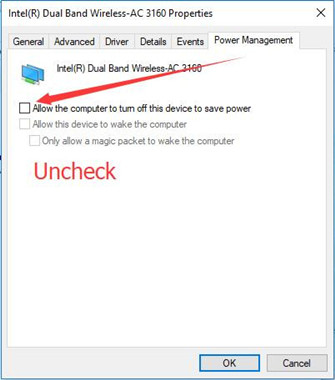
2. Expand Network adapters and then right click the WIFI adapter driver to open its Properties.
3. In WIFI adapter driver Properties, under Power Management, uncheck the box of Allow the computer to turn off the device to save power. If this item is grayed out on your computer, you can fix it from here.
Or you can also choose a value for the advanced power saving option.
4. Under the Advanced tab, choose one setting in Property and change Value for it.
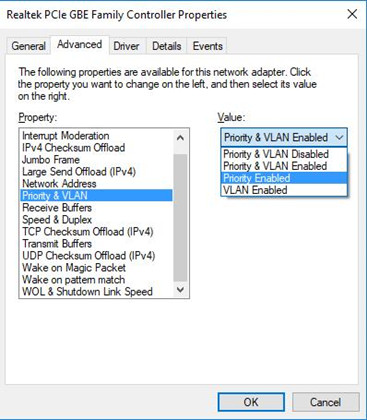
Here you can choose power management for the properties list and change to the best-matched value for it.
5. Click OK to save changes.
Although you may have already closed the 802.11 power save mode, your WIFI on Windows 10 still drops now and then.
Now your PC won’t turn off the WIFI adapter so as to lose WIFI connection when on battery power.
Solution 3: Use High-Performance Power Plan
When you connect a PC to a WIFI but find it not smooth for the power saving mode included in Windows 10. You should have found that when you are using WIFI on battery power, this WIFI connectivity issue can also occur to your Windows 10.
Maybe it is time for you to change the poor performance to High performance.
Follow the path to complete the process: Start > Settings > System > Power and Sleep > Additional power settings > High Performance.
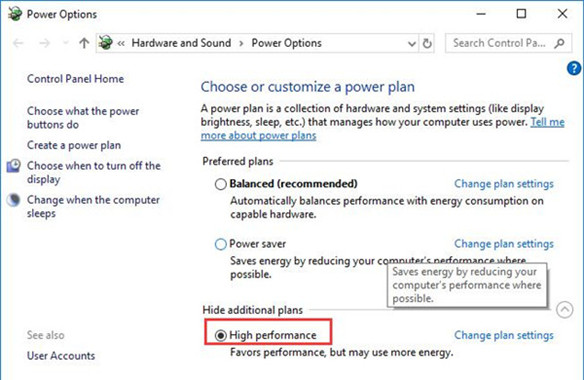
Then you will find your WIFI on the PC has become faster and you have successfully solved the WIFI connectivity issue on Windows 10. In most cases, laptop WIFI connection issue will be solved and WIFI icon missing is nowhere to be found as well.
Solution 4: Update Wireless Adapter Driver
For some reason, maybe some of you have encountered this wireless connection issue when connecting to a hotspot on Windows 10 after Windows 10 upgrade. When you happened to this issue, you might as well manage to update your WIFI driver for Windows 10.
Option 1: Update Wireless adapter Driver in Device Manager
1. In Device Manager, find out Network Adapters and then right click the WIFI Adapter Driver to Update driver.
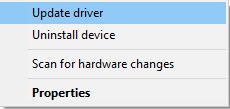
2. Choose to Search automatically for updated driver software.
If possible, Device Manager will find the right or updated driver for your WIFI adapter, but if it failed, just go ahead.
Option 2: Update WIFI Adapter Driver Automatically
Or you can take advantage of Driver Booster to update the wireless adapter driver quickly and safely. Driver Booster is also capable of fixing network failure if it noticed that no WIFI connection or connection is poor on Windows 10.
1. Download, install and run Driver Booster.
2. Hit the Scan. Then Driver Booster will be ready to scan your PC for all the missing, outdated, and corrupted drivers on Windows 10.

3. Select Network adapters from the search result and then Update the WIFI driver.

4. If updating the driver for WIFI adapter is of no use, you would better manage to click Tools on Driver Booster left pane and then Fix Network Failure on the right pane.

Driver Booster can in a large sense fix Windows 10 WIFI connectivity issue when on battery power.
Just as what has been briefed above, this connectivity or performance issue on Windows 10 occurs to you when you are connecting a mobile PC to Windows-based wireless AP or when your computer is running on battery power. On that basis, solutions are offered to you according to two main aspects, one is turning off the 802.11 power save mode and the other one is changing power saving settings.
1 Comment
Leave a Response


Thank you! I did it, I solved the problem. Your article was helpful, but I had to combine your info to get the right result. Thank you once again.