Contents:
WIFI No Internet, Secured Overview
Why Does WIFI Say No Internet Secured?
How to Fix No Internet, Secured WIFI Problem on Windows 10?
WIFI No Internet Secured Overview
Strangely enough, sometimes, even if your WIFI is connected, when you check it at the right bottom system tray, but it still shows you No Internet, Secured on Windows 10. You can’t help wondering how it is connected secured but no internet. On this occasion, some of you are unable to browse a webpage, while part of you find no internet secured but internet works as you can surf online.

Most of you will bump into this no internet secured WIFI error on a mobile hotspot. Or this error changes into connected and secured now and then on your PC. Furthermore, especially, Windows 10 can’t connect to WIFI after the Creators Update. Now take your time to fix no internet secured with effective methods.
Why Does WIFI Say No Internet Secured?
For different PC with different software and hardware configuration, this WIFI problem no internet secured can be caused by various reasons.
But when diving into it, it can be easy to find that WIFI network configuration, WIFI driver, Power settings and of courses WIFI network hardware can be the most common causes. Hence, if you wish to fix Windows 10 no internet but secured and connected error effectively, you need to take targeted methods.
How to Fix Windows 10 WIFI No Internet Secured?
According to the culprits of the Windows 10 not connecting to WIFI, you need to change the WIFI settings, update the network drivers, and try some other feasible ways.
More often than not, waiting for some time upon no internet secured error showing up is also needed.
Solutions:
1: Check WIFI Hardware Connection
2: Change WIFI IP/TCP Configuration
3: Uninstall and Reinstall the WIFI Driver
5: Disable WIFI Sharing Software
6: Modify Power Management Settings
7: Modify Advanced Power Settings
Solution 1: Check WIFI Hardware Connection
First and foremost, it is necessary to make sure your WIFI is physically working well. Undoubtedly, as long as there is any hardware problem with the wireless connection, there is no WIFI connection on Windows 10, 8, 7.
You need to try the things below in accordance with different types of WIFI connections.
For users using WIFI routers, try to:
1. Disconnect the WIFI connection and close the WIFI router.
2. At the right bottom of the Desktop, locate and hit the Action Center icon to open it and then open the Airplane mode from it.
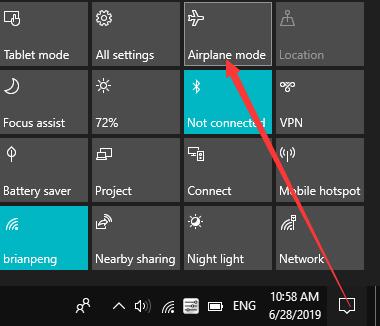
3. After some time, disable the Airplane mode from the Action Center and then turn on the WIFI router.
4. After that, connect Windows 10 to the WIFI connection.
It seems to be unreasonable, but it does work for many users to enable and then disable the Airplane mode before connecting to WIFI again.
For Users with Wireless Card:
1. Make sure the network card is properly connected to the network card port.
2. Try to clean the port and computer fan with a dry and clean cloth.
If you tried the corresponding ways to examine the condition of the WIFI router or card, but Windows 10 is still can’t connect to the internet, you can try to get your PC connected another WIFI network if possible.
Once your PC WIFI is connected and secured on another WIFI connection or hotspot, perhaps you have to replace a new WIFI router or card. Nevertheless, if your computer shows no internet secured WIFI error even when connected to the other network, it is high time that you fixed the WIFI error within the system.
Solution 2: Change WIFI IP/TCP Configuration
You may as well change the IP/TCP settings for the WIFI. Normally, the IP/TCP properties are closely associated with the network connection. If the network hardware works fine, there is much need to modify the WIFI properties. That can fix Windows 10 mobile hotspot no internet secured.
1. Press Windows + R to open the Run box and then enter ncpa.cpl. Then hit OK to get into Network Connections.
2. In Network Connections, locate and right click your WIFI to head to its Properties.
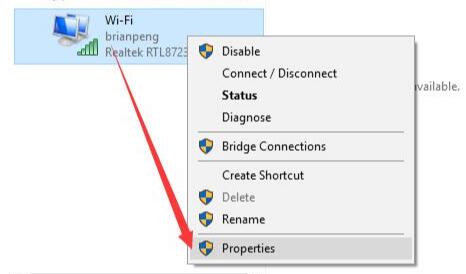
3. In WIFI Properties, under Networking, find out and double click Internet Protocol Version 4 (TCP/IPv4).
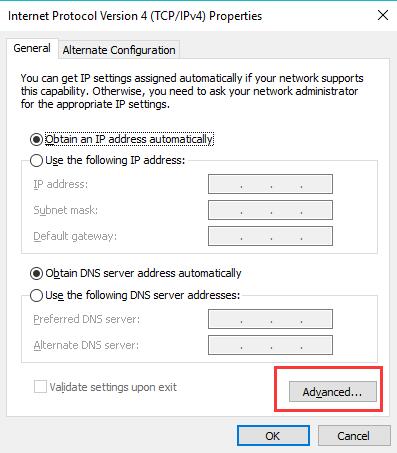
4. Decide to Obtain an IP address automatically and Obtain DNS server address automatically.
5. Then hit Advanced at the bottom of Internet Protocol Version 4 (TCP/IPv4) Properties.
6. Under WINS, tick the circle of Enable NetBIOS over TCP/IP and then click OK to save changes.
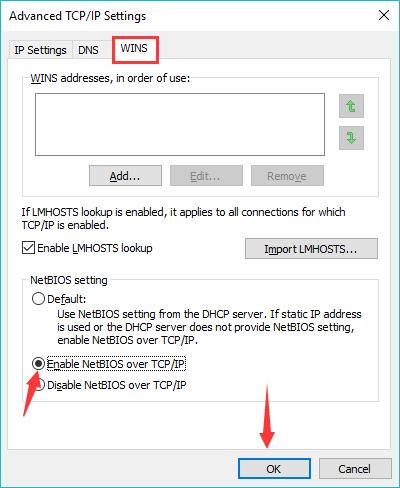
Here if static IP address is used or the DHCP server does not provide NetBIOS settings, enable NetBIOS over TCP/IP.
7. Hit Apply and OK to save all these changes.
All relevant items configured, you can re-connect to the WIFI. Here unless the WIFI icon is missing, you will notice that WIFI error no internet secured disappeared from the network icon.
Solution 3: Uninstall and Reinstall the WIFI Driver
The WIFI adapter driver can also give rise to Windows 10 WIFI error no internet secured. So you can attempt to get rid of the WIFI driver and then reinstall a new one. That may help some of you.
1. Go to Device Manager.
2. Expand Network adapters and then right click the WIFI adapter driver to Uninstall device.
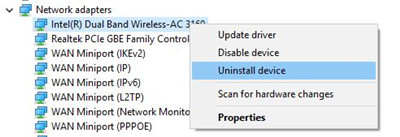
3. Then on the top left corner of Device Manager, hit Scan for hardware change button.
By way of this action, you will install a brand-new WIFI driver. And it is likely that Windows 10 can’t connect to WIFI is nowhere to be seen. Otherwise, try to update to the latest network driver.
Solution 4: Update the WIFI Driver
Supposing Windows 10 WIFI no internet appears after Windows 10 Creator Update, it is of great necessity for you to update the WIFI driver. Only when the WIFI driver works with Windows 10 can WIFI be connected and secured.
Here since there is no network on your PC, you may find it difficult to install the latest driver on your own. In this way, Driver Booster, the top one driver updater, can be the reliable helper for you. Besides getting the updated WIFI driver for you, Driver Booster is also capable of Fix Network Failure if you need it.
1. Download, install and run Driver Booster.
2. Then click the Scan. You can see Driver Booster is scanning for the missing, corrupted, and even faulty drivers on your PC.

3. Pinpoint Network adapters from the search result and then let Driver Booster Update the WIFI driver.
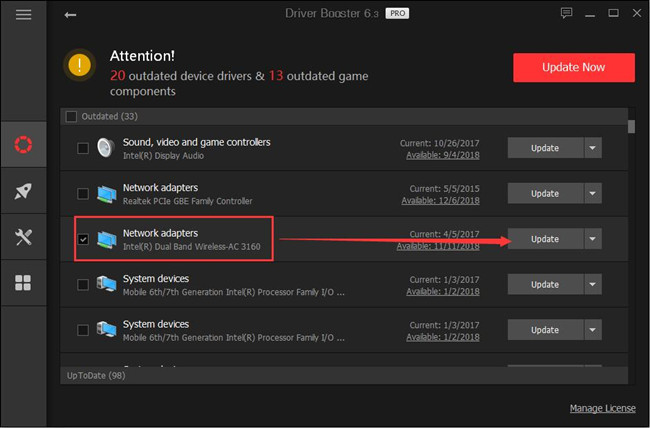
Tips: How to Fix Network Failure Using Driver Booster?
In Driver Booster left pane, hit Tools and then choose to Fix Network Failure on the right side.

In most cases, users will find Driver Booster useful in fixing such network errors like not connecting to WIFI.
Solution 5: Disable WIFI Sharing Software
There is a high probability that the router driver related programs will conflict with those of WIFI driver. To eradicate this conflict, you are supposed to stop the WIFI sharing programs from running on Windows 10. In doing so, WIFI connectivity issue no internet secured will get out of your sight as well.
1. Bound for WIFI Properties with reference to Solution 2 step 1-3.
2. Then check the items used by your WIFI connection and also their individual Description as well.
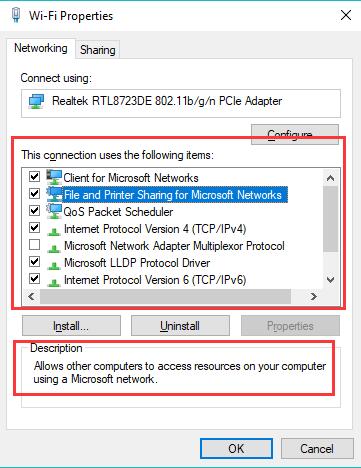
3. Uncheck the box of the items related to WIFI sharing to disable them.
Here for instance, when you check the Description of Microsoft Network Adapter Multiplexor Protocol, you will notice that it is associated with network sharing. That is what you need to disable.
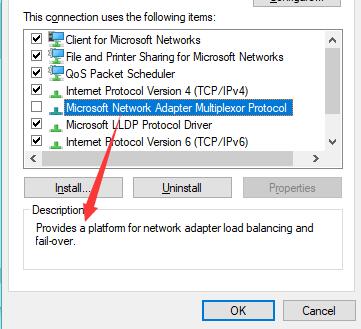
Try to check the description of every program WIFI driver uses and disable one or more of them if necessary. Then Windows 10 can connect to WIFI as you wish. There is no more WIFI no internet secured on Windows 7, 8, 10.
Solution 6: Modify Power Management Settings
Windows system sometimes will turn off the network device in order to save power. From this perspective, you would better check this power management setting for your WIFI adapter as well.
1. Open Device Manager.
2. Expand Network adapters and then right click the WIFI driver to head to its Properties.
3. Then under Power Management, uncheck the box of Allow the computer to turn off this device to save power. Click OK to save the change. And if this settings is grayed out, you can fix it with this tutorial.
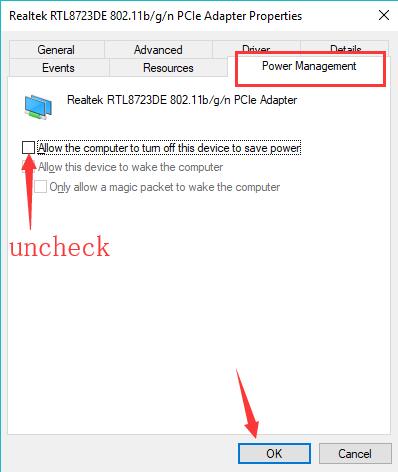
Possibly, Windows 10 can connect to WIFI with network status connected and secured.
Solution 7: Modify Advanced Power Settings
Apart from the power management settings, there are some advanced power settings awaiting modifications. Somewhat irrelevant at first glance, but it resolved laptops’ saying “no internet, secured”.
1. Search Power in the search box and then go to Power & Sleep settings.
2. Under Power & Sleep, select Additional power settings in Related settings.
3. Then go to Change plan settings > Change advanced power settings.
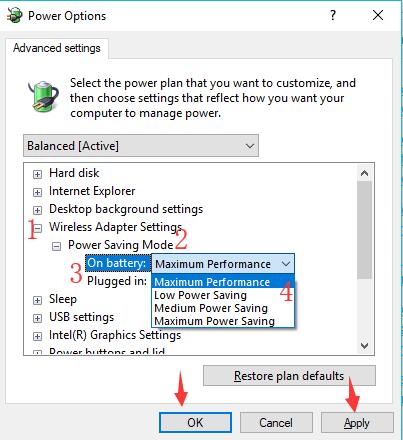
4. In Power Options, expand WIFI Adapter Settings and then choose to set Power Saving Mode Maximum Performance.
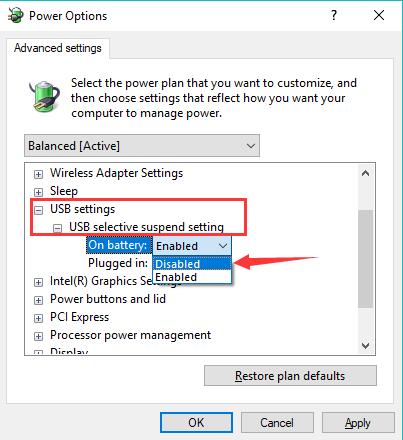
5. Similarly, choose to set USB Settings USB Selective Suspend Disabled.
6. Stroke Apply and OK.
Try connecting to the WIFI and you will notice “No internet, Secured” on WIFI is changed into Connected and Secured.
Solution 8: Refresh DNS Settings
For some laptops, DNS caches left will cause network connection error. There is no exception for No internet, secured WIFI issue on Windows 10. So you may as well refresh the network DNS.
1. Type Command Prompt in the search box and then right click the result to Run as administrator.
2. In Command Prompt, execute the commands of ipconfig /flushdns and ipconfig /renew one by one to refresh the DNS cache.
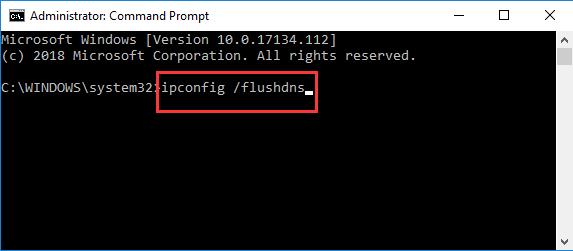
3. Exit Command Prompt and then re-connect to the WIFI again.
Lucky, some of you won’t stumble upon WIFI – No internet, secured Windows 10.
All in all, network issues are common, especially after Windows 10 Creators Update. In terms of this connected, no internet, secured WIFI connectivity issue, the above solutions are of great help and effectiveness.
More Articles:
WiFi Does Not Connect Automatically on Windows 10

