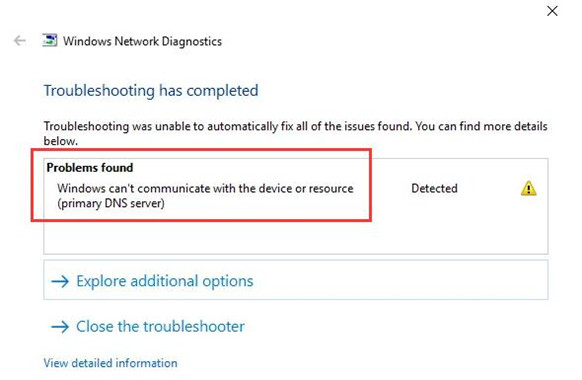
Normally, when there is no network connection on your PC, many users tend to troubleshoot the network error using Windows Network Diagnostics, which is said to be useful in fixing some problems with the Windows network.
Unfortunately, this diagnostic tool detected that Windows can’t communicate with the device or resource (primary DNS server). That is to say, the device or resource isn’t responding to the requests, causing no network connected on Windows 10, 8, 8.1, 7, Vista, etc.
How to Fix Windows Can’t Communicate with the Device or Resource?
In fact, when your PC can’t communicate with the primary DNS server, it is likely that the DNS server isn’t responding at all. Therefore, to get rid of this DNS server issue, you are supposed to ensure there is nothing wrong with network components, especially the DNS (Domain Name Server) address and network driver.
Solutions:
- 1: Update the Network Driver
- 2: Obtain DNS Server Address Automatically
- 3: Set DNS Server Address
- 4: Edit Hosts File
- 5: Flush DNS Cache
Solution 1: Update the Network Driver
To some extent, the outdated, corrupted, and damaged network driver will give rise to “unable to communicate with the device” on Windows Vista, 7, 8, 10. So you need to make sure your network driver is compatible with the system.
Here, to save your time, it is recommended to use Driver Booster to update the driver automatically. As a top one driver tool, it is said that Driver Booster is capable of updating drivers and fixing device issues automatically.
1. Download, install and update Driver Booster.
2. Click Scan. Then Driver Booster will get started to scan for your PC for outdated, missing, and corrupted device drivers.

3. In the scanning result, locate Network adapters and then Update the network driver via Driver Booster automatically.
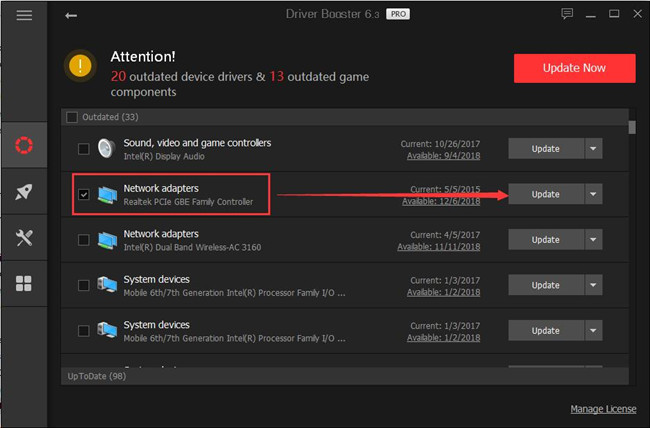
Then Driver Booster will be installing the updated driver for your network adapter. After that, you might as well check if there is a network on your PC and the error that Windows can’t communicate with the device or resource persists.
Related: How to Fix Realtek PCIe GBE Family Controller Not Working
Solution 2: Obtain DNS Server Address Automatically
As mentioned, this network error may result from the DNS server not responding. In this way, it is worth a shot to allow Windows systems to obtain DNS server address automatically. In so doing, it is possible that “can’t communicate with the primary DNS server” will disappear as Windows 10, 8, 7 detects the DNS server address set automatically.
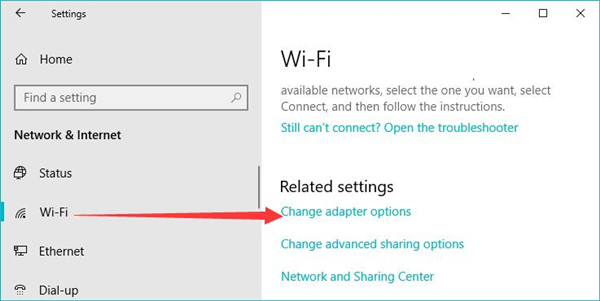
1. Head to Start > Settings > Network & Internet.
2. Under WIFI, scroll down to find out Related settings > Change adapter options.
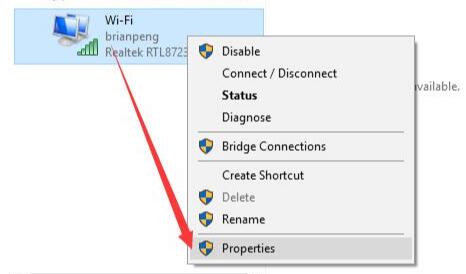
3. Then right-click the WIFI your PC is using to open its Properties.
4. In WIFI Properties, find out and double click Internet Protocol Version 4 (TCP/IPv4).
5. Tick the circles of Obtain an IP address automatically and Obtain DNS server address automatically and then click OK to save changes.
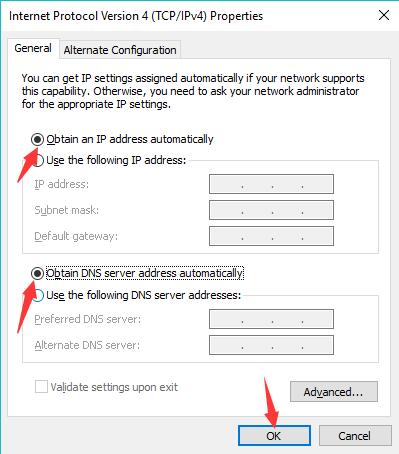
Now, the DNS server address will be obtained automatically according to your system. For some users, that will help fix the DNS server address isn’t responding error.
Solution 3: Set DNS Server Address
However, if the automatically assigned DNS server address can’t enable Windows to communicate with the device or resource, you can also try to allocate a DNS server address manually for Windows 10, 8, 7.
1. Follow Solution 2 to go to Internet Protocol Version 4 (TCP/IPv4).
2. Then in Internet Protocol Version 4 (TCP/IPv4) Properties, locate Use the following DNS server addresses, and set the Preferred DNS server 8.8.8.8.
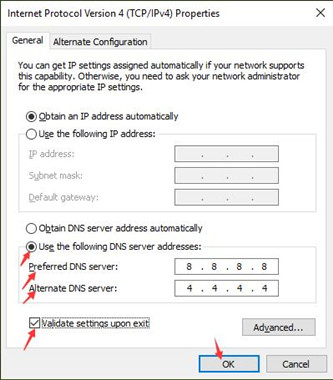
That DNS server address belongs to Google public server, so for most users, it would work well with the system.
3. Click OK to save changes.
Try to troubleshoot Windows 10, 8, 7 with Windows Network Diagnostics to see if Windows cannot communicate with the DNS pops up again.
Related: What is Tap Windows Adapter V9 and How to Remove it on Your Computer?
Solution 4: Edit Hosts File
A hosts file exists on all operating systems used to map the connection between IP address and domain names. Therefore, the hosts file on your PC has much to do with the DNS server addresses, which demand you to edit this file to fix “can’t communicate with primary DNS server” error.
1. Open File Explorer from the search box.
2. Go to Windows (C:)> Windows > System32 > drivers> etc.
3. In the etc folder, locate and right-click hosts file to Open with Notepad.
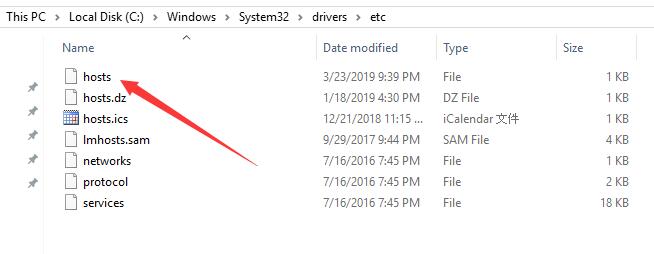
4. In Notepad, press Ctrl + A to highlight all content of the hosts file and then hit Ctrl + D to Delete the content.
5. Hit Ctrl + S to save the edited hosts file.
This time, you can view that the DNS server address works well on Windows 10, 8, 7 without the primary DNS server issue.
Solution 5: Flush DNS Cache
If the methods above can’t resolve the network problem that Windows can’t communicate with the device or resource, don’t worry, and follow on to try to clean up the DNS caches. In this sense, the corrupted DNS cache won’t cause any errors to Windows 10, 8, 7, Vista.
1. Search Command Prompt in the search box and then right click the best-matched result to Run as administrator.
2. In Command Prompt, enter ipconfig /flushdns and then hit the Enter keyboard key to clear DNS cache.
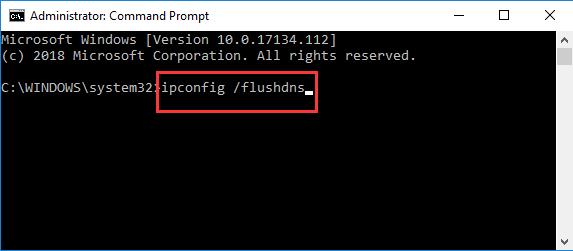
3. Try to connect to the network again. And this time primary DNS server not responding won’t plague you. You can surf online as you wish.
All in all, this post has offered the most effective solutions to help you solve Windows can’t communicate with the device or resource (primary DNS server). Be patient and you will remove this DNS issue.
More Articles:
Fix Network Adapter Not Showing Up on Windows 10
Fix Ethernet Doesn’t Have a Valid IP Configuration Windows 10
Fixed: Windows Sockets Registry Entries Required for Network Connectivity are Missing Windows 10


