Some Windows users who fail to update their system to Windows 10 1809 may receive a 0xC1900101 error message. 0xC1900101 error is a device driver related problem, which can be caused by various issues, such as inadequate storage space, faulty drivers, antivirus software, connected peripherals, corrupted system files and so on.
Solutions:
- 1: Check your Available Upgrade Space
- 2: Uninstall Antivirus Software and Some Unnecessary Software
- 3: Remove All Peripherals
- 4: Remove Unused SATA Devices
- 5: Update Device Drivers
- 6: Run the System File Checker Tool
- 7: Disable Wireless and Bluetooth in BIOS
- 8: Perform a Clean Boot
- 9: Update BIOS
- 10: Reset Windows Update Components
Error Codes
You may see these error codes when installing Windows 10:
0xC1900101 – 0x20004,
0xC1900101 – 0x2000c,
0xC1900101 – 0x20017,
0xC1900101 – 0x30018,
0xC1900101 – 0x3000D,
0xC1900101 – 0x4000D,
0xC1900101 – 0x40017.
Though they all begin with 0xC1900101, there is some difference between them. Solution 1 – Solution 8 can be used for all these errors when installing Windows 10, and the last solution is for 0xC1900101- 0x30018 error.
Solution 1: Check your Available Upgrade Space
Sometimes you cannot update to Windows because there is not enough update space on your computer. To upgrade to Windows 10 Creators Update 1809, you need at least 16GB of storage. In order to meet this requirement, you have to delete some temp files or unnecessary files.
Related: 9 Ways to Free Up Disk Space
Solution 2: Uninstall Antivirus Software and Some Unnecessary Software
Your antivirus software, security software, and some other software could cause your problem. You can uninstall your antivirus software, firewall software, and some unnecessary software temporarily, and reinstall them after you update to Windows 10 successfully.
After you uninstalled them all, try to install Windows 10 again. If you still cannot install it, try another method.
Solution 3: Remove All Peripherals
Some users find that unplugging all peripherals from their computers is useful. For this method, you need to remove them all, such as External Disk Drives, USB Printers and other USB devices except your keyboard and mouse.
Solution 4: Remove Unused SATA Devices
Your problem appears may be because your DVD drives and other SATA drives are conflicting with Install Recovery Environment. So disconnecting SATA DVD drive and removing SATA cables from unused devices could solve the update error.
Related: Download Standard SATA AHCI Controller Driver Windows 10, 8, 7
Solution 5: Update Device Drivers
Some faulty or incompatible drivers may cause your problem. In this case, updating these drivers can solve your problem. You can open Device Manager and locate devices marked with a yellow exclamation. Then update these device drivers. But it may be troublesome. So there is another way to update them.
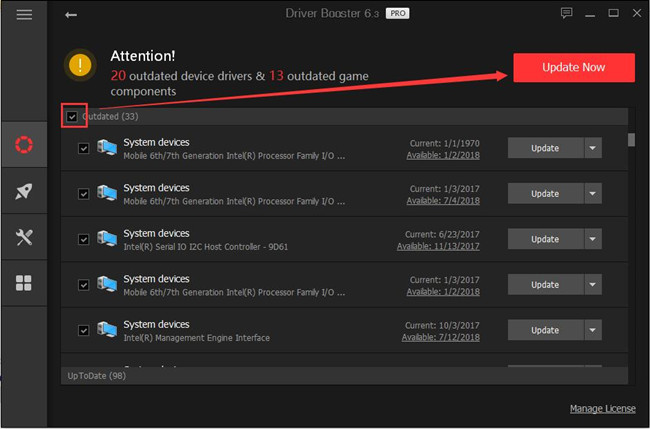
Driver Booster will be the best choice to help you finish this task. As the best driver update software, Driver Booster can download all the missing, outdated and faulty drivers at one time, and then update these drivers automatically. Besides the drivers, it can also help to update the game components to help fix the game error.
1. Download, install and run Driver Booster on your computer.
2. Click Scan. After that, Driver Booster will find all the faulty, missing and outdated drivers for you.

3. Click Update Now. This step will help you update all the drivers at once.
After that, reinstalling the Windows 10 again and to see if 0xC1900101 error message pops again.
Solution 6: Run the System File Checker Tool
Corrupted files should be checked and repaired to ensure you can fix your problem. You can follow these steps.
1. Type cmd in the search box and right-click Command Prompt. Choose Run as administrator.
2. Input sfc /scannow and hit Enter key.
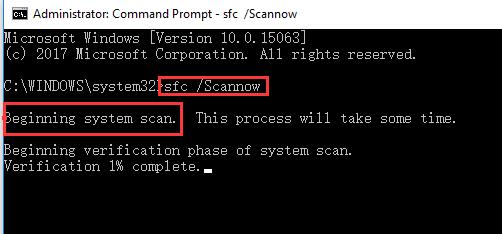
The scanning process takes some time to tell the results.
3. After this process completed, input Dism.exe /Online /Cleanup-Image /RestoreHealth and hit Enter.
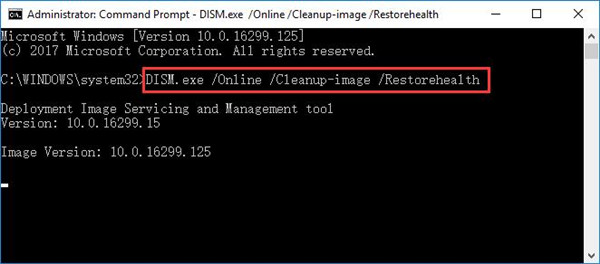
Then your computer should be restored to good healthy state and you can check if the error is gone.
Solution 7: Disable Wireless and Bluetooth in BIOS
For this method, you need to close all the programs and shut down your PC first.
Restart your computer and enter BIOS. Then go to the Advanced tab using the left/right arrow keys. Then go to the Wireless area. Disable Internal Bluetooth, and Internal WLAN.
Then use a network cable and try to update to Windows 10. See if your problem is solved.
Solution 8: Perform a Clean Boot
Doing a clean boot requires you disable other programs and drivers and make the very basic and built-in drivers and programs run in your computer. It can tell if there is some installed software conflicting with others. Try this method may fix your problem.
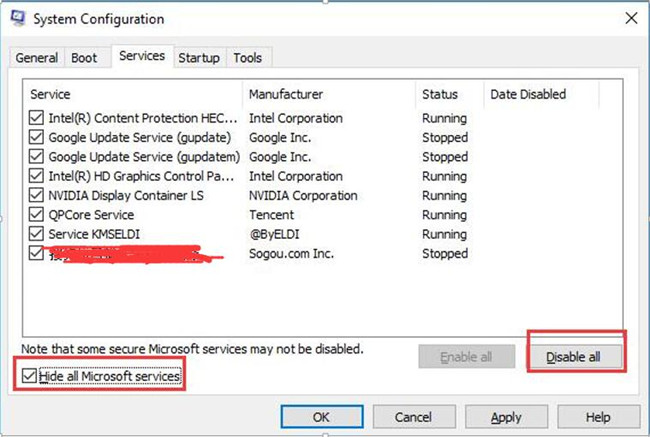
1. Type msconfig in the search box and hit Enter to run System Configuration.
2. Choose Service tab and tick Hide all Microsoft service. Then click Disable all.
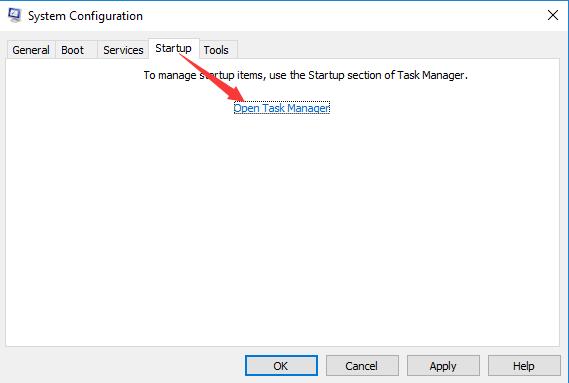
3. Select Startup tab and click Open Task Manager.
4. Click the startup items and disable them one by one.
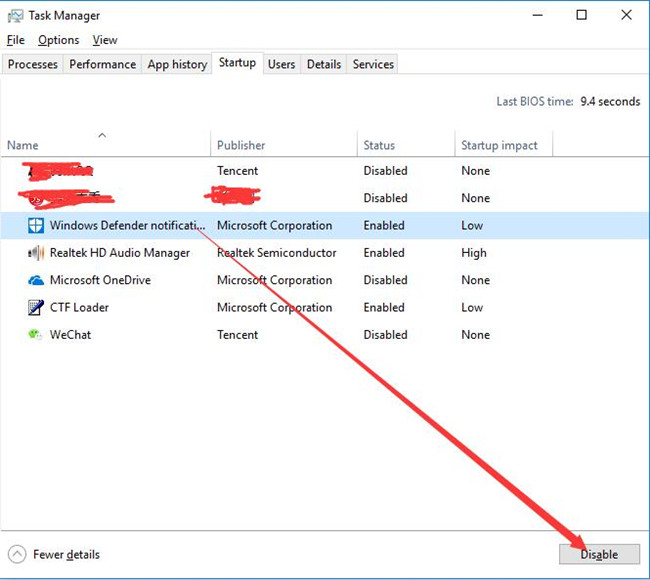
5. Close Task Manager and back to System Configuration window. Click OK.
6. Restart your computer.
Check again and see if you can install Windows 10 now.
Solution 9: Update BIOS
Sometimes it is because your BIOS is not upgraded that you have the 0Xc1900101 problem. So you should consider updating your BIOS.
To manage it, you can go to the manufacturer of your computer’s official website to download the proper BIOS package files and get installation instructions from the official website.
After you update your BIOS correctly, check whether it helps.
Solution 10: Reset Windows Update Components
If your error code is 0Xc1900101-0x30018, this method could help you a lot.
1. Type cmd in the search box and right click Command Prompt. Choose Run as administrator.
2. Input the following commands one by one to disable BITS, Cryptographic, MSI Installer, and Windows Update Services. Hit Enter key after each of them.
net stop msiserver
net stop wuauserv
net stop bits
net stop cryptSvc
3. To rename SoftwareDistribution and Catroot2 folders, type the following commands in the same window and press Enter key after each of them.
ren C:\Windows\SoftwareDistribution SoftwareDistribution.old
ren C:\Windows\System32\catroot2 Catroot2.old
4. Then input the below commands to start BITS, Cryptographic, MSI Installer, and Windows Update Services. Press Enter key after each of them.
net start wuauserv
net start cryptSvc
net start bits
net start msiserver
After you finished this command, restart your computer. Then check if this way helps you solved your problem.
All these above are feasible solutions for 0xC1900101 Windows update errors. Hope these solutions can help you when you have this kind of error.
More Articles:
Fixed: Windows Update Error 0x800705b4


