Wondering how to screen record on a Chromebook? Whether you’re looking to capture what’s happening on your Chromebook screen or want to record the audio along with the Chromebook screen recording, we’ve got you covered.
In this post, we will show you 4 easy ways to record screen on Chromebook and discuss some common problems that you may face while trying to record Chromebook screens.
Can you screen record on a Chromebook?
Yes, you can record the on-screen activities on your Chromebook.
Chromebook offers different built-in methods for screen recording: a Screen Capture option (with a keyboard shortcut), and a Screencast recording tool.
Apart from the built-in tools, there are a handful of Chrome extensions and third-party screen recorders that do the screen recording job pretty well.
Luckily, the process is pretty easy and simple regardless of which method you choose. Now let’s take a look at the features and steps for each one.
Way 1: Screen Record Chromebook Using Built-in Screen Capture
The easiest way to record the screen on your Chromebook is by using the built-in Screen Capture feature. It allows you to record the entire screen, a selected portion, or a specific window.
Google integrated this screen recording tool into Chrome OS 89 and later to aid virtual learning and other tasks. You can also record online classes, create tutorials, record games & more with this tool.
How to Capture Screen on Chromebook
Check the step-by-step guide below to record your screen on Chromebook with Screen Capture.
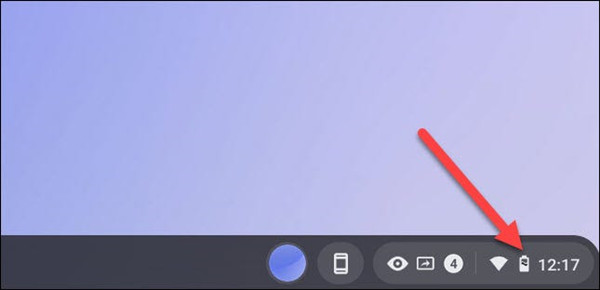
1. Click on the clock at the bottom right corner of your Chromebook screen.
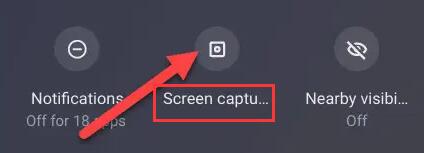
2. Click on Screen Capture from the pop-up menu.
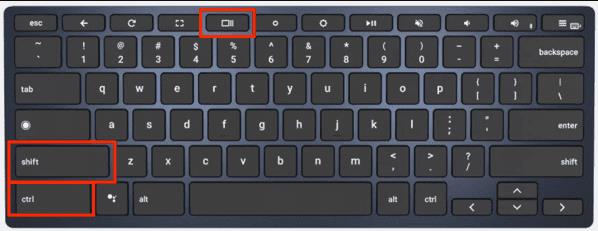
You can also use the keyboard shortcut to launch this recording tool: Press Shift + Control + Show windows (a rectangle with two lines on the right side) keys together on your keyboard.
3. Select the video icon from the Screen Capture toolbar.
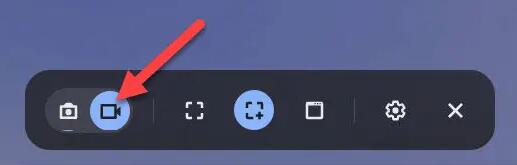
Tips: The camera icon on the left allows you to capture screenshots on your Chromebook.
4. Click on the gear icon, and adjust the audio, camera, and location settings according to your preference.
Note: The built-in screen recorder doesn’t record audio by default. You’ll need to enable your Chromebook’s microphone manually to record audio. To do so, toggle on the microphone option.
5. Choose to record the entire screen, a portion, or a single window.
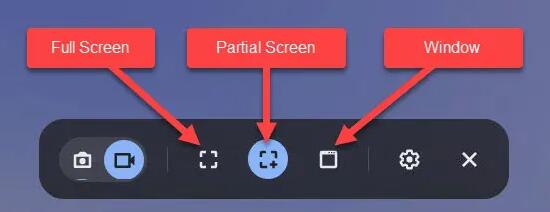
- To record full screen: click on the full-screen icon and then click anywhere on the screen to start the screen recording.
- To record a partial screen: drag to pick the area to record, then press the Record button to start the screen recording.
- To record window: click on the window icon and select the window you want to screen record
A three-second countdown will appear on your Chromebook screen, and then the screen recording on your Chromebook will start.
How to stop screen recording on Chromebook
To stop screen recording on your Chromebook, click on the red Stop button in the taskbar at the bottom.

Note: the screen recording on Chromebook will automatically end once you click on the stop button.
How to find your screen recordings on Chromebook
This built-in tool only supports recordings to be saved in WEBM, after recording on your Chromebook, you will need to choose a video converter if you want to save the recordings in other formats such as FLV, AVI, or MP4.
1. Once you click on the stop button, the recording is saved, and you will get a message saying “Screen recording taken.”
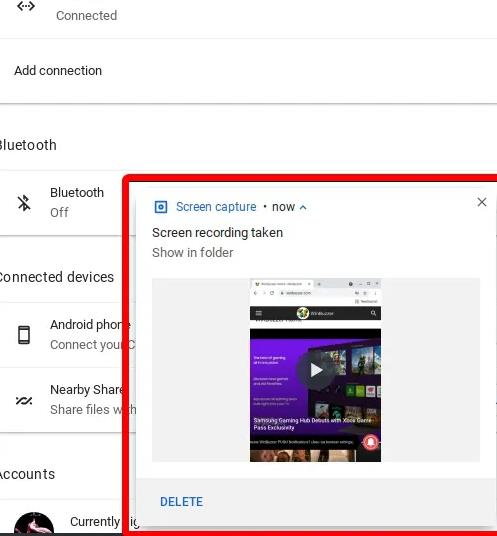
2. Click on it to find and check the recorded video.
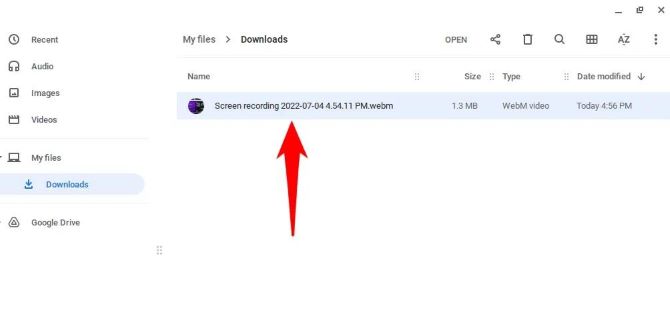
3. You can also find the recordings by navigating to the Downloads folder. The recorded video is automatically saved here.
Tips: You can select the recordings to watch, save to Google Drive, share or delete from the Downloads folder.
Way 2: Capture Screen on Chromebook Using Built-in Screencast
The Screencast feature is available on Chromebook with Chrome OS 103 or later. It is a recording tool that is more robust and powerful than Screen Capture.
Screencast offers advanced features such as screen and voice recording, adding your face using the webcam, drawing on the screen, generating transcripts, and providing translations, among other features.
Learn how to record your Chromebook screen using the new Screencast tool by following the steps below.
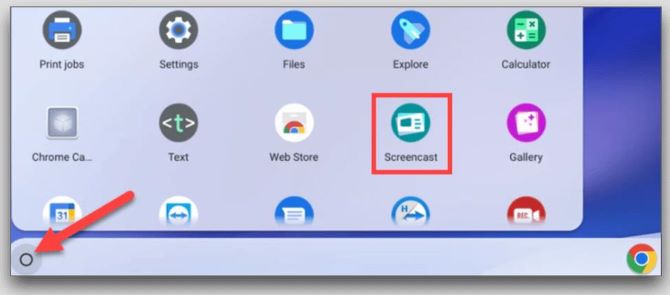
1. Click on the Screencast app in the app launcher of your Chromebook.
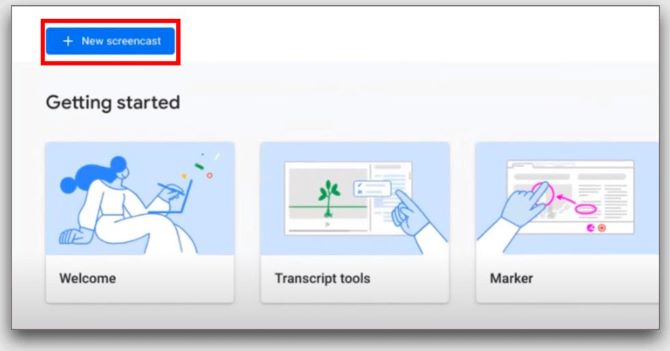
2. Once the Screencast is open, click on New Screencast at the top-left corner.
3. After that, you can choose the full-screen area, partial-screen area, or window to record the Chromebook screen.
4. The microphone and webcam are enabled by default, if you want to disable them, click on the settings icon at the bottom.
5. Now, click the red icon on the shelf to start the recording.

Tips: You can click the pen icon for annotations, and you can drag the webcam view to whichever corner you want.
6. You can stop screen recording on your Chromebook by clicking Stop on the shelf. The stop is next to the date and time, typically in the lower right corner of your screen.
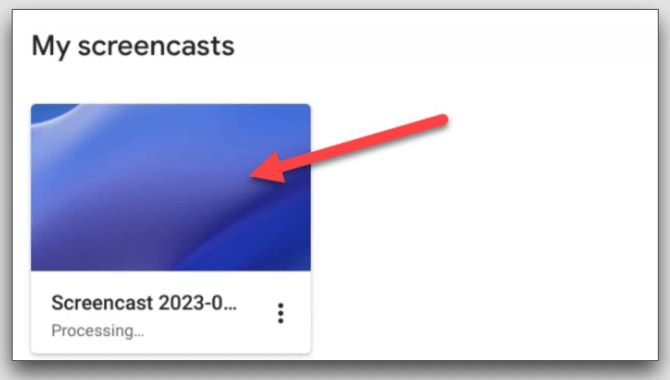
To find your recordings, go to the Screencast app > My Screencasts. You can review the transcript and edit it from here if necessary.
If you want to share your recordings, click on Share to create a shareable link, and you can copy the link to share the recorded video with others.
Reminder: the Screencast app doesn’t save your Chromebook recordings locally, you can keep them in the cloud for up to 12 months.
Way 3: Record Your Screen on Chromebook With Chrome Extensions
Screen recording on Chromebook could also be accomplished through Google Chrome extensions.
There are several Google Chrome extensions available on the Chrome Web Store, and if you don’t like the built-in recording option, you can try Chrome extensions instead.
Best Chrome extensions to record on Chromebook
- Screencastify: It offers several different options to control how much of what appears on the screen gets recorded, and allows you to save both audio and video files in case you want them later.
- Nimbus: This extension it’s one of the few extensions that allows you the choice between recording in full screen or just a partial screen.
- Berrycast: It is a powerful and easy-to-use screen recorder that allows you to record Chromebook screens in a variety of ways and saves the recordings online.
- Loom: You can record your screen, voice, and face to create an instantly shareable video on your Chromebook with this extension.
- NinjaCapture:It allows you to record your voice, screen, and video all at the same time. And you can take an unlimited number of screenshots and recordings with this tool.
How to screen record on Chromebook with Chrome extension
The steps to record your Chromebook screen by using a Chrome extension are generally similar, with slight differences in the details.
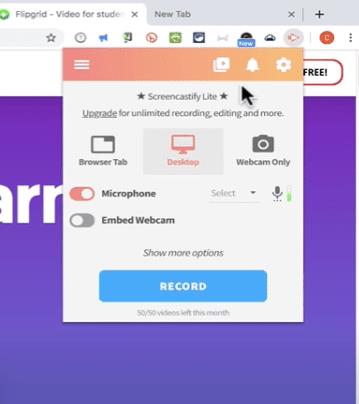
Now we’ll show you how to screen record on Chromebook by taking the Screencastify extension as an example.
1. On your Google Chrome, open Chrome Web Store, and enter Screencastify in the search box.
2. Add Screencastify to Chrome by clicking the Add to Chrome button, then you will be taken aromatically to the page for downloading.
3. The Screencastify extension would be systematically added to your Chrome browser, where you could find it on the right side of the Chrome search bar.
4. To begin the recording, click the Screencastify button and open what you want to start the screen recording. (Turn on the microphone toggle to capture your sound.)
5. To stop screen recording on your chromebook, click the stop button in the drop-down menu, and you will find your video saved in your Google Drive.
Way 4: Screen Recording on a Chromebook With Screen Recording Software
Screen recording on Chromebook can also be done with professional screen recording software. It can help you with recording online courses, sessions, gameplays, sports, and much more.
Here we’d like to take the VLC media player as an example and go through the steps to use VLC to record screen activity on your Chromebook.
1. Download VLC Media Player on your Chromebook, then launch it.
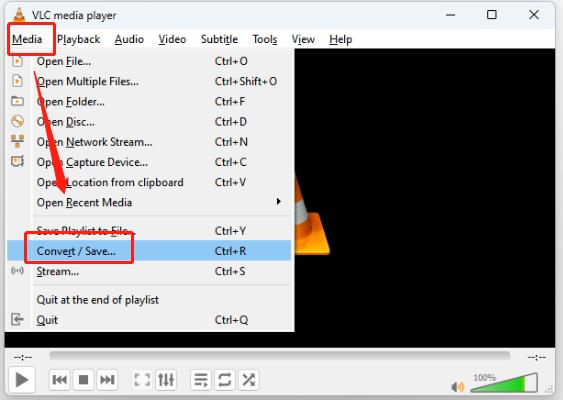
2. Navigate to Media, and click on Convert/Save.
3. In the Capture Device window, at the top right, click the Capture mode dropdown and select Desktop.
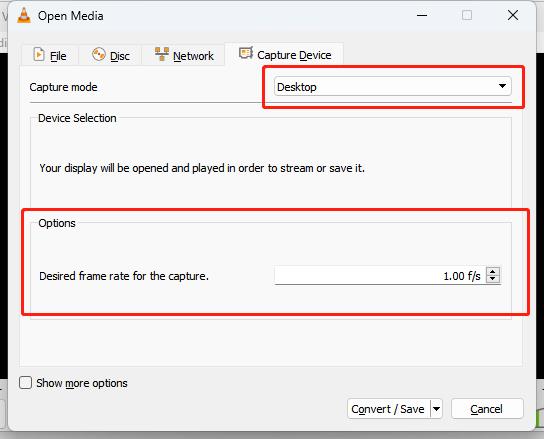
4. Choose your preferred frame rate from the Desired frame rate for the capture drop down menu.
5. Click Convert/Save, then click Browse to select the output destination folder and name the file, click Save.
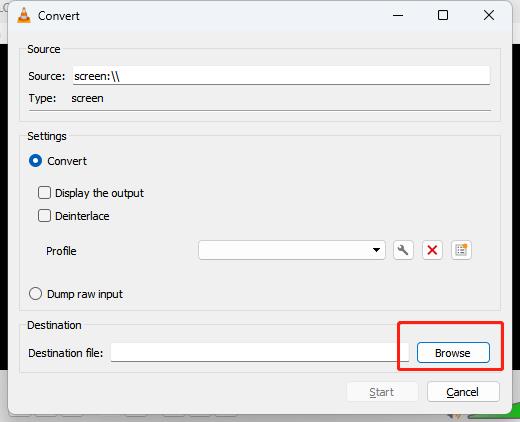
6. Click Start to start recording your Chromebook screen.

7. Click Stop Playback in the bottom left-hand corner when it is finished.
That’s everything you need to know about how to screen record on a Chromebook.
Whether you want to capture a video tutorial, record for a presentation, or document, or just capture something that happened to be on your Chromebook screen at the time or some specific window, this guide will get the job done in no time.
FAQs About Screen Record on Chromebook
A: The built-in screen recorder for Chromebook does not capture audio by default. You need to manually enable the Chromebook microphone to record audio. To do this, click on the gear icon on your screen, and select the microphone option.
A: Yes, you can record your entire screen, a specific window, or a specific tab on Chromebook by using the Chromebook built-in recording tool Screen Capture or Screencast.
A: You need to have Chrome OS version 89 or higher to access the built-in screen recorder feature on your Chromebook. Go to Settings > About Chrome OS > Additional details to check your Chromebook version.
A: Your screen record time limit depends on how much free space you have available. Generally, you can screen recording until you run out of space. If you are low on local space, you can use the Chromebook’s built-in Screencast to save your recordings in Google Drive.
A: You can’t record your Chromebook screen when using apps with protected content. For example, when trying to record a movie in the Netflix app, you are likely to get a “Can’t capture content” error message in the notification panel.
More Articles:
How to Record Screen on Windows 10